

Community Member Credit: Frank / motorvate.ca
After 255,000 KM I decided to replace my alternator. It was not because it was not working, it was because of a bad bearing and the awful low RPM knocking noise it made that had become louder and louder in the past 18 months.
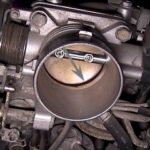
- I was 100% certain it was the alternator. I did this simple test:
- Get a long flat blade screw driver eight to ten inches long
- Hold the metal part on the end of the alternator (CAUTION: do not jam anything in the alternator!)
- Place your ear on the handle of the screw driver
- Listen
I heard a very loud knocking sound. Then I placed the screw driver on the compressor for the air conditioning, the idler pulley and they were almost silent.
I called the local Nissan dealer to get a price on a rebuilt alternator. It was $440. (or $387 with a 15% discount) Then I remember an article I read in the Toronto Star about a local place that rebuilds alternators and starters. I called Start Auto Electric and was quoted $260. In both cases they want the old alternator back, so they can rebuild it. Fine with me, I won’t need it.
The rebuilt alternator from Start Auto.

Disconnect the battery. (and clean up the battery connections!)

Loosen the belt pensioner about 810 revolutions (shown by yellow arrow)

Remove the lower right plastic cover from under the car.

Loosen the nut on the idler pulley. (shown by yellow arrow) Push up on pulley, and snug the idler nut. This will give you some slack in the belt to make it easier to remove. Right:

Remove the drive belt by pulling it off the idler pulley.

Remove the air intake snorkel. (if you still have it)

Disconnect one electrical plug for each fan. (yellow and green arrows) You will also have to remove 2 clips from the fan shroud that hold the wiring harness going to the fan on the left.

Remove the two fan shroud screws. (shown by the yellow arrows)

Remove the hose clip, and disconnect the overflow tube from the radiator filler neck, and the fan shrould.

Lift out the fan shroud. Be very careful, the radiator fins are very easily damaged.

The fan shroud. Notice that each fan has a different number of fan blades.

Disconnect the 2 wire plug. On my car the release clip was stuck. I used a small screwdriver to disengage the clip, so the plug can be easily removed. Right:

Loosen the top alternator bolt, but do not remove. We don’t want the alternator to fall. Not shown: Remove the lower alternator bolt and nut. It is located directly opposite to the smaller bolt on the top of the alternator.

Remove four bolts that hold the air conditioning compressor.

Remove the top alternator bolt. It will now rest on the compressor which is sitting in a bracket.

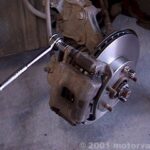
Gently push the compressor toward the back of the engine. This will give you just enough space to remove the alternator as shown. This is very tricky, and it may take quite a while to get the compressor in just the right position so that you have enough space to get the alternator out. Right:

The yellow arrows show the two mounting points for the alternator.

After much “trial and error” the new alternator is in position. Tighten the lower bolt and nut. Tighten the upper bolt. Connect the large cable, and tighten the nut. Push in the 2 wire plug.

Tighten the 4 bolts on the air conditioning compressor.

Install the drive belt, making sure it is properly seated in the middle of all pulleys.
Install the fan shroud, the end caps, connect the two plugs for the fans and connect the overflow tube.
Tension checking points Right:

Tighten the drive belt tensioner (yellow arrow) until the belt deflects 4.2 – 4.6 mm (used belt) or 3.8 – 4.1 mm (new belt) at the “Tension checking points” while pushing in with 22 pounds of force. (I know this seems like a difficult way, but this is from the Nissan factory manual. I think most people guess. I tighten the belts until they just stop squeaking)
With the drive belt at the correct tension, tighten the nut on the idler pulley.
Install the air intake snorkel, and the lower right plastic cover.

Summary
This is not a hard job, but it can be very time consuming. You will need some patience, some good luck, and a little skill to change the alternator on a Maxima.
![]()
Comments are closed.