

Community Member Credit: Frank / motorvate.ca
With any front wheel drive car, after a while the constant velocity (CV) boot will have to be replaced. This may be due to the boot being ripped open, or (in my case) due to the boot cracking after 240,000 + KM.
If the boot has been ripped open, you may be able to change just the boot, *IF* you notice it quickly. Once it is has a rip in it, the CV grease is “spun out” of the CV joint, and any road grit or water can enter the CV joint. This greatly reduces the life of the CV joint. If this applies to you, it is better to change the entire CV shaft. This will give you 2 new CV joints, grease and boots.
Quick Test: While moving very slowly with the window open, turn fully to the left or right. If you hear a “click-click-click-click-click” sound coming from your front, your CV are probably badly worn, and you should replace the entire CV shaft.
As you can see from the picture below on the below, my boot is not ripped. It simply has a deep crack in it. If this is not replaced soon, the crack will continue to get deeper, until the boot is split.

Speaking of split, many people ask me about the “Split CV Boots”. If I trusted them, I would show you how to install them. The original factory boots gave me 240,000+ KM, so I will stick with them.

The factory boot was $50 (CDN) and it came with the correct amount of grease, new shaft clips, and the metal CV boot straps. (above right picture)
Raise the front wheels, support the car with jack stands, and remove the front wheel. Always work safe, and use proper jack stands that are in excellent working order. You life may depend on it.

Remove the bolt that holds gear indicator switch.

*CAREFULLY* remove the switch. Make sure you have a large bin that can hold at least 5 liters under the transmission to catch the gear oil. (factory fill is 4.4 liters)

Remove and discard the cotter pin from the CV shaft.

Remove the sheet metal castle nut. (this prevents the CV nut from coming off the CV shaft if it ever came loose)

Use a 36 mm, 6 point deep socket to remove the CV nut. You can use an air gun, or use the method shown below:

Which ever method you use, be prepared: This can be one tough nut. The 6′ floor jack on the 1/2 inch ratchet never fails, but sometimes the ratchet does. It is now in pieces.

Remove the 2 large bolts that connect the strut to the steering knuckle. (17 mm bolts, 19 mm nuts)

Remove the ABS sensor wire from the strut by gently pulling it off.

Remove the clip that holds the brake line. Make sure the screw driver does not slip, and damage the brake line.

With the clip removed, wiggle the brake line to remove it.

Using a large screw driver, pry the steering knuckle from the strut. Make sure that the ABS sensor wire, and brake line do not get pulled tight when you pry the steering knuckle out.

Pull the steering knuckle away from the car, and the CV shaft has just enough room to separate from the steering knuckle.

Use a large screw driver to pry out the inner CV (not shown). Make sure you don’t damage the inner CV seal or your tranny will leak.

Place the CV shaft in a vice, and remove the metal CV boot clips using a flat blade screw driver.

The outer CV joint is simply pulled from the CV shaft. I used a slide hammer to pull on the CV, with the CV shaft in a vice. It pops off fairly easy this way.

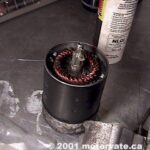
Here is the inside of the CV. As you can see there is lots of grease, and the grease is in good condition. After a while, the grease may turn “watery” or dry out and turn into soft clay. If this happens, your CV is probably quite worn.

Soak the CV joint in turpentine to remove most of the grease. I found that lifting the CV in and out of the turpentine helped. After 10-15 minutes, use any type of “Brake Clean” product to remove the rest of the grease.

With all the grease removed, the CV will look like this. Nice and clean.

Remove CV shaft retaining clip (indicated by the yellow arrow), and then the old CV boot.

Wipe the shaft with a clean cloth. Place the new small CV boot clamp on the shaft. (Very important!)

Cover the end splines with tape, and apply a little CV grease. This is to prevent small cuts in the CV boot as it slides over the shaft. Gently push on the new CV boot until it touches the small raised part on the CV.

Install the CV retaining clip. Use CV grease to keep it properly centered. (as shown) This will make for easy installation of the CV joint, as the clip will compress the easiest, due to being centered.

Squirt about 1/3 of the tube of grease in the CV where the shaft will go. Use your finger to pack the grease against the other side of CV balls and the inside of the CV joint.

Align the CV on the splines. Make sure the retaining clip is still centered, and using a rubber hammer, gently tap the CV joint on the shaft until you can not see the splines. You will feel it click, and hit a firm stop. When tapping on the CV Joint, make sure that you hit the nut, and not the CV shaft threads!

Use about 1/3 of the CV grease and pack it on the CV balls, and ball cage. The last 1/3 is placed in the CV boot. Make sure you use all the grease that comes with the Nissan kit.

With the CV boot in the proper groves on the shaft and CV joint, gently pry open the boot to remove any build up of air pressure, using a screw driver.

Here is the final result: a nice and shiny boot.

Place the CV shaft in the transmission, and push it in until you hear and feel the click of the retaining clip. (TIP: use a small amount of thick grease to hold the inner CV retaining clip in the center of the shaft to make it slide into position easier.)

Tighten the struck to steering knuckle bolts. Place the brake line in the bracket, and install the retaining clip. Connect ABS sensor wire grommet to the supporting bracket.

Place the CV shaft washer, and nut on the shaft, and tighten to spec. (This requires LOTS of force, 174-231 foot-pounds!)

Whenever the steering knuckle has been removed from the strut, you should have your alignment checked. The odds of it being back in the exact same position is very small, and you don’t want to increase the wear rate on your front tires.
Install the gear position switch, and tighten the 10mm bolt.

With both CV installed, pour in the gear oil until is start to pour out the fill hole. Install the tranny oil fill plug. Make sure to only use GL-4!

Just before installing the tires, double check everything you touched. Install the tires.

Time for a test drive. During the test drive listen for any new noises. After the test drive, check for any signs of leaks, and double check all nuts and bolts you loosened.

REMEMBER:
- If your CV make a clicking noise when you turn, you probably need to replace the entire CV shaft.
- If you boot has been torn for an unknown time, your best bet is to replace the whole CV shaft.
- If your CV boot has just torn, or if your CV boot has deep cracks, then just replace the boot and grease.
This is not a difficult job. The hardest part is getting the CV shafts off the car. After that, it is quite easy.
![]()

Comments are closed.