Member Credit: whlimi
I was running a cali spec ECM in my 3.5 swapped 99. I had 14 codes, most of them emissions related (damn cali spec) and TCM codes (running SSV4). Got myself a 95 5spd ECM from the junk yard and decided I would take the plunge and swap it into my 99. After an EU and SSV4 install, I’m happy to say that it was a fairly easy modifaction and took about an hour and a half most of which was spend tracing wires to double check the 99 FSM.
The advantages are obvious. No more codes apart from EGR (will solve this) and the P1320 because of the EU. This mod is great for those 3.5 swapped 99s looking to erase some codes. I can finally replace my broken keys without paying for the reprogramming and if I ever choose to do so, I can run a JWT or Technosquare ECM without paying the extra bucks for a 99.
Since I’m running the SSV4, I did not pay any attention to the automatic transmission communication wires running to the ECM. You might have to make a few more changes to get it to work with an auto. This write-up will work for a 5spd.
Here’s what you need to do:
– Disconnect the negative terminal of your battery
– Pull out the ECM and disconnect the harness. Familiarize yourself with the orientation of the harness and the pinout sheet you’re referring to.
– Pry the white locking tabs up to unlock the pins. I used a small flat head screwdriver.
– I removed the Pins by yanking on the wire a la Pmohr. No wires or pins were damaged this way. (Make sure the white tab is unlocked or you will damage the wire/pin)
Pin Swap:
Fuel Pump Relay – switch B/P wire from 117 to 11. What you need to know about this pin is that it’s larger than the socket in location 11. It’s the only pin that was not a direct swap. You will either need to acquire a smaller pin from another harness or use a redundant one from the 99 ECM. I used the NATS pin. NATS is pin 17 (Orange wire). Remove the NATS pin and relocate it to 11. Cut the NATS Orange wire leaving enough wire so that you can splice into it. Remove 117 B/P and splice it into the NATS wire now located 11. You have successfully moved 117 to 11.
PNP Switch – Wire colour is G/W Manual Transmission or R/G Automatic Transmission located at 27. We need to swap it over to 22.
CKPS REF and CMPS – This was super easy. All you need to do is swap the locations between the two sensor’s pinout locations. Originally on the 99, CKPS is at 46 and 47 and CMPS is at 44 and 48. We need to swap it so that CKPS is at 44 and 48 and CMPS is at 46 and 47.
Rear O2 – Not necessary but will get rid of the code. Red wire Located at 107. You need to move it to 105.
Reconnect harness to 95 ECM. (I think you can run 95-98 but I’m not positive and will let the Guru’s chime in)
Swap completed
During the course of your modification, you might be a bit overwhelmed by how tightly packed all the wires are. If you cant get to a wire, trace it down, locate it near the bottom of the harness and you can pull it up and yank it from there. When inserting the pins, make sure it’s all the way in. Most of the time once it’s in, it will resist being pulled out again.
Double check everything and reconnect the negative terminal to the battery. Your security light will remain on when the car is running but will not effect anything. You will have an EGR code. I suggest you verify pinout locations yourself with a multimeter and not solely rely on this writeup. Better safe than sorry.
****** I will not be held responsible for any damage caused to your car due to preforming this modification. You do so at your own risk. *****
Member Credit: 95crackedhead
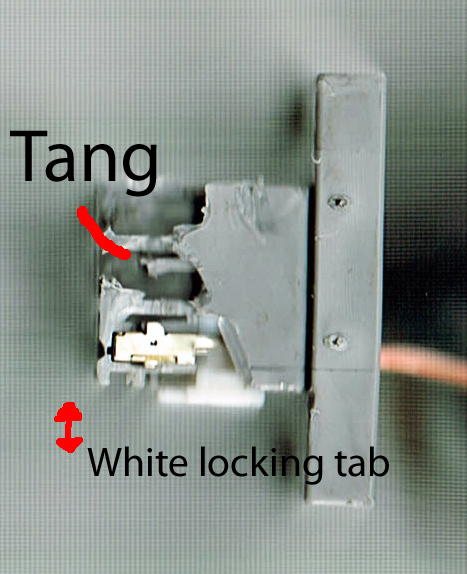
For anyone that wants to know how to repin the harness, I took a couple pictures. First one is a side view of a harness that I sacrificed to practice on, (car came with a spare). I broke off a portion of the housing so you can get an idea of what a pin looks like fully seated in its socket.
First, pull the white locking tabs away from the housing. Use a small flatblade screwdriver or electronics pick.

The plastic tang that is contained in the harness for each pin is what is holding the pin in place once the white locking tab is pulled away. If you insert your pick or small screwdriver inside the terminal side and release it, you should be able to pull the wire out the back of the harness to clear it. But this must be done simultaneously.

Looking at the last pic, the horizontal portion of each pin socket is what actually makes contact with the pin sticking out of the ECM. Don’t put the pick here. Put the pick in the hole above the horizontal portion, feeling for when the pick bottoms out, then pry upwards. I had luck with a small flatblade jeweler’s screwdriver for the large sockets, and an electronics pick (Radio Shack) for the small sockets.
![]()


Comments are closed.