

Credit: tooslow_4_u
Thanks Taz, for the nice surprise!
This will be a basic DIY install instructions. there was one spot I messed up on, but Taz told me what to do after I already made my own adjustment. Oh well, didn’t hurt the kit at all. I’ll point out what I did later in this.
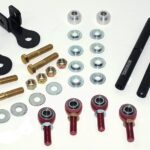
Firstly, I got this nice box sent to me today

Took everything out of the packaging, and a smile came to my face when I saw it was the new Traction Rods for the 4th gens.

I did a quick assembly to determine how everything went together. In this pic, it’s not all assembled correctly, but with Taz’s help via emails, and a link he sent to the 3rd gen installation instructions, I got it put together correctly. (BTW, this isn’t the mistake I was referring to)

First, you get the car up off the ground. If you have a ramp, or a lift that will keep a load on the front tires, this will be ideal. I didn’t have access to either, so I used a regular floor jack, took the wheels off to get better access, left the locking nut on the rods loose until I put the car back on the ground.
Start by loosening the four bolts on the sub frame bracket. You will completely remove the two closest to you if you (closest to the outside of the car)

This is where I messed up!
I noticed the bolt couldn’t slide all the way through without hitting the brace. So I used a grinder and gut out the small notch in the brace so the bolt would fit. Turns out, if you assemble the entire TR Brace to the rod, you can put it all on as a whole unit, and not have to do what I did. You will slide the bracket under the subframe brace. Once in, reinstall the two bolts, but don’t fully tighten them down until you have the entire unit together as one piece.


Now, to work on the front end by the control arm.
Install the hardware in this order.
Bolt, washer, special washer, heim joint, special washer, aluminum adapter. Then install through the bottom of the control arm, then washer, and two nuts!

Topview before bolt is pushed all the way through.


Notch I made


Now, since I still have a bad axle, I haven’t been able to really get on this thing. My new axle should be here wednesday. But just the little bit of acceleration and cornering I’ve taken so far, it’s like night and day from normal. You can literally feel the wheels staying put to the pavement.
So far, on a scale of 1-10 on this mod, I’m giving it an 8. It’s not higher just because i can’t put full pressure on them yet. But by next week, that will be a different story!!!
It reduces the TQ Steer a lot. It isn’t completely gone, but if you were to put it on a scale, and normal torque steer was 10, with these rods, the TS would now be about a 2. Very minimal.
Update:
Taz made a revision on the kit to upgrade the bushings. I was having some issues with the bolt on the control arm would loosen up. I will have them installed tonight and new pics updated as well.
Taz has made the adjustment, and removed the aluminum adapter that goes on the Control arm, and now uses some thicker bushings. I reinstalled it, and I no longer have the issue with the nut coming loose. Also, make sure you follow the instructions on how to adjust the tension correctly and don’t over tighten the bars. Once everything is installed, keep the bar slacked. once the car is on the ground completely, turn the bar by hand until it gets snug. Once you get that hand tight, turn it maybe another half turn, and then tighten the locking nuts at each end.


![]()
Comments are closed.