

Last Updated: 12/20/2022 @ 07:13 am
This content was submitted by supporters (social media and/or online forums) to help inform and educate others. If you would like to request removal click here. For additional info, please visit our Legal Terms & Conditions.
Community Member Credit: CS_AR
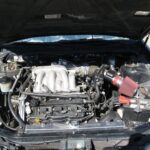
In viewing several internet postings and videos that show how to remove a VQ30DE Timing Cover (TC). Unfortunately only a few explain the two bolts inside the oil pan area that are required for TC removal. Next week when I remove another TC on the 99 Max, I will start with removing by removing the bolts inside the oil pan.
The first picture shows how the engine looks with the timing cover removed and the inside area where the two bolts connect with the cover with the two yellow arrows.

This picture shows the bolts from looking inside the oil pan area from below the engine. I removed one bolt (left) before I snapped the picture.

This picture shows the bolts from looking inside the oil pan area from below the engine. I removed one bolt (left) before I snapped the picture.

I hope this helps another VQ30DE owner in the future. If you need to remove the timing chains to remove the rear timing cover, remember to position it at Top Dead Center before you start.
The Half Moon gasket appears to be “glued” to the TC with a brown RTV looking material that is different from the gray RTC used to seal other engine components. It appears Half Moon gasket is so well bonded with the timing cover in the picture that will need to be separated with a scraper.

When you get the TC off, it is a good practice to get everything lined up on top dead center (TDC) with the gold link, the crankshaft mark, and the dowel marks. The first time I took the TC off of Max III’s first engine, I found the camshaft chain color links were opposite for each cam. It doesn’t really make a difference if you find your camshaft chains links like the picture.
The FSM goes into detail about TDC alignment.

The main point is to get everything lined up on TDC before you start working with the guides or water pump. If something goes wrong and the chain jumps a notch, you know how everything should be lined up. I like to use my own markings once I’ve found TDC so it is easier to recover if the chain jumps a notch.
My first big car project was to replace the timing chain guides on a VH45DE. That was a great experience.
One thing I learned on that project was to zip tie the chains to keep them from slipping when replacing the guides. If you think you might have some chain slack while working with the tensioner, guides, or water pump, you use a big zip tie or some mechanics wire to pull out the slack so the chain won’t jump.
Additional Reference Photos


![]()

Comments are closed.