Category

my5thgen 00-03

Category

Community Member Credit: Eddy

I wanted to add a sequential shift light to my 2002 Nissan Maxima. After doing some research, I decided to go with the Ecliptech Shift-P2 Shift Light Light. Pretty simple and straightforward to install. I ordered it from the link below and these guys shipped it out super-fast. Would recommend ordering from them if you choose to go this route. It was super easy to install as well.

Order Link: https://flyinmiata.com/products/ecliptech-shift-p2-shift-light?variant=43356833251583
Price: $219.00
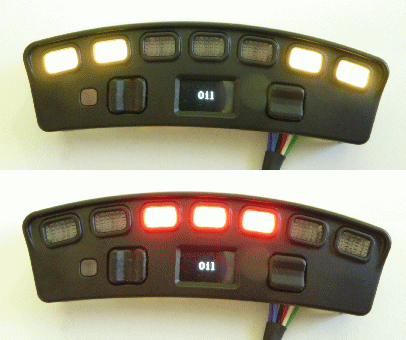
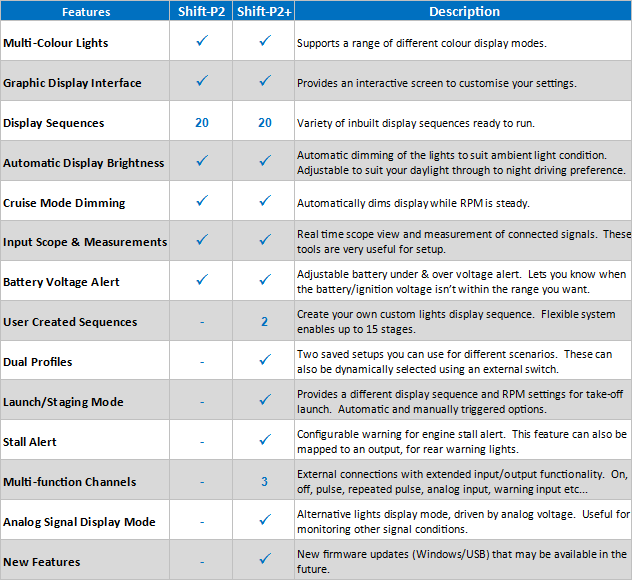
Shift-P2 - Ecliptech

Benefits:

  • You get smooth and consistent anticipation of your shift point.
  • It reduces driver workload and fatigue, both in sprint races and endurance events.
  • It provides drivers with reference points for performance.
  • You can achieve consistent staging RPM for standing starts & launches – so no more watching the tacho on the start line!
  • In enduro events, you can manage your fuel by short-shifting at an indicated point below the peak RPM.
    You can improve your lap time consistency and get up to speed at new tracks and with new suspension setups faster.
  • Eliminate unnecessary engine/transmission wear by keeping the RPM within the range you want, without bouncing off the limiter.
  • A good progressive RPM display can give you what you don’t have… a gauge in your peripheral vision showing the range of RPM you’re interested in! It gives you a reference for improving performance and building on skills. For example, maintaining staging RPM while concentrating on race start, smooth anticipated shift points and maintaining corner entry pace.

Installation:

  • RPM (Blue) –> PIN 34 on ECU (Green/White Wire)
  • Switched 12V (Red)
  • Ground (Black)

ECU Pinout:

Demo Video:

Product Feature & Walkthrough from Manufacturer
Loading

Member Credit: Jon Jainarine

Disclaimer: Besides getting a wheel from 2019 or later, please do not buy wheels equipped with intelligent cruise control. Using such a wheel will result in your cruise control not functioning correctly (see Picture 6). If your 8th-gen wheel control connector resembles that of the 5.5 gen, be sure to re-pin it to match the configuration shown in Picture 7.

Step 1: Remove negative from battery and let the car sit for at least 30 minutes before touching your 5.5 airbag or installing the new one.

Step 2: You need a T-30 security torx bit to take out that airbag. Theres one screw on each side behind small trim pieces. Pull the screws and the bag comes right out. Unplug your harnesses.

Step 3: Some 8GM steering wheels come with a steering control connector that is the same as the 5.5. Others come with a smaller white connector (Pic 1.). Either way I find that the easiest way to install this is to cut the 8GM and 5.5 connector off and splice the wire from the 8GM wheel into the 5.5 connector. This way you can reuse your original 5.5 connector without the need to de-pin and re-pin. Just follow the wiring instructions (Pic 2.).

Step 4: For your airbag you’ll need a pair of orange and yellow Steering Wheel Clock Spring Plug Wires. I got mine from Amazon that came the next day with prime (Pic 3.)

Step 5: With the airbag connectors facing down and the black clips facing up, both left wires will connect to the blue wire on your 5.5 connector. The right wire on the orange connector will connect to the black on the 5.5 connector and the right wire on the yellow connector will connect to the yellow wire on the 5.5 connector. (Pic. 4.)

Step 6: Now torque your new wheel down to 30 ft.lbs connect all your wires and say a lil prayer before connecting that airbag. If it doesn’t blow up good work your 5.5 gen maxima has now gained 10 cool points.

Video:

Loading

Community Member Credit: Eddy

Both my AC and heat stopped blowing air at the time same. Since I had NO AIR blowing at all, I suspected it was the blower motor itself. Usually, when it’s the resistor, you can get air blowing on speed setting #4.

I ordered an OEM-used blower motor off eBay for $30 bucks vs aftermarket. Upon inspecting the blower resistor itself, it was very corroded and dirty. So I decided to order a new blower resistor as well.  Also, you need to ensure you get the correct resistor as there are differences between Digital Climate and Manual Climate controls.

I replaced both and everything started working again. I really only needed to replace the blower motor. But since I saw the condition of the resistor, I decided to change that as well. Now have cold air and hot air. Also, while you’re at it change the CABIN FILTER too. 

Important Note: You should check the 2 blower motor fuses under the engine bay to ensure they are not blown.

2000-2003 Manual Climate Control Blower Resistor

  • Part #: 27150-2Y910
  • Nissan OEM Price: Approx. $30.00 (RECOMMENDED OPTION or USED OEM WORKING PART)
  • After Market Price: Approx. $35.00

Manual Climate Control Reference Photo

2000-2003 Digital Climate Control / Navigation Blower Resistor

  • Part #: 27761-2Y000
  • Nissan OEM Price: Approx. $80.00 (RECOMMENDED OPTION or USED OEM WORKING PART)
  • After Market Price: Approx. $15.00

Digital Climate Control Reference Photo

Digital Climate Navigation System Control Reference Photo

Difference Between OLD Blower Resistor vs eBay (Old on Right)

New Blower Resistor

2000-2003 Blower Motor Fan Assembly Unit (Same for Manual / Digital / Navigation)

This is what turned out to be my issue.

  • Part #: 27220-2Y910
  • Nissan OEM Price: Approx. $145.00 (RECOMMENDED OPTION or USED OEM WORKING PART)
  • After Market Price: Approx. $35.00

Helpful Video

Reference Photos

Loading

Credit: Sam Jacobs

Completed the installation of eBay Cefiro mirrors today. The guide on my4dsc was accurate, yet I decided to include some photos and additional information about the folding mechanism, as it has some unique aspects.

The turn signals and foot lights were accurate, so just follow that and you’ll have no issues. White and black wires are the negatives for those.

Folding Part

  • Moving on to the folding functionality. The switch has five wires. I didn’t use the red wire because I prefer not to have a bright blue light at night. The essential wire is the blue one marked “ACC,” which should be connected to power when the key is in the ACC position. It’s beneficial for both you and your car to use a fuse box wire (as shown in the picture). I used a 15amp fuse and connected the blue wire directly to it. This setup ensures that it only works when the key is in the ACC position, preventing it from staying on.
  • Then, ground the switch. There are several suitable grounding points under the dash; I chose to connect mine to the factory ground to ensure reliability.
  • After grounding the switch, you’ll have only two wires remaining: white and green. When threading the wires through the door, I also ran two extra wires to make future work easier. Keep in mind, mine aren’t color-coded, so don’t rely on that for guidance. Coincidentally, I used white extension wires for both of the pink wires from the mirror, which are your positive connections. Connect the pink wire from the mirror (extended with white in my case) to the white wire from the switch. The orange wire from the mirror (my extensions were red and yellow) should be connected to the green wire from the switch.

All you have to do now is clean up your wiring job, mount the switch, and put the car back together. Enjoy! Hope this helps some of ya’ll out.

Videos:

Loading