Category

my6thgen 04-08

Category

Community Member Credit: Robert Mandru

Important Note: These brackets for only for the front calipers. The rear Akebono calipers are plug-n-play but only for the 04+ Maximas/ 05+ SE-R Altimas.

Installation Instructions

View PDF Version

Each kit comes with the following:

  • Four M14x45mm long bolts (Note: these bolts will stick out beyond the adapter to mount M14x1.5mm nuts if desired [recommended].)
  • Four M14x55mm long bolts
  • Four washers (if nuts are being used with the kit)
  • A pair of Grade 6 aluminum calipers

Tools you will need:

  • 22MM sized socket or wrench
  • A fine file or fine burr drill bit (if modification required)
  • Torque wrench

STEP 1

Due to casting variation of the Akebono calipers, some slight modification may be required to the adapter in order for it to clear the body of the caliper.

Using your 55mm long bolts, thread the adapters to your Akebono caliper until seated. The adapter is mounted to the caliper with the bottom of the “L” shape of the adapter oriented to towards the bleeder while the machined notch sits towards the caliper.

Verify that the notched portion clears the body of the caliper. If it does not, mark the area of contact and remove the appropriate amount of material until cleared. (Take away about 1-2mm of material at a time at approximately a 45-degree angle to match the caliper body angle. Re-mount to verify clearance. Repeat if necessary).

STEP 2

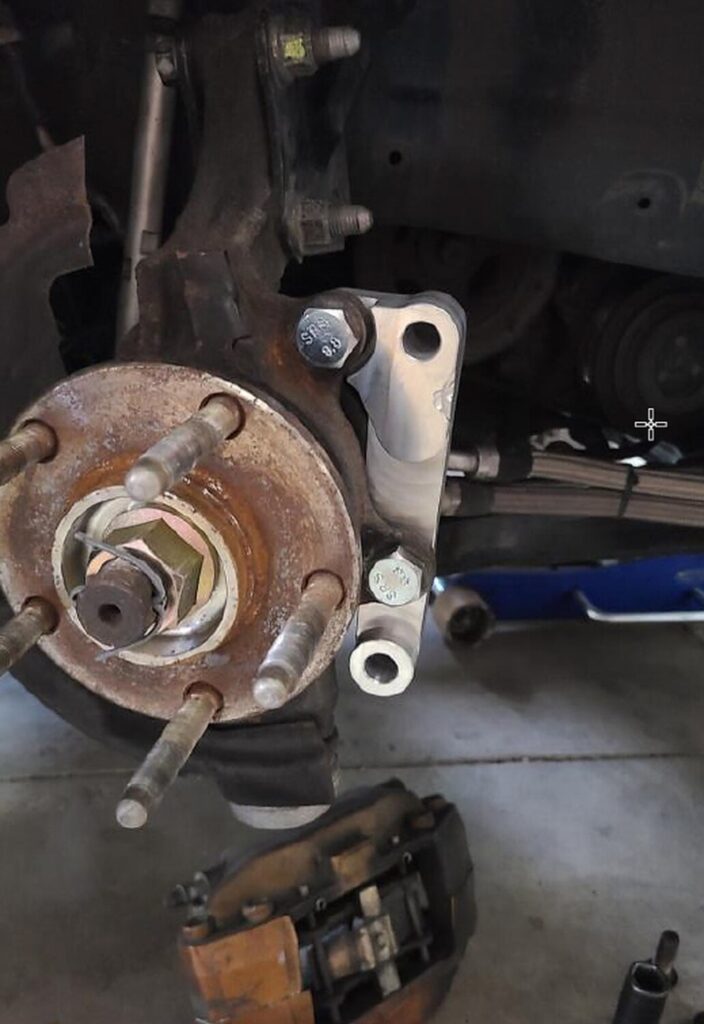
Mount your adapter to your spindle. The adapter sits outside of the spindle mounting holes while the 45mm long bolts mount from the inside of the spindle towards the body of the car. Hand thread one 45mm long bolt by only a couple of rotations. Take your other 45mm bolt and repeat for the other mounting point while extending the adapter away from the spindle. This will allow for extra pitch and play to align your second bolt to the threads of the adapter.

STEP 3

Once both bolts are comfortably thread-started into the adapter, fully thread both bolts through and tighten to OEM specifications.

NOTE: DO NOT FORCE BOLTS ONTO STARTING THREADS OF THE ADAPTER! This may result in damage or cross-threading to the aluminum adapter.

Your bracket will look like this mounted to the vehicle:
STEP 4

Repeat all steps to the opposite side of your car. Mount your Akebono calipers using the supplied 55mm long bolts. Tighten to OEM specifications. NOTE: Part of the dust shield will need to be trimmed in order for the caliper to be mounted. Use metal shears or a cut-off wheel with the appropriate tool to complete this step.

STEP 5

Double-check all fasteners for tightness prior to driving your vehicle. Test drive and enjoy!

*** This kit is to be used for off-road use only. No warranty is implied or expressed. Purchaser assumes all liability. Tighten all fasteners to OEM specifications. ***

Loading

Community Member Credit: Ksnelgrove

I just installed these aluminum valve covers on my 5thgen Maxima. AND YES, THEY ARE ALUMINUM! The brand is MITZONE. They are well-made and come with gaskets. I have no leaks or problems so far. They are also very sturdy/solid vs. the crap plastic stuff. Highly recommend.

eBay Description: ALUMINUM Valve Cover Kit for 02-09 NISSAN Altima Maxima Murano Quest I35 3.5L
Price: $87.99-$95.00 (Shipped)
Order Links Below:

OEM Part Numbers (These can cost over $400+):

  • 6thgen Front: 13264-ZA30A (Price: $197.18)
  • 6thgen Rear: 13264-7Y000 (Price: $197.18)

Fitment:

  • 2002-2004 Infiniti I35 V6
  • 2002-2006 Nissan Altima 3.5L V6
  • 2002-2008 Nissan Maxima 3.5L V6
  • 2003-2007 Nissan Murano 3.5L V6
  • 2004-2009 Nissan Quest 3.5L V6

Installed Photo:

OEM Price Reference ($450 Shipped)

Stripped to Reveal Aluminum


Loading

Member Credit: KZ 259

If your steering is worn-out and you would like to replace it, the following how-to will help you achieve that. Very simple to do.

Step 1: Disconnect the battery

Step 2: Unscrew this 10MM nut and one more on the opposite side.

Click the image to open in full size.

Step 3: The airbag will now be able to come off, but be careful and be slow. If you man-handle the airbag, it can possibly knock you in the face. There are two connectors attached to the airbag. Disconnect the two wires as shown.

Click the image to open in full size.

Step 4: You will need this tool to complete the job. This can be either bought or rented from any of the big 3 auto chain stores. Under $30 bucks.

Click the image to open in full size.

Step 5: Take off the center nut first. It will have some torque to it so don’t be afraid to give it some strength. After you take the center nut off, you will see two threads (marked by the white arrows). That is where you will place the two bolts that come in your puller kit.

After the puller kit is in place, just ratchet away and the steering wheel will pop off. When placing on the replacement wheel, you will see a notch in the center of the steering wheel and another small notch on the steering wheel thread. These notches need to be lined up when inserting the new steering wheel or your steering wheel will be crooked.

Click the image to open in full size.

Click the image to open in full size.

DONE! And that is it for this DIY. Tit’s simple and straight forward. If you are doing this for the first time, it should not exceed longer than an hour.

Loading

Contact @Terrance on Facebook to order set.

Replace that unused Exhaust Cam Sensor with this Plug on your new Gen2/Gen3 Engine swap.

This works with the following Engine Swaps (This is if you swapped your 4thgen, 5thgen, 6thgen or Altima SE/SE-R with a newer Engine):

  • 2015-2018 Nissan Altima Engine Swap  (Does not work on earlier 2008-2014 Altima models as they have this sensor blocked out)
  • 2009-2021 Nissan Maxima Engine Swap
  • 2015-2021 Nissan Murano Engine Swap
  • 2015-2020 Nissan Pathfinder Engine Swap

Each Kit comes with:

  • 2- sensor plugs
  • 2- O-Rings
  • 2- Allen Head Stainless Steel Bolts & Washers
  • Only available in BLUE or BLACK colors.

$25 Shipped in the 48

2008-2014 Nissan Altima Reference (Why these won’t work on those)

Additional Member Submitted Photos

Loading

Gallery of Maxima with VQ35DE Kinetix Intake Manifolds.


Loading

Order Link: https://www.2j-racing.com
Price: $99.99

2JR introduces our lightweight race pulley for the VQ35 Maxima and Infiniti I35, 01-04 years. Based on a far better design than the OBX pulley with a 75% weight savings over OEM, this is a must have mod for your VQ. Gain upwards to 9WHP / 12WTQ. Offered ONLY in anodized BLACK, with 2JR Logo.

2002-2006 Maxima Belt Size

  • Gates belt part number is K060408 for Alternator/AC
  • Gates belt part number is K040300 for Power Steering

2007-2008 Maxima Belt Size

  • Gates belt part number is K060388 for Alternator/AC
  • Gates belt part number is K040300 for Power Steering


Loading

Price: $189.99 (Shipped Anywhere in the Continental US)

Applications

  • 2009 – 2016 Nissan Maxima
  • 2007 – 2016 Nissan Altima
  • 2007 – 2013 Nissan Altima Coupe

Tune On The Go is proud to present phenolic its 2pc thermal intake spacers. These spacers are made from 3/8 thick high-grade phenolic. The spacers will isolate the throttle body from the manifold and also the manifold from the block.

With the isolated areas spaced off this way the manifold will run about 23 degrees cooler thus creating colder, denser, heavier air into the chamber

Sold as a complete kit which includes:

  • 2 – Extended High Strength Manifold Studs
  • 4 – Stainless Steel Manifold Bolts
  • 8 – Stainless Steel Lock Washers
  • 4 – Stainless Steel Allen Head Throttle Body Bolts

Loading

Community Member Credit: Darby Bryan Mccullers

This fixed the infamous gear slamming issue after upgrading to the upgrade Level 10 valve body.

Reference Info:

The Nissan Maxima-Quest has become well known as a fine automobile. Unfortunately, the transmission continues to be a problem.

Even when overhauled, the same factory parts are installed resulting in the same problems. LEVEL 10 has developed a series of valve body components and modifications that will correct the hard shifts, gear slams, erratic shift points, and transmission failures. The best part of our modifications is there is no need for a complete transmission overhaul saving thousands of dollars.

Loading

Community Member Credit: Robert Mandru

These brackets will guarantee the proper fitment of Akebono calipers on your Maxima or Altima. Say goodbye to pad overhang and knocking off wheel weights when running your 18s!

The kits will be made out of 6061 high-strength aluminum. I am currently in talks with the machinist to see if I can do a separate run of steel brackets though. I was quoted $45 USD more (subject to change).

The aluminum kits will cost $225 plus shipping and PayPal fees. ($50.00 Deposit Required)

Important Note: These brackets for only for the front calipers. The rear Akebono calipers are plug-n-play but only for the 04+ Maximas/ 05+ SE-R Altimas.

Improvements (Over Previous Brackets):

  • Mounting holes to the knuckles have been shifted to the correct spots to fix the pad overhang problem.
  • A notch has been made to clear the curvature of the caliper as it was not allowing it to seat on the bracket properly.
  • The caliper mounting holes were oversized. This is also corrected.

Loading