Order Link: https://www.ebay.com/itm/161362333646
Price: $98.47


Video:
![]()


Community Member Credit: fxlr8
MATERIALS:
TOOLS:
SAFETY

1. REMOVE THE DOOR SILL BY PULLING UP AND UN-POPPING THE CLIPS.

2. UNSCREW THIS PLASTIC NUT AND REMOVE THE SIDE PLASTIC PANEL. THE PLASTIC NUT SHOULD COME OFF BY HAND, IF NOT USE A WRENCH.

3. LOOK UNDER THE GLOVE-BOX AND REMOVE THIS PLASTIC PANEL, PULL DOWN ON THE FRONT AND IT WILL UNCLIP.


4. USING YOUR PHILLIPS SCREWDRIVER UNSCREW THESE 2 PHILLIPS SCREWS UNDER THE GLOVE BOX.


5. OPEN YOUR GLOVEBOX AND UNSCREW THESE 4 SCREWS.

6. YOUR GLOVEBOX SHOULD NOW COME OFF (DISCONNECT ANY WIRES NECESSARY – DO NOT DISCONNECT THE YELLOW AIR BAG PLUG/WIRE).
7. TO REMOVE THE FILTER YOU WILL PUSH ON THIS TAB TO RELEASE THE FILTER COVER.


8. PULL OUT THE OLD FILTER.

9. INSTALL YOUR FILTER **(NOTE THE DIRECTION OF AIR FLOW ON THE NEW FILTER – THE AIR FLOWS DOWNARDS IN OUR CARS, SO MAKE SURE YOU INSTALL YOUR FILTER PROPERLY).

NOTE: WHEN PUTTING THE FILTER COVER (DOOR) BACK ON YOU WILL NEED TO LIFT THE FILTER UP WHILE CLOSING THE COVER, THE DOOR HAS TABS ON IT AND THE FILTER NEEDS TO SIT ABOVE THESE TABS.
![]()
")
Owner: Nelson Andino
Year: 2009
Model: Infiniti
Color: Mojave Copper Metallic
Photo Credits: drippin_media
DaMechanic: Tune On the Go


![]()
")
Community Member Credit: Eddy
Out of nowhere, I noticed that the trunk on my FX35 was not fully closing. Initially, I thought the actuator was toast and I would need to replace it. When you get the lock, you should be able to hear the trunk latch engage. I wasn’t hearing.
I did some research and found a quick solution. I removed the 15A – BACK DOOR fuse for 30 seconds and plugged it back in. After that, the trunk was opening and closing fine. I may have to replace the actuator soon but at least the trunk is closing. I was worried someone could just randomly open it and take stuff from the trunk.
Hope this helps anyone who has the same issue.


If you need to replace the actual, I found the following information. Adding it here for future reference.


![]()
")
Community Member Credit: Eddy
My recline and power seat move button stopped working. Seems like they were stuck. I’m sure I could have taken it off and tried to prepare it but I found a better solution that worked for me. I bought two Dorman 85919 toggle switches and swapped the button with that. The switches fit great and work 100%. A good option for those who don’t want to pay $100 bucks for a new one. This costs less than $10 bucks to do.


![]()
")
Community Member Credit: angryfx
1- Take the 6 clips out of the grill.

2- The grill is now free but there are 4 clips that are attached towards the radiator that you use
a plier to take out…. close up of the clip…

3-the holes were where the clips were held in place to the bumper.

4-the headlights are held by 4 screws. 2 on top and 2 at thhe bottom… one behind the front bumper
and the other behind the wheel wells.


5-to remove the bumper you will have to remove 10-15 bolts depending on how many you have under the car
by the bottom plastic cover… but you have to remove 2 screws that hold the bumper to the fender…on each side..


hard to get a nice pic so these are some supporting pics..

6- once you unbolt these 2 bolts then you will see that the bumper will kinda wobble… they are still
held in place by 2 clips right under the headlight housing… if you pull the bumper you will see them.


7- when pulling on them be careful i broke 1 of the clips but when putting them back in i found it
not to be bi issue with just 1 clip instead of 2 but still be careful…
8- with the bumper off or hanging by 1 or 2 screws at the bottom… you can now access the bolt under
the headlight. this shoul be the last bolt to remove… unplug all th electrical harnesses/wiring…
take em out gently…


9- once you take the headlights out you can now exchange the ballast (3 screws) held in under the headlight.
and the light bulbs..(unclip the metal pin and take the bulbs out..

this is the ballast ( i didnt know until today)

now take the silver holder out by twistin like a regular bulb

you will see the rear side of the bulb

unclip thes metal sprins by pushing them with your thumb n finger n open the latch….

10- do it to the other side and put the bulbs and the ballasts back in …..

11- if you are going to do DTRL SWAP now is the time …. cut the black wire cover tape

12- i used a nipper to cut the tabs because i was lazy…

13 – please refer to dtrl swap thread for more info if you have any question.
14 – put headlight back in and connect all the wires


15 – put the bumper back in …..

16 – PUT GRILL BACK IN AND CHECK THE LIGHT TO SEE OR OF THEM ARE WORKING WELL CLEAN AFTER
YOUR MESS AND FEEL GOOD DONE!!!!

![]()

Credit: la_fx35

Remove the battery compartment cover and crowl top cover to access the IPDM.

IPDM

Lay some rag over the batter terminals so that your IPDM cover won’t be all scratched up and to protect the wires from sharp edges on the battery terminals.
Remove the IPDM, reach behind the IPDM and squeeze the two tabs toward the front of the car and lift it from the bracket.
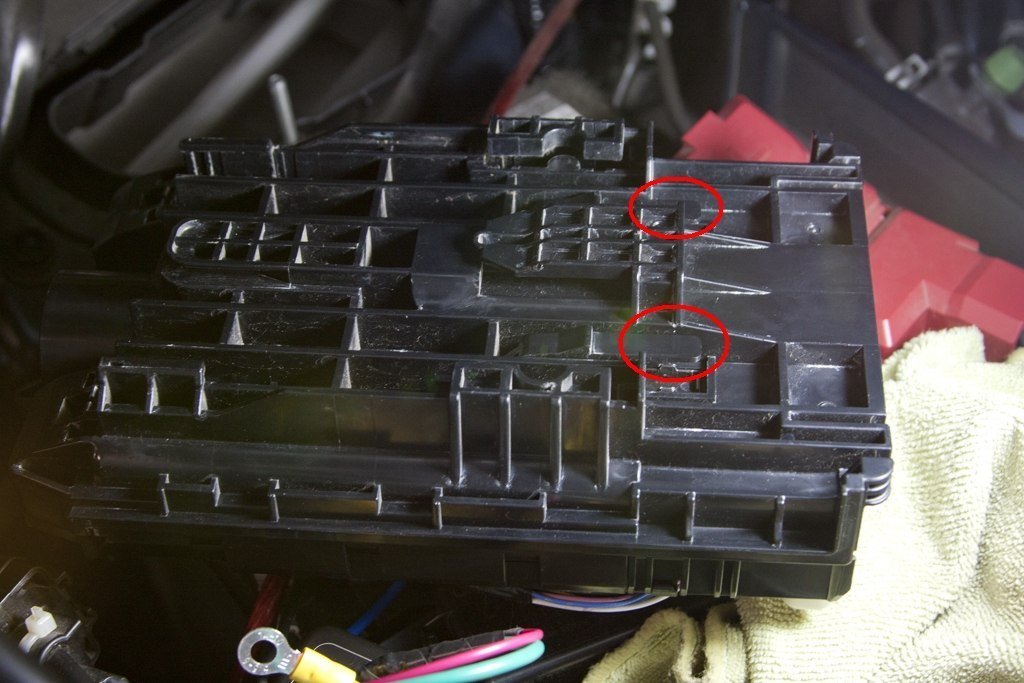
Remove the IPDM cover, use a small flat head screwdriver and lightly pry the tabs up while you pull the cover away from it.

Remove the IPDM from it backing bracket, carefully work the wire bundle out of the guide tabs at the bottom of the backing bracket. Spread the two tabs on top of the backing bracket and then pull up to take the IPDM internal off the backing bracket.

![]()

Credit: shralp
So I just took the plunge into my first tranny fluid change and took some pics. I used 5 quarts instead of flushing all of it.
Important Note: Nissan Matic J was replaced with S.
THINGS YOU’LL NEED:
1. Lift car and remove splash guard.
2. Remove the engine cover so you can get to the charging pipe behind the engine.


4. If you’re replacing X quarts of fluid, fill your bucket with X quarts of water and make a line at the water level. This way you’ll know when do stop draining.

5. Get all your Nissan Matic J transmission fluid opened and lined up so you or you’re friend can continuously pour. Start your engine (nothing will drain without the engine running).

6. Get under the engine with your bucket ready. You’ll be removing the smaller hose from the radiator (see picture).
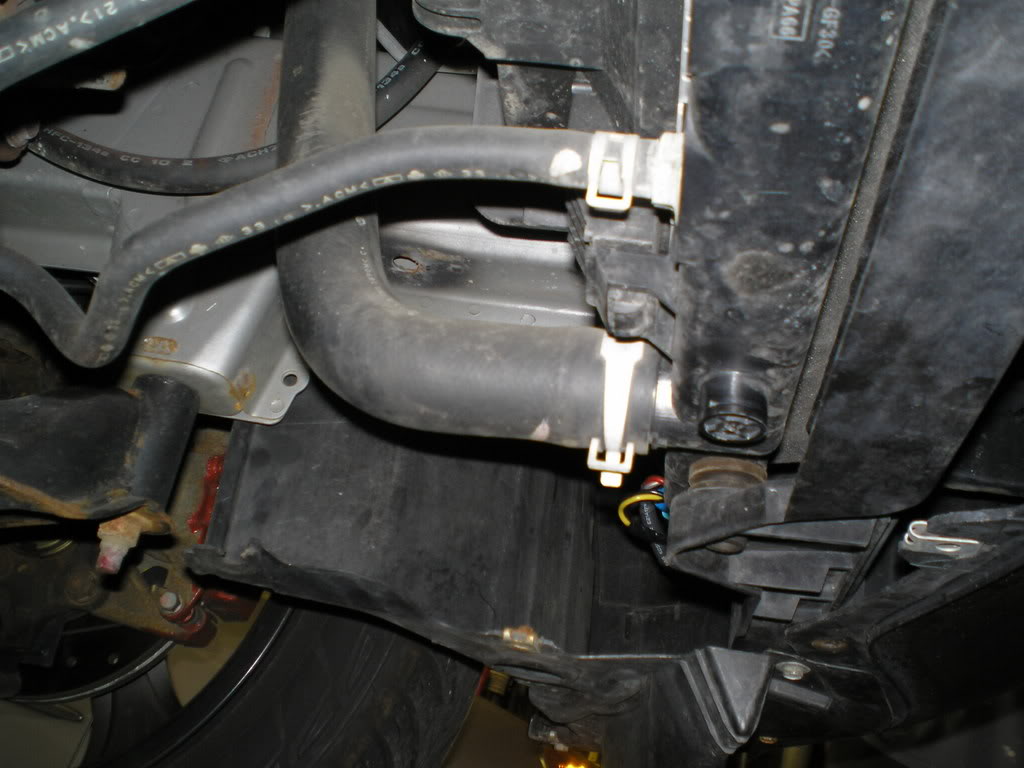
7. With your plyers, squeeze the hose clamp and slide it farther up the hose.
8. Put your bucket directly below the end of the hose and get positioned so you can watch the fluid level reach the line on the inside of the bucket.
9. Pull the hose off the radiator. I used plyers on this step but it might be easier to just use your hand. TIP: JUST AS THE HOSE RELEASES FROM THE RADIATOR, GIVE IT A PINCH TO STOP THE FLUID FROM SPRAYING ALL OVER YOUR GARAGE!. Otherwise you’re garage will look like this.

10. Yell to your friend to start pouring. Aim the hose at the bucket and stop pinching. Watch the fluid fill the bucket. As soon as it reaches the line in the bucket, pinch the hose again and reconnect it to the radiator. Hopefully all the old fluid is in your bucket and not on your body/garage floor.

11. Slide the hose clamp back to the end of the hose with your plyers.
12. Turn off your engine and give your friend a high five or a kick in the nuts, depending on his performance.
13. Put the splash guard back on. Screw the dipstick bolt back into the charging pipe. Put your engine cover back on.
14. Good work, now go drink a beer and order some more mods for your FX.

![]()
![]()
Actually the transmission holds 10 3/4 quarts. The 30,000 and 60,000 mile services call for a drain and fill which takes about 3 1/2 quarts to do.
OP what I would do is buy 8 quarts, drain the pan, and refill with 3 1/2 quarts. Drive 50-100 miles and repeat the process. Give the car about 1-2000 miles and repeat. That way you don’t shock the tranny all at once with new fluid. I don’t think the tranny has been hurt unless you track your car but check your fluid ASAP. If it is dark or brown and smells burnt, you probably need to ignore my first advice and take it to the dealer for a complete flush and fill.
The tranny fluid is Nissan S-Matic, it replaced the J-Matic and is the only transmission fluid recommended for our engines.
—————————————
I had my tranny fluid changed last month. Me and my buddy did it with the car on the hoist. We used the drain plug on the tranny oil pan. Drained out about 4~6 qts. Then we filled another 4 ~ 6 qts back to the oil pan (depending on how much you drain out). The turn on the engine, with the brake on, shifting from P to R, to D, then D to R to P, each gear stays about the 20 secs to let the new fluid to mix out with the old fluid. Then we did the process again. After that test drive the car in manual mode for about 10 mins. Then measure the fluid level. If not enough, then top out from the tranny dip stick tube with a thin tube funnel.
I do my tranny fluid change about every 30k miles. The car is running fine, no issue with the tranny.
![]()
")
Credit: la_fx35
Perform this DIY at your own risk. Please DO NOT have open flames near the gas tank and work in a well ventilated area. As your FX age, the gas gauge gradually become less accurate to the amount of gas left in the tank. This DIY will fix the gas gauge problem.
I would recommend to do this fix when your tank is close to empty to avoid fuel continually spraying out of the fuel line as you disconnect it from pump.
Tools: Pencil with eraser top, pliers, screw drivers (philips and flat), 8 mm socket and ratchet.

To begin, remove the rear seat by pulling on the black ring at the bottom edge of the seat and
lift the seat. Remove the seat and the flimsy insulation sheet.

To remove the access door to the gas pump assembly and sender, use a philips screw driver and turn the black plastic locks in the direction imprinted on the lock. I find using a pliers is much easier than a screw driver

Start with the sender unit located on the driver side rear seat. Undo the six 8 mm bolts, unplug the electrical connector, remove the fuel sender retainer ring and lift the send unit out of the tank.

Use a flat head screw driver and gently pry on the hooks to expose the part that needs to be cleaned.

In this pic the part in the red circle is dirty. The part in the green circle has already been cleaned.
To clean, using the eraser, gently rub the black deposit off the silver leads.

All clean up. Move the floater arm to the center and pop the plastic cover back on. Insert the sender unit back into tank, bolt the sender retainer ring back, plug the electrical connector back and put the access door back.
Turn the locks in the opposite direction of the imprinted arrow to lock the access door in place. I find using a pliers is much easier to turn the locks back.

Now start to work on the send unit that is attached to the fuel pump. The fuel pump is located on the passenger side rear seat. To removing the fuel line, squeeze the white tab and pull on the fuel line to separate them. There will be a little squirt of fuel when they become apart. Have some rags handy!
If your tank is full, you may need a cup/pan to catch the fuel as it will continually dripping
from the disconnected fuel line.
Unplug the electrical connector. Undo the six 8 mm bolts to remove the fuel pump retainer ring. Note, when you undo the last couple of bolts, hold the retainer ring as the fuel pump will try to pop out of the tank.

Carefully lift and work the pump assembly out of the tank. Use a flat head screw driver and gently pry on the hooks to expose the part that needs to be cleaned.

Dirty sender leads. Again using the eraser, gently rub the black deposit off the silver leads.

All clean up. Move the floater arm to the center and pop the plastic cover back on. Insert the sender unit back into tank, bolt the sender retainer ring back, plug the electrical connector back and put the access door back.
Turn the locks in the opposite direction of the imprinted arrow to lock the access door in place. I find using a pliers is much easier to turn the locks back.


The fuel pump listed at $258.

Fuel pump sender unit circuit board.

Stand alone (driver side) sender unit circuit board.

Before:

After:


![]()
