

Member Credit: DEADBOLT
Tools Needed: (NOTE: Socket is size 14 & make sure it’s a long socket, not short)

1) Jack up the car from BOTH sides.
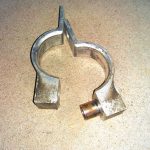
2) Unbolt the outer part of the sway bar first, since the sway bar is stable. There’s 1 bolt on each side


3) Unbolt the middle section


Now you should have 3 bolts total from each side and the middle section brackets

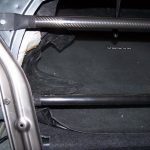
4) Wiggle the old sway bar out and be careful. Take your time and try twisting the bar to avoid pulling any lines with you. NOTE: Notice the way the sway bar is facing before you put it in.


5) After you put in the NEW sway bar, connect all bolts in place, but DO NOT tighten anything yet. NOTE: Do the middle section first to hold up the bar because it’s heavier than stock.


6) Once every bolt is in place, tighten the outside bolts then do the middle section. And now you’re done.
Enjoy the better handling.
![]()
Comments are closed.