Member Credit: jgadlage
I wanted to give a walk-through of how to install the 2 brace setup as it is a little different:
I would recommend that you use the following when doing this install:
• Power drill with a 21/52 bit (it is 1 size bigger than a 5/16 bit- you could use a 5/16 and then just make it larger)
• 5/16 socket wrench
• Level
• Get a 1 inch 5/16 bolt (as KCMAXX currently has ¾ inch 5/16 bolts and I’ve told KCMAXX about this and hopefully he’ll change it with the future2 brace kits). This gives a little more thread for the nut to grab hold of.
Installation
Total install time took about 4 hours, but it really should take no more than an actual hour of real labor. I ate away time doing the following:
• Trying to find a good mounting position for the lower bar
• Drilling out one side to mount the bar
• Finding that the included bolts aren’t long enough
• Going to get longer bolts
• Mounting one side
• Drilling out the mounting location for the other side
• Finding out that mounting location isn’t level
• Guestimating another location based on the previous and drilling it.
• Checking the level and drilling through the brace
• Cutting the carpet where the bars are in order to pull it back into place
Suggestions: I would suggest installing the bars in the following way:
Top brace
Install with the bar from the interior of the car with the bolts on the interior side and the nut on the trunk side
Bottom Brace
Install the bar in the interior of the trunk with the bolts on the interior side and the nuts on the trunk side. This way you will be going through the same metal mounting plate as the top brace as well as the silver brace below it to increase the rigidity of the mounting holes you will have to drill out. Try to drill out a hole for the brace at 5 1/4 inches up from the folded down seatback on the drivers side 3 inches over from the seat, and 5 1/4 inches up and 2 1/4 inches over on the passangers side. This should get you in the area that I drilled out my holes, but you might need to see what works best for you.
Hopefully these pictures will help you out in mounting your rear lower strut brace. Let me know if you have any questions and I’ll get back to you as soon as possible.
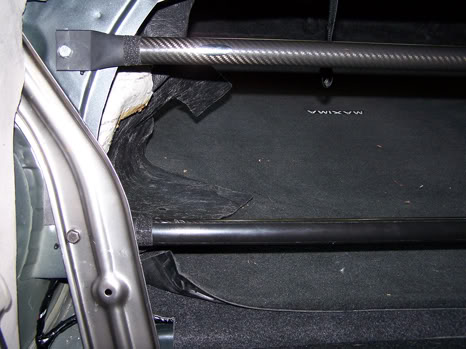
Shows the where I decided to drill on the metal brace that the the upper strut brace mounts to as well as the silver brace behind it.

Interior view (passanger side) of lower brace mounting pont

Interior view (driver side) of lower brace mounting point – I drilled once, missed the mark, drilled again got in the right ballpark, but the level was off, drilled a 3rd time and it was better.

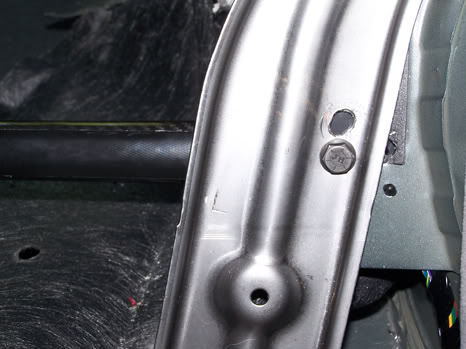
Interior view (driver side) of upper and lower brace mounting points. If you look to the right of where the brace is connected you will see a hole. That is where the bar would have connected with the stock mounting point, but there was no way that the bolt would fit and be able to be snugged down with the silver brace in the way. I corrected this by drilling in the current location through the silver brace, metal, and support bar. Everything seems solid now.

Both braces installed with carpet peeled back

Both braces installed with carpet put back in place

Here are my impressions on how the car handled before and after the install of these braces:
Before
The car has more of a luxury car feel in that the suspension is soft and feels a bit floaty over bumps in higher speed sweeping corners. It has body roll (both left/right and up down). It feels kind of like a boat in that it’s comfy, but it doesn’t inspire confidence when you first go into a uneven fast sweeping corner and find out what the car does (bobbing and rolling).
After
With 1 bar the car does feel more responsive in that the chassis feels more rigid and connected. The front still seems to bob and roll when tossing it around a corner (as the front has yet to receive a FSTB), but the car seems more planted and stable. With the 2nd bar added in, the car feels like a sport/luxury car (it has crisper and more connected handling, but it isn’t harsh). The front still bobs and rolls, but the rear is more stable and planted with the bobbing now gone. A high speed sweeping corner with a bump that would once make me anxious now doesn’t as the rear of the car doesn’t get unsettled. If you are going to put in a rear lower brace, I would recommend that you take your time and plan out what you are doing as there isn’t a lot of room for mistakes.
Afterthoughts
This is a good upgrade that is well worth the money. It isn’t hard if you are doing either a single bar or a double bar. The single brace was a snap to install, the lower brace was a little more complicated but by no means difficult. I agree with Chernmax in that this is a 1 wrench job that anyone can perform, just take your time and take it one step at a time.
I also want to add a side bar that with the FSTB installed and Rear Sway Bar the car now feels more stable during the long sweeping corners. If I am going around a 180 degree sweeping onramp (I take this onramp everyday so I am used to it and have tested my car many times on it) with a posted 40MPH speed limit I can do the following:
* I can make the corner at 60 with the car holding stable (tires might be squeeling, but the car sticks and is controllable). I could go faster, but I would have to give it all its got and I don’t feel the need to go any faster.
* If I wanted to I can lift off of the gas during this corner at 50MPH and the car might start to kick out the rear end ever so slightly, but the braces bring it right back into line and keep it controllable. If I did this before without the RSB and the FSTB, the rear end would start to come around and regaining control would be a whole lot more difficult.
Morale of the story – don’t let out of the gas during a sweeping corner or brace your car to ensure better handling if you have to so that it keeps in line. At least now I know how my car will react if it does get upset during a corner (either intentional or in a case of emergency) and I can respond accordingly. I am not saying to go blazing into a corner at wreckless speeds, but if you can find a deserted place where you can test your car do it in increasing increments so you can find some limits of your car and know how it will react with your current setup. Better to know what your car will do when the need arises than hope it will react the way you think when the time comes.
![]()


Comments are closed.