Last Updated: 08/03/2022 @ 08:12 am
STEP 1: Download and Install VAG-COM KKL 409.1 Drivers
(DO NOT connect cable to your computer yet. Only do this when you’re instructed below.)
Here’s how to install on different Windows versions…
Windows Vista, 7, 8, 8.1, 10:
- Uncompress the file. Double-click on “Install.exe” to install the drivers. When complete — plug in cable into any USB port on your computer and wait for automatic installation to complete.
- If install is successful, move onto Step 2.
- If installation fails, see below: Troubleshooting: If Drivers Failed To Install
Windows XP:
- Uncompress the file. Double-click on “Install.exe” to install the drivers.
- Plug cable into any computer’s USB port.
- “Found New Hardware Wizard” will start and it will ask you “Can Windows connect to Windows Update to search for the software?”. Select “Yes”.
- Select “Install the software automatically”.
- After the installation is complete, click “Finish”.
- “Found New Hardware Wizard” will start once again because there are two drivers for this cable.
- Go through the same steps as explained above to install this second driver.
- If install is successful, move onto Step 2.
- If installation fails, see below: Troubleshooting: If Drivers Failed To Install
Troubleshooting: If Drivers Failed To Install:
- Installation failed? Download here VAG-COM Driver Pack 2.
- Unextract the file into any folder. Then while your cable is connected to the computer — go Device Manager.
- Windows Vista/7/8/10: Control Panel » System » Device Manager
- Windows XP: Control Panel » System » “Hardware” tab » Device Manager
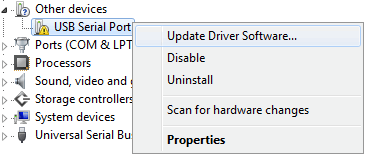
- You’ll see a device similar to “USB Serial Port” under either “Other devices” or “Ports (COM & LPT)”.
- Right-click and choose “Update Driver Software”. Like this:

- Then select the location where you unextracted Driver Pack 2. Let it install.
STEP 2: Discover Port Number that VAG-COM KKL Cable is Using
- Go to Control Panel.
- Windows Vista/7/8/10: Control Panel » System » Device Manager
Windows XP: Control Panel » System » “Hardware” tab » Device Manager - Expand “Other devices” or “Ports (COM & LPT)”. Whichever contains “USB Serial Port”.
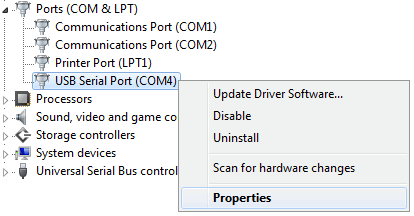
- Next to “USB Serial Port” — you’ll see a number.
 If the COM port number is between 1-4, then everything is fine. Move onto Step 3.
 If the COM port number is above 4, then we’ll have to change it so it’s between 1-4. Here’s how…
Right-click on “USB Serial Port” and click on “Properties” — as per below pic:

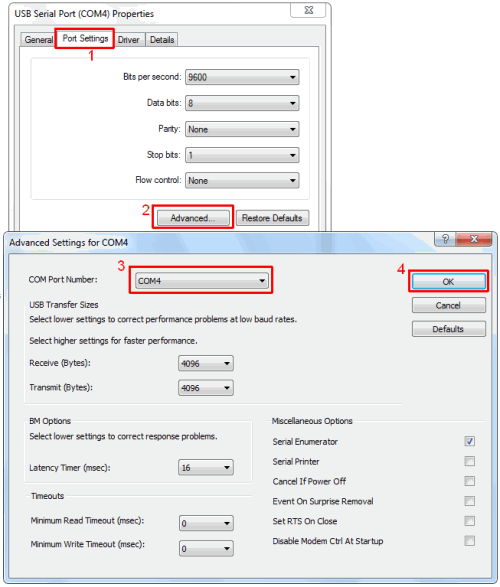
Then:
Click: Port Settings
Click: Advanced
For “COM Port Number” — you MUST choose any number between 1-4.

That’s it! Now let’s test if everything is working. Move onto next step below…
STEP 3: Test Everything is Working
Open Nissan DataScan II and try to connect.
![]()
Facebook Comments


Comments are closed.