

Last Updated: 02/05/2017 @ 10:17 pm
Member Credit: omahasubaru

Materials you will need:
– canvas material from a local fabric store.
– heavy duty thread
– heavy duty velcro
– some rope/string or zip ties
Tools you will need:
– Fabric tape measure
– Scissors
– Pencil or fabric marker
– Sewing machine
Other items that may be useful:
– Spare fabric to use for your first template
– Ability to use this DIY as a guideline and interpret/adjust as needed.
– A measure twice cut once mindset
– Patience
– Skill with the sewing machine, or a friend who does
Phase One : Building a template
There are a few ways to do your covers. I’m only going to cover the two more popular ways.
1) Measure your springs and perches
You’ll want to use the fabric tape measure for this. Measure around the widest part you want to cover. Sometimes this is the upper or lower perch, other times it is spring. Especially if you have some of the newer Hypercoil OBD springs. Take this measurement and add around 1.25-1.5″ to it and write it down. This helps to account for overlap and velcro strip.


2) Measure your coilovers for the length you want to cover.
This is where options come in. You can either measure from above the upper perch and just to below your lower spring perch, or you can measure all the way down to the knuckle ears if you want. Neither way is wrong, but I prefer the latter, as it covers any remaining exposed un-used threads you may have. Please be aware that not all struts are the same length. You rears will likely be longer than the front, so you may have to make two patterns for best results. Write down your measurements.


3) Build your template
Take your measurements and use the guide here to add to them. You have to add to account for folding over and stitching. This also gives you just a little more length depending on how good your measurements were. Your measurement goes on the inside of the lines in the template below.

The top/bottom has a longer fold to account for room to run your rope/string or ziptie through to snug up the ends.
4) Test fit it.
It should be over-sized at this point, but this is a great time to catch any issues you may have with your measurements before you go further.
Phase Two : Make your bags
Now we take your cut out pattern and start to put it together.
1) Fold & stitch your pattern.
Use this guide below to setup your folds and location of your stitching. You don’t want to stitch the ends closed as then you can’t run your rope or tie through to snug up the ends. Use the zig-zag stitch pattern on the sewing machine.

2) Place your velcro & stitch it on.
Use the guide below to determine where to locate it. You need to place one side of the velcro on one end and stitch it on. Then place the matching side of the velcro on the other side of the fabric on the opposite end. This is so when you wrap it, the velcro meets up correctly. Use the straight stitch pattern on the sewing machine.

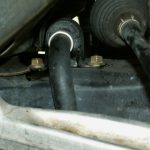
3) Test fit it.
Now it should fit quite well and should look something like this.


4) Choose your snug method.
This is where you decide if you want to use some rope/string material to snug up the ends, or zip ties. I initially went with some nylon rope, but have since had concerns about how well it would stay tied and have elected to go with zipties. My intended use for the car and the [COLOR=blue ! important][COLOR=blue ! important]suspension[/COLOR][/COLOR] is scca rallycross events and lots of gravel road use. So I really didn’t want my bags to sag.

Phase Three : Repeat & Enjoy
Now you merely continue to make your remaining coil bags and then put them to use.

Thanks for checking out my DIY, I hope someone can find it useful.
![]()

Comments are closed.