

Last Updated: 02/06/2022 @ 07:32 am
Community Member Credit: One Post Wonder
So I did the 6 speed swap a couple of years ago following the guide in the stickies. I did a lot of research on the swap and thought I would improve the guide a bit by consolidating the information I found, fixing some grammatical errors, and adding some of my own experiences to the mix. I’ve added the part prices and who I bought them from for reference, although I would recommend swappers find parts locally. I didn’t include any pictures from my swap but the same ones in the original procedure thread apply. If I’m missing information or information is wrong, let me know.
REQUIRED PARTS
- 6spd Maxima transmission-junk dealer Action Auto Parts $620
- 5.5 gen 6spd Maxima shifter assembly- junk dealer Riverside Auto Parts $90
5.5 gen 6spd Maxima shifter cables- 05 Max cables Pence Nissan $160 - 5.5 gen 6spd drivers side axle- DO NOT BUY GSP brand from Advance Auto Parts, stock 4th gen may be used
- 5.5 gen 6spd passenger axle (must be OEM) – EBay seller $150, DO NOT BUY GSP brand
- 6spd frame transmission mount (11220-5Y700)- CourtesyNissan $86
- 6spd transmission mount bracket (11253-AU400)- CourtesyNissan $36
- aftermarket Maxima 6spd flywheel w/ bolt on timing ring (Jim Wolf, Fidanza, etc.)- UltraRev Clutch/FW Ebay Package $631
- 6spd clutch- UltraRev Clutch/FW Ebay Package $631, ImportRP $210
- custom 5spd timing ring (same no. of teeth and spaces as 5 spd, but no offset)-Ballos Precision Machine $350,
- individual seller (TuRK on NYCNissans.com) $70
- 6spd starter- junk dealer Bishop’s Used Auto Parts $75
- 6spd slave cylinder-PartsGeek $30
- 6spd flywheel bolts (8) (12315-A33B002, star bit) –Pence Nissan $20
- 5spd or 6spd bell housing bolts-Pence Nissan $40
FLUIDS
- brake fluid
- GL-4 transmission fluid
- brake parts cleaner
- white lithium grease
- blue loctite
OPTIONAL PARTS
- rear main seal
- Energy Suspension shifter (banjo) bushings
- axle seals
- short throw shifter
- stainless steel clutch slave cylinder line
- speedometer pinion (if necessary) (32702-AD012)
- various sized metric nuts and bolts
EQUIPMENT
- drill and bits (for cutting metal, pyramid bits)
- tap and die set (6.7mm tap)
- impact gun
- flare nut wrenches
- bolt cutters/electric saw/angle grinder/metal cutting tool
PROCEDURE
Check the 5 speed removal guide for information on removing the 5 speed parts.
1. Install shifter cables (Method 1)– Route the cables through the passenger side. Pull off the A/T control cable cover and snake the cables in above the ECU. No need to drill through the sound deadener, but boring out the hole wouldn’t be a bad idea, as it can be hard to move and bend the cables to route them properly.
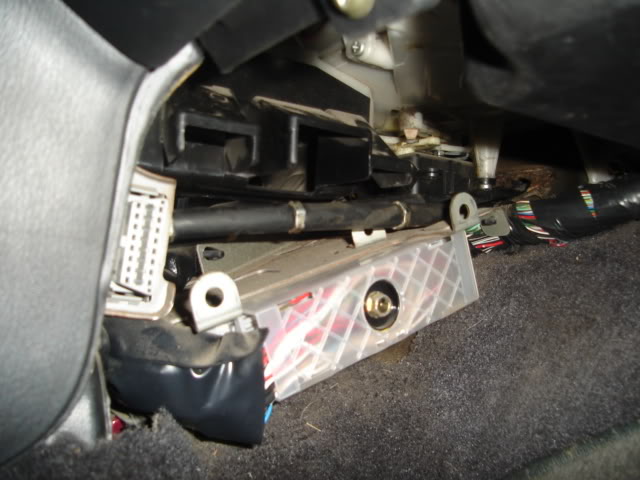

It will be necessary to drill into the shift cable cover as the pre-drilled holes will not line up.

Apply weather insulating/sound deadening material such as Dynamat (shown above) on the firewall hole to keep road noise and water out.
2. Install shifter cables (Method 2)-If the A/T control cable hole was not drilled into the firewall from the factory, or is otherwise inaccessible, use the manual A/C control cable hole in the firewall, right above the fuel filter. It will require about 2 inches of boring out (towards the bottom) to fit both cables. Apply insulating material to the hole to keep water out.
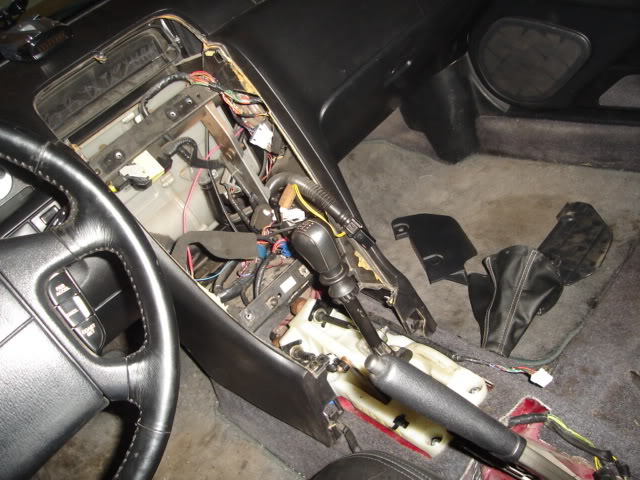
3. Mount shifter assembly– Pretty easy to do also, but it needs to be slightly modified. There are bushings on each of the 4 bolt holes, these bushings must be taken out in front because, if not, the bolts attached to the floor won’t be tall enough to be used. You will need 2 pairs of nuts and bolts for the back holes.
4. Taking off the old 5spd mount– Cut off the old 5 speed mount with a suitable cutting tool (angle grinder and bolt cutters work well). Cut and grind the extended part of the mount bracket as close as you can to the frame so that the new mount can go on relatively flush to the frame.
5. Install 6spd flywheel– Take the 6spd CKPS ring off your aftermarket flywheel and align that timing ring with your custom ring (these custom timing rings MUST BE PRECISION MACHINED to avoid spark timing issues). Then drill out the corresponding mounting holes. Then reattach the timing ring with the supplied bolts and some blue locktite if desired. Since you are using a 5spd CKPS, you don’t need to clock the timing ring, so just install the flywheel by aligning the dowel pin and tightening the bolts in a criss-cross pattern, to the torque specs.
Fidanza Maxima 3.5 flywheel installed:

Make sure to clean the pressure plate and flywheel well with brake cleaner, and torque all mounting bolts to the correct specs in the correct sequence. With Fidanza flywheels, it is even more critical to torque all bolts correctly to prevent stripping threads from flywheel or pressure plate mounting bolts.
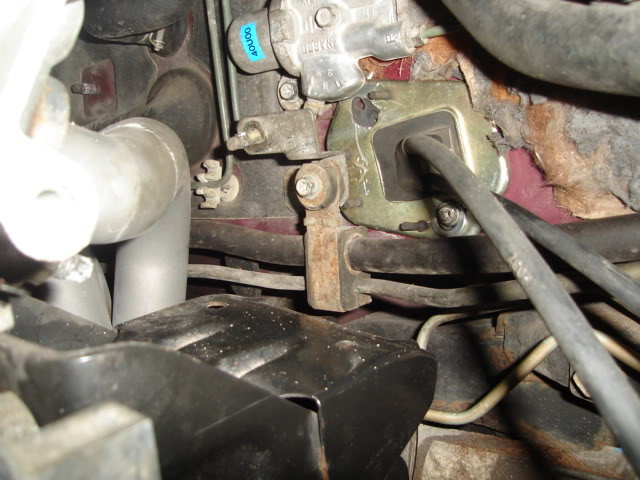
6. Trans mount install– You can either weld this mount to the frame or bolt it to the frame. If you do decide to bolt it to the frame, you will either need to cut a small, rectangular hole in the outward facing side of the frame to be able to anchor the bolts with the mounting nuts, or you can try drill through both top and bottom of the frame (the frame is hollow inside), vertically aligning the drill points. You will need to install the transmission on the engine to align the mounts. Get the transmission on, use a couple bolts to get the transmission flush with the block. Reinstall the front cross member if unbolted. Bolt on the transmission-mounted bracket on the transmission, and then attach the frame-mounted rubber mount with the mounting bolts. Then set the frame mount flush on the frame and mark the holes. Unbolt both brackets, lower the front cross member, and uninstall the transmission if necessary. Drill the holes for the mount. Then cut the rectangular hole on the outward facing side of the frame and tighten the nuts onto the bolts, securing the frame mount.


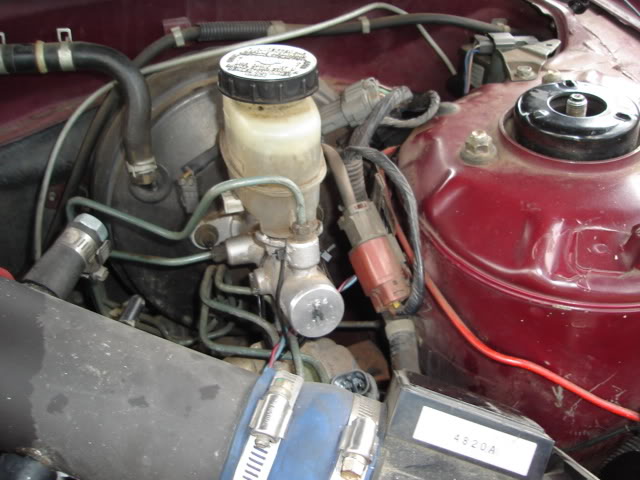
7. Moving the ABS modulator (if equipped)– The modulator is bolted to a bracket, which bolts to the inner frame rail. This bracket needs to be gotten rid of. Use zip ties to pull it upwards by the master cylinder.
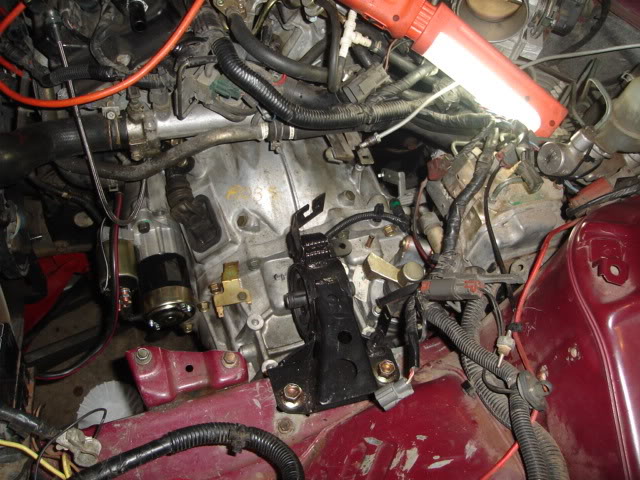
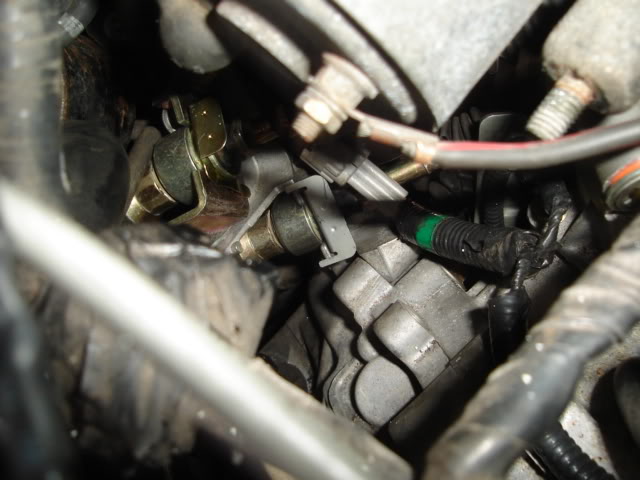
8. Transmission install– It’s easiest to do with someone under lifting it up and someone up top helping. Remove the transmission-mounted shifter and shifter cable bracket to gain clearance. It may be necessary to grind down part of the frame to get the transmission on (shown below). Make sure the mating surface between block and bell housing is clean, to avoid starter grounding problems. Torque the transmission bolts to spec and in the proper sequence. Reinstall the shift cable bracket and shifter. Raise the front of the sub frame, so the cables can be attached to the shift assembly using cotter pins and the cables installed in the bracket using the appropriate clips.
Attach the mount bracket to the transmission. Then jack up the transmission/sub frame, so the 2 mount parts can be joined. Torque the front sub frame and the mount bolt to spec.
9. Starter install– The 6spd starter ground cable is a female connector, so is the connector on the engine harness. You may either cut both connectors off and solder them together or cut the male connector off of a 5spd starter and solder it onto the 6spd starter.
10. Relocating CKPS– If you are using a FWD 6spd Fidanza flywheel, no further action is required other than reinstalling the CKPS sensor in its original location. The crankshaft position sensor (CKPS) hole will need to be enlarged, and a new hole for the mounting bolt will need to be drilled and tapped IF the RWD 6spd Fidanza flywheel is used. The RWD 6spd flywheel has a different timing ring offset than the FWD 6spd flywheel.

Draw a line on the bell housing and on the CKPS; bore the hole out to the driver’s side, until the car will start and run. Then mark, drill, and tap the hole. The tap for the hole should be 6.7mm. Use the “Making Your Own CPS Ring” guide to make your own CKPS ring that does not require CKPS relocation, or use a precision machine shop to make the ring.
Extra Information
- JonBlz said: You can tell if you have HLSD by checking the tranny code at the end of the code it should have H.
- HotshotVQ35 said: people who upgrade get the 04+ cause of a short final drive, and i think the 3rd gear grind is gone also.
- Derrick2k2SE said: 02-03 trannys are the same. Yes, they are notchier than the 5-speed trannys. They still feel good and and I wouldn’t consider it a deal breaker at all.
- The 02-03 trannys are prone to what we call the “3rd gear crunch” where the syncro wears out and causes a crunch when shifting into 3rd fast from a high RPM. It won’t cause a complete failure, it’s more of an annoyance.
- They fixed the issues 04+ trannys. They’re smoother too.
- The HLSD does make a huge difference in these cars. It’s kind of a rare option though. Finding a car that meets your other requirements AND has HLSD will be hard.
- Go here http://car-part.com/ and get a low mile HLSD 04+ tranny and swap it in. It’s a direct fit with no issues.
- scrhale said: Just for people in the future. The code is indicative of what is in the tranny. RS6F51H is the one everyone wants. The 6 means 6-speed and the H means Helical/HLSD. Don’t buy transmissions with a 5-code or an A (open differential) on the end.
- RS5F50A – 1995-2001 Open
- RS5F50V – 1995-2001 Viscous LSD
- RS5F51A – Altima 5-Speed Open ( I think)
- RS6F51A – 2004 Open
- RS6F51H – 2004 Helical LSD
![]()
Comments are closed.