

Member Credit: The Wizard
How to Re-clock your Supercharger
Why? So that one of the bends of the 2.5″ charge pipe can be eliminated (the retarded chamfered elbow) and ease of configuration for those who want to upgrade to a 3″ charge pipe system. Re-clocking the blower also gets the charge pipe away from the back of the headlight and allows a lot more room for those who do headlight retrofits. (My chamfered elbow was rubbing my OEM headlight bulb connection and causing it to flicker on and off)
Keep in mind that if you’re keeping the 2.5″ charge pipe that originally was provided in the Stillen kit, then you’ll have to cut off a portion at the end of the charge pipe (at the second bend near the SC mounting plate) and get a new silicone 90 degree coupler (2.75″ to 2.5″) to reconfigure the system. If you’re upgrading to a 3″ charge pipe, then you’ll have to buy quit a bit more including: piping/couplers/your choice of BOV, Maf adapter etc.
Where? In your car, blower fully installed and mounted to the engine. It’s a common misconception that the blower must be removed from the car in order to re-clock the blower. You do not have to take the blower off the car, unless you run into the problem stated in the disclaimer below. This probably goes without saying, but re-clocking the blower while installed in the car allows you to fine tune and find the perfect angle in such a way that the 90 degree silicone elbow is situated just right and allows proper hood clearance. If the blower was removed from the car, then you’ll be taking the trial and error approach and burning a lot of time taking the blower/plate on and off/re-clocking the blower in order to find the perfect angle.
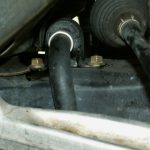
Here’s how the blower looks as Stillen/Vortech intended (2.5″ charge pipe, two bends at/near blower outlet)

Here’s how the blower looks re-clocked (3″ charge pipe, one 90 degree bend)

Here’s how to re-clock (rotate) your blower
Pic 1

Pic 2

Look near the oil feed fitting and you’ll see a hold down plate and two allen screws. (See Pic 2) Keep in mind, there is still one more hold down plate and two screws to locate. See pic 1 for both plates (outlined in red) and all 4 screws (noted in green). Although the blower is installed in the car and space is limited, you should have no problem getting to the plates and allen screws. The hold down plate and screws holds the scroll to the blower itself. Loosen the screws quit a bit until you are able to re-clock (rotate) the blower’s outlet. You can remove the screws and hold down plates if you find it easier or the scroll isn’t rotating freely. Now re-clock the blower’s outlet to the desired position. Tighten the allen screws to prevent any further rotation and snug things back up the way they were. If you removed the 4 allen screws and 2 plates, reinstall them at this time.
* Some people have reported that they have 5 screws and 3 hold down plates. If you can’t re-clock the scroll after undoing/removing the 4 screws and 2 hold down plates as stated above, then look for a fifth screw and small hold down plate. This small hold down plate is only slightly bigger than the screw head itself. This 5th screw and small plate is noted in blue in Picture #1.
Disclaimer: Some people have it easier than others. Some discover that one of the plates is easily accessible (12 o’clock position) while the other is impossible to get to (6 o’clock position) while the blower is installed in the car. If this is the case, you may have to remove/uninstall your blower from your Maxima to gain accessibility to the hidden plate and screws. If so, feel free to relocate the plate and screws to a more accessible location anywhere around the perimeter of the scroll. Just keep in mind, that wherever you install one plate, the other plate should be on the opposite side of the scroll. When I re-clocked my blower, I had it easy. Both of my plates and 4 screws were easily accessible (3 o’clock and 9 o’clock position) [Positions are based on the individual standing at the passenger side of the car and looking at the blower]
![]()

Comments are closed.