

Member Credit: !PrjctMax!
Tools needed
-10mm socket or wrench
-12mm socket AND wrench
-14mm socket or wrench (only if you have a FSTB)
-needle nose pliers and/or pliers
-patience and finger strength for the clamps/harnesses
1.) First you have to remove the engine cover.
2.) If you have a FSTB, then you will have to remove both strut covers and the strut bar itself. 14mm socket or wrench will be needed to remove the FSTB
3.) Now you may as well start with the more difficult part…in the rear of the manifold-this will be the left side…or passenger side.

-Use needle nose pliers to slide the clamp off the hose and pull it off.
-Make sure to un-clip those two green connectors from their BRACKETS, do not just un-clip the female/male connection because it will still be connected to the bracket and will piss you off when it comes time to take the manifold off
-There is also a 12mm nut below and to the right of those harnesses’ that you will have to squeeze your hand into and be careful to not drop your wrench. It is holding on some bronze bracket.
4.) Now you will need to take your VIAS off if you have a grounding kit…if you do not have a grounding kit, then you will not have to take the VIAS off until you have the manifold off and choose to put a block off plate on it. Either way you should use a 12mm wrench here. And just carefully yank that thin black hose off.

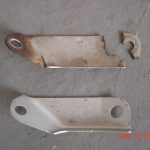
5.) Now you will take off the little bracket on the manifold with a 10mm socket and then 2/5 12mm nuts holding the manifold down.

6.) Now take the bigger bracket off the manifold which is held on by a 12mm bolt, so a socket or wrench would do good here, and a 12mm socket for removing 2/5 bolts holding the manifold.

7.) Now you have the last 12mm nut holding down the manifold on the bottom. Then take off both brackets with a 10mm socket and un-clip the blue harness. The EGR valve has 2 12mm nuts IIRC, so remove both of those and make sure to also take off the two washers that are on each stud so that they don’t fall into the engine bay while sliding it off.

8.) Un-clip the throttle body harness and loosen your CAI hose.

9.) Use needle nose pliers to slide the clamps off these two hoses. The bottom hose will leak out coolant, so put a towel there or w/e you want.

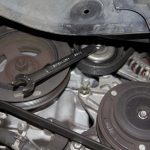
10.) If you do not already have intake manifold spacers, then you will have to remove the bottom two 12mm nuts off the elbow so that it will be off its bracket…BIGGEST PITA besides the driver side coolant hose. The bottom passenger side bolt isn’t that bad, but the bottom driver side is pretty damn tight, but doable with a 12mm ratcheting wrench.
11.) Now you can start to slowly take the manifold off to get access to two more hoses in the rear. Lift the manifold and pull it to the passenger side so that the EGR valve can slide off because the thing is not too flexible. After you have the manifold off its studs and off the EGR valve, you should have enough room to get some pliers and take this hose off on the passenger side…

Notice how my clamp is NOT tightening the hose down too much because when I was putting everything back I did not realize that spacer would be minimal and did not feel like taking everything back off. Air blows out of that valve, so it shouldn’t be a problem and it hasn’t moved for the few days I’ve had it on…so hopefully it’s ok
Now the most PITA hose…behind the driver side on the elbow. This hose will also squirt some coolant out as well.

12.) When installing everything make sure that gaskets are in working condition and use some silicone gasket, which is what I used. I was going to use Permatex Grey, but my Nissan tech hooked me up with the stuff that they use, which is a tube of orange/redish silicone gasket that runs about $50 a tube
13.) When re-installing, make sure that you install those two difficult hoses first and then put everything back
![]()
Comments are closed.