

Member Credit: scrui
Lift the front end of the car about two feet, high enough for you to get underneath and have
easy access. I used ramps. Please make sure car is lifted safely so there’s no serious injuries.
Drain oil from transmission, use an Allen key to remove plug.

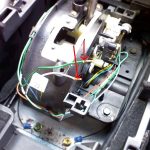
Remove battery & battery plate. You will be able to see the upper bolts.

Also remove this bracket.

Now you are ready to start unbolting cover, but first spray Torx bolts with WD40, wait a few minutes before loosen them. The manual tells you not to reuse them, well let me tell you they cost $8 each at Nissan, I reused them. I cleaned them up with wire brush and break fluid cleaner.
Tip: A couple of the bottom ones were a little more worn from the weather, so when reinstalling put them on top.

From the picture below remove suction cover bolts first. (this cover has a gasket that’s very brittle, it will most likely brake if you try to handle it. Tip have a new one on hand when reinstalling).

I strongly recommend having a second person working with you, one can be underneath the car and the other on top. I had more then one person working with me so we chose to unbolt first then to disconnect wires, if you are by yourself then I would recommend disconnecting before unbolting them just like on the service manual.
From underneath take out bottom and center bolts first, then from the top take out upper bolts, be sure to hold on to valve. You will notice they are not to tight, remember this when reinstalling not to over tighten them, if you have a torque wrench better for you. I didn’t have one so i just used same pressure to tighten them.
Once you pull the valve out, two small washers will either fall off or stay behind. from my photo one fell right away and the other eventually fell off also. these two washers were in excellent condition, so i reused them. In order for these two washers to stay up use Vaseline when you reinstalling new valve body.


Here you will start to disconnect all the wires from the solenoids, the S1 – S5 were easy to disconnect, but the PS1 – PS3 were a pain to disconnect.
All the connectors are color coded and measure to length. when you reconnect them it’s hard to make a mistake.


Remove bolt from sensor.

Installing new valve:
Place two washers with a bit of Vaseline on them back first, then while holding control valve assembly, connect the parking lock rod sub assembly to manual valve lever sub assembly. Then make sure you put the right bolts were they belong (what I did was, as I took one out I placed them on a towel picturing the valve, this made it easy to reinstall in order). Don’t over tight them, remember how they felt when you took them out.
Connect all the wires, again they are color coded and measured to length, but be careful. Make sure they are all connected.
Follow these instructions to put cover back.

Wait an 1 hr for RTV silicone to cure before putting new oil. I lost 3 1/2 qts of matic k oil, so i replaced 3 1/2 qts of new Matic k oil. check for leaks, tighten accordingly.
Good luck.
![]()

Comments are closed.