

Last Updated: 04/15/2021 @ 06:39 am
Credit: 02whitemaximase
The OBX headers (02-03 Maxima, equal length y-pipe) have been out of stock for at least a year. For engine performance mods I have the Megan OE-RS Catback installed along with berk/Apexi intake and 5 piece spacers. I have compiled all of the information needed to get these headers installed correctly.
My first photo is of new OEM exhaust gaskets. Look at the part numbers and order those if you plan on doing a header install on a 3.5. Although you could get away with reusing the original gaskets, I would recommend spending 35 bucks for peace of mind.
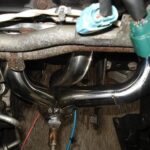
The front (closest to the radiator) header measurements are as follows:
Runner length from where it meets the flange to where all three join cylinder 2= ~10″, 4= ~9″ 6= ~12″
Prices and part numbers:
- OEM exhaust header gaskets $13 each 14035-4W015
- OEM cat gasket $8 20692-65J00
- Spark plug anti-fouler $5 each pack made by HELP 42009, 42002
- MAF cleaner $7
- Energy Suspension (ES) subframe bushings $25 7.1116G
- OBX 02-03 headers $350-380 shipped
The purpose of this thread is to display the newest batch of OBX headers. Exhibit how the install goes and post up some before and after pictures and videos.


Installation Notes
My install went nearly flawlessly minus one heat shield bolt being seized and a secondary o2 sensor not coming out of the old converter. I know these headers are made overseas where quality control is not great. With that being said I think no two sets of headers are exactly the same which means that you may need to trim something during your install. I came to a couple of millimeters from having to trim my front motor mount bracket and my rear bracket went on no problem although it was very close. Probably about 2-3 mm from touching and my front bracket is literally 1mm from touching the header. My flex pipe has about 1/4′ space from touching the subframe.
As you can see one of the primaries comes very very close to the front motor mount bracket but it did not require trimming. Although some may be uncomfortable with how close they are, it is no problem. The mount and header will NOT move even though mine are basically touching it does not matter.

The y-pipe comes about 1/4 of an inch from touching the sub-frame cross member. Again this is not a problem. I have driven it like this enough to not experience any noise and the way I see it the motor really only moves front to back so this tight space does not come into play.

In order for the front primary to have enough wire slack to reach the new header bung, you will have to cut the tape holding the group of wires that travels directly over the middle coil from the larger harness that runs along the top of the valve cover. The tape was holding both harnesses together to about right in the middle of the top middle of the valve cover. Easy fix takes one second.

As you can see below the far left plug has to be unclipped from the coolant pipe in order for that primary to reach.

The rear primary wire has to be extended too. From all of my research people here have been saying to cut the primary either at the wire harness and add some wire to lengthen it or to cut the actual o2 wire and extend those by adding wire. Problem is that it can mess with the voltages. The wire is stainless steel which is nearly impossible for an amateur to solder correctly. My method requires NO WIRE CUTTING!!! You need to remove the wire harness cover pictures below and simply separate the o2 wires from the rest of the wires. First, you need to separate it from the green plug wires, then you need to slit the right side of the main harness that fees into the back of the plastic box. PLEASE TAKE YOUR TIME!!! Be very careful to cut precisely and slowly. Doing this will give you enough slack to reach the rear primary o2 sensor.

This next picture shows exactly where my o2 wire is coming out of the main harness. It is wrapped in a black plastic protector. This picture is taken along the firewall from the driver side, so the top of the picture is the passenger side, the bottom is the driver’s side and as you can see the top left is the upper part of that black wire harness box. The fattest harness coming from the box is what you need to slit the side of and separate the 02 wire from. My o2 wire is running out of that harness down toward the middle of the picture.

The following picture is of one of my secondary sensors. I have the antifouler setup and as of about 75 miles no CEL. This secondary is the one with a green plug and red wire cover. The wire running above it is actually the other secondary which is the blue plug with a white wire cover. Secondaries have different length wires so I recommend this configuration.

Additional Info
As you can now see the y pipe outlet is not quite at 2.5″ but pretty damn close

My new wideband bung on the y-pipe.

The relocated rear header primary bung and plugged original location


![]()

Comments are closed.