

Member Credit: SrgScott
Hey guys, I had an oil leak in my upper oil pan, so decided to give you a write-up on how to remove it! I’m going to assume everyone knows how to apply liquid gasket and seals, so I will be leaving that part out. So, if you ever have to remove your upper oil pan, whether its for a simple leak, or your replacing your rear main seal (the “correct” way) then I hope this helps!
I should also warn you. The first time I did this it took me just over 7 hours. But, this being my third time, it took me 5 hours. So be ready to spend the day under your car. I know it will take each person different amounts of time depending on experience. But this just gives you an idea.
Also, I suggest you clean up your engine and engine bay really well while you are in there. I used berrymans B12 carb and throttle body cleaner. The stuff is insane. But be careful to dry it off painted surfaces, just in case
Tools needed:
1/4″ Ratchet
Extension
Breaker Bar
Universal Joint (Swivel Head)
10mm Socket
12mm Socket (Shallow & Deep)
14mm Socket (Shallow & Deep)
17mm Socket
13mm Wrench
17mm Wrench
Gasket Scraper
Flat Head Screwdriver
Rubber Mallet (May not be needed, I did need one)

Now on to the process!
Step 1: Remove the ground cable from your battery, safety first!
 Step 2: Drain Engine oil (Mine was a 13mm Plug, however, yours may be 14mm or another, just try wrenches till you find the right one for you), and remove oil filter.
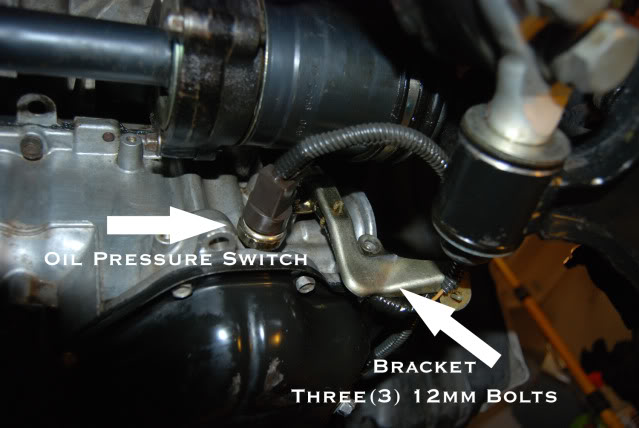
Step 3: Remove both CKPS sensors, three(3) 10mm bolts total, and the Oil pressure sensor(along with the little bracket that holds the wires, three(3), 12mm bolts)


Step 4: Remove the ten(10), 10mm bolts that hold up the steel oil pan. Picture only shows five, but you get the idea.
Step 5: Remove the oil strainer, two(2), 12mm bolts

Step 6: Remove the Y-Pipe, eight(8), 12mm nuts(Aparently on some other Maxs or I30s the 6 nuts at the manifold may be 14mm, again, just try them till you get your correct size). You will need your extension, universal joint, and both shallow and deep 12mm sockets here. Also, you may need some liquid wrench for the nuts, as they may be rusted on, be gentle yet firm and TAKE YOUR TIME, you don’t want to break a stud off. (Sorry, I don’t have a photo for this step, but if you need one let me know and I will get one for you!)
Step 7: Place a SUITABLEfloor jack on a SAFE location on the trans to support it for the next step. In the photo is where I placed my floor jack. You could also use an engine hoist if you want.
![]()
Step 8: Remove the eight(8) center beam bolts


Step 9: Remove your drive belt. 14mm deep socket and an extension is what I use.
Step 10: Remove the A/C Compressor, and its brackets. Six(6), 14mm bolts, and two(2) 12mm bolts.


After removing the compressor, I place it on an extra jack stand so it is not just hanging there adding stress to the lines.

Step 11: Remove the cover plate, its black and literally covers a hole that lets you inspect the timing ring. Two(2), 10mm bolts. Sorry it’s not in the photo, but you get the idea.

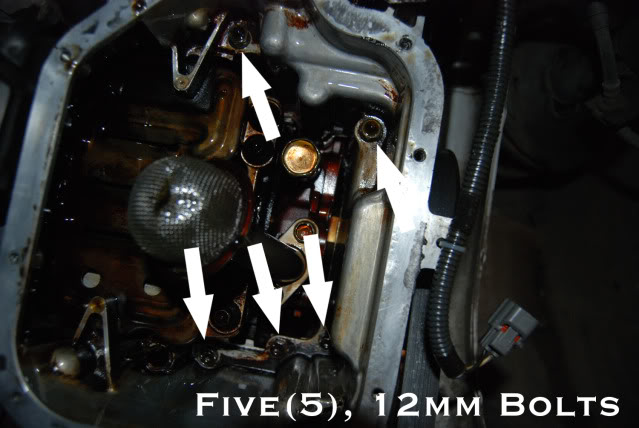
Step 12: Remove the Upper oil pan. Twelve(12), 12mm bolts(Five are inside where the oil strainer was, see photo), and then remove the four(4), 14mm tranny bolts(see photo). I’m sorry I dont have a photo of all twelve bolts the hold it up there, its just a little difficult to get a D80 under there. If you need me to get some photos of the bolts for you let me know and I’ll do my best.
The upper pan won’t come out too easily. Just be patient with it, there are a few spot that have a slight indention where you can place a flat head screw driver(or the recommended tool the dealer uses) to pry it off. Just take your time and it will be off soon.
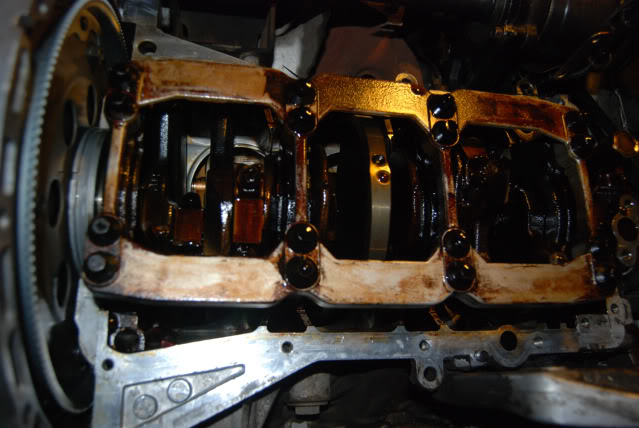
And here is the upper oil pan off of your car, congrats! I’m so proud of you…..

See the two little o-rings there? If they are still in good condition (as mine were) just clean them up and use them again, otherwise, replace them (dealer part?). Look at the bottom of your engine, you should see where they go, I just put a tiny bit of liquid gasket on them to hold them in place while I installed the upper oil pan. Be sure to scrape all of the old gasket out of those little crevasses, so that your new liquid gasket will work as intended!
And here is the view from the bottom of your engine, not the best photo, but you get the point.


![]()


Comments are closed.