

Member Credit: Bryan Tisch
I was successful in repairing my broken exhaust manifold studs. Below is my exact procedure I used. I took some video and some pictures, which I will post also. Half of the time for this procedure will be spent in removing the components in order to get to the manifold, the other half involves a delicate procedure for proper extraction of the broken. My manifold was also warped. I’m not sure if it warped and caused the stud break or if it warped after the stud broke. Whatever the case, I had to have it evened out with milling machine. A special thanks to Matt Blehm, who gave me some excellent points and direction in this process.
Before starting the procedure, it is almost essential that you spray the bolts that you can with a “liquid wrench” type lube. I would suggest making this project a two day project by letting the fluid soak over night after taking the components off and exposing the studs.
Here are the part numbers that I used. These are the studs from the turbo VG engine, which are recommended for our application. I got part of my order for Nissanparts.cc from the Internet. They have the best prices I have seen. Unfortunately, I had some delay in shipping and had to go local for my others.

1. Disconnect the negative terminal on the battery .
2. Jack the car up and support it properly, locking and blocking rear wheels .
a. If you don’t feel you can support it correctly or don’t have the equipment, take it to a professional.
3. Remove the two splash shields on each side of the cross member under the car .
a. 10 mm bolts.
4. Remove the elbow leading to the throttle body .
a. There are a total of three bolts, two on each side and one in the center that also supports the spark plug wires.
b. Pull the two rubber tubes going to the elbow.
5. Disconnect the radiator shroud .
a. The transmission cooling lines are routed at the bottom of the shroud. Pull those off.
b. There are two electrical harnesses, pull those off after labeling which one is at the top.
c. There are a total of 5 screws that hold the shroud in, three at the top and two at the bottom.
6. Remove the air conditioner belt .
a. Loosen the nut in the center of the air-conditioning belt idler pulley. This will allow the belt to loosen when you loosen the tensioner bolt.
b. Loosen the air-conditioning belt tensioner bolt, which is a 12 mm adjuster located above and to the left of the pulley. Loosen around 15 turns or enough slack to remove it, picture shown.

7. Remove the alternator belt .
a. See the step-by-step procedure I followed for replacing the alternator on my alternator page, here .
8. Remove the alternator. Again, instructions , here .
9. Remove the air conditioning compressor .
a. Now that the alternator is removed, you can remove the two lower air conditioning bolts on the bracket. I suggest loosening all four of them first.
b. Get to the top two bolts from under the hood.
c. You will not have to disconnect any hoses. Just move it out of the way. I brought mine up and rested it on top of my engine on the left side, without over-stretching any hoses.
10. Loosen the exhaust gas recirculation copper pipe from the manifold .
a. Before pulling this out of the way, try to unscrew the other end of the copper pipe. I could not get this off. You’ll need a long wrench for plenty of torque.
b. I used some considerable force to pull this out of the manifold. It is flexible material and I had no problems bending it.
c. You will need it out of the way in order to drill, particularly on the cylinder 6 chamber.
11. Move the oil dipstick tube out of the way by first taking off the two small bolts that hold it in place .
a. Again, I bent this tube out of the way, towards the radiator.
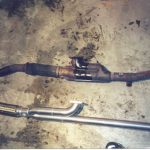
12. Remove the manifold nuts carefully and remove the manifold .
a. You may have more studs snap, be slow on un-loosening the nuts.
b. Scrape away any existing gasket. I used sand paper on both surfaces to clean them up.
At this point, you’ll want to use a straight edge of some sort in order to determine if your manifold is warped. Mine was. I’m not sure if the warp caused the stud to break or if it warped because I drove with it broken for two months. Probably the latter. I took my manifold to a machine shop, where they milled the surface with a milling machine so that it was square again. I’m not sure of the cost because I had mine done for free. I stood there and watched. It took about 30 minutes.
13. Use a Center Punch and carefully punch the center of the stud in the head .
a. This is an important step. Be sure that when you tap the punch that it’s dead center.
b. Alternatively, Matt mentioned a safer but more time consuming method that can be used, which will ensure a more accurately drilled hole. This involves taking a broken piece from a stud and drilling through it on the workbench. Next screw the pre-drilled stud in partially in the head, where a broken stud exists. Then take a drill and guide it through the stud that you pre-drilled. This will ensure a centered hole.
c. I learned that it is not so imperative that you drill perfectly into the center of the stud. I was accurate enough to successfully drill in the centers, except for one. I got into the threads on my first attempt because of a poor center punch attempt. I ended up using a simple heli-coil kit, which required a 21/64 drill bit. This is further explained at the end of this document.
14. Carefully drill into the studs .
a. Don’t be concerned with using the biggest bit you can at first. I used one that was a little less than half the size of the stud and then worked my way up a couple of sizes before using the EZ out.
b. Be sure you are steady with the drill. Do not use too much pressure.
c. You’ll be on your back in an awkward position – endurance is key.
d. You don’t have to drill in very far. The broken stud is only about .25 inches long.
15. After creating a successful hole, spray some solution into it and get your EZ outs ready .
a. Use the biggest EZ out you can for the hole you created. The bigger EZ out you have, the lesser chance of it breaking.
b. I prefer using the spiral EZ outs, but use whatever you’re comfortable with.
16. Carefully tap in your EZ out and then back the stud out, using a wrench or vice grips .
18. Once you have the studs out, insert the new ones. I doubled up with two nuts to screw them in the head .
19. Replace the manifold and all components .
If you drill improperly or drill into the threads, do not panic. I simply used a heli-coil kit, which came with individual heli-coils and a tap. I had to supply the recommended 21/64 drill bit, which I had. After inserting the heli-coil, the stud screwed perfectly into it. In fact, this stud felt more secure than the others! I believe I used the 21/64″ Drill for 5/16″ Coil Kit, but I think this one would be an exact match: M8x1.25 x 12.0mm, using a 21/64 drill bit. Here’s a picture of a heli-coil:
I used a friend’s kit, which required only one heli-coil. I believe a kit will cost about $30.
![]()

Comments are closed.