So, the Maxima was left with me this week so that I could detail it. Started Monday morning, finished late Tuesday. The car was washed, clayed, polished, washed again to get rid of any dust left from polishing, sealed, and then waxed. Overall I am pretty satisfied with the results. There are still some deeper swirls that I couldn’t get out with my current polishing setup, but the paint has much more depth and clarity now. Here are the pics, enjoy!
Calipers + torque member from a 2004 maxima through a junkyard ($50)
Black Zinc coated Dimpled Rotors + Hawk HPS pads via rotorpros ($149)
Total of 200 spent
The first step is to really clean the calipers.. they were filthy!
Before: After:
Then sand the hell out of it and mask everything off for paint:
I used enamel based spray paint (high heat as it is really meant for BBQ grills)
Rotors and pads get delivered: Look at the size difference with my OEM ones!
So jack up your car, USE JACKSTANDS, take off your wheel
At this point you want to place a drip pan under the caliper and loosen the brake line bolt (12mm)
Then remove 2 bolts (14mm) that hold the caliper on, hang the caliper to the spring using rope or something similar:
Then remove 2 more bolts (19mm) holding the torque member (these are on hella tight): Use a C-clamp and an old brake pad to push the new caliper’s piston back to allow for the new pads to sit.
Now, connect the brake line to the new caliper and hang that one by the spring.
Place the rotor on. NOTE: some rotors are directional and have curved vanes, follow the instructions!
Put on the new torque member (with those two 19mm bolts). I applied some loctite here for a secure hold.
Put in the new brake pads, apply the special anti-squeal stuff.
Put the caliper on using the two 14mm bolts.
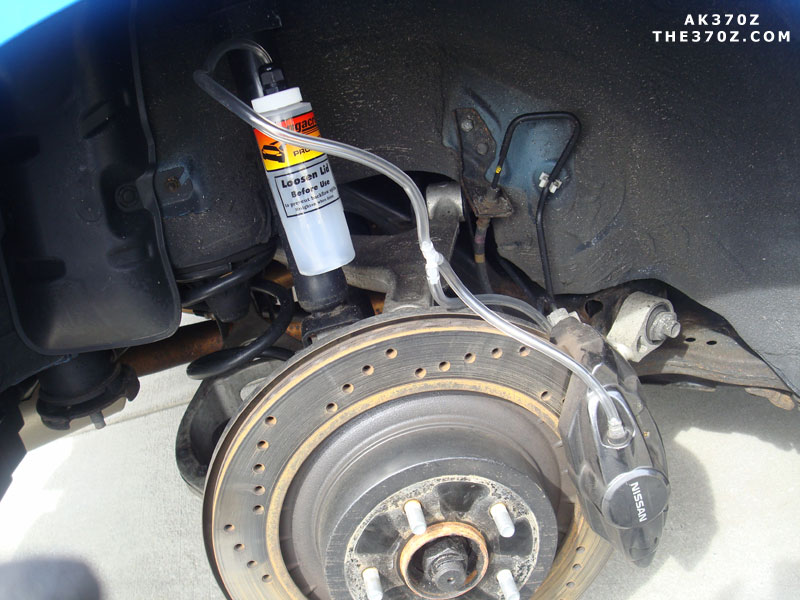
Now you need to bleed the brakes, so pick up some Dot 3 brake fluid, and have a friend help. If you don’t know how to bleed, the person outside of the car opens the bleeder to allow fluid to escape while the person in the car pumps and holds the brake to provide pressure. Keep bleeding until you don’t see any air in the line. It helps to use a tube into a water bottle filled w. some brake fluid so you can see the air bubbles come up. Remember to keep topping off the fluid so you don’t start drawing air in. It’s also a good idea to bleed a whole bunch of that nasty old fluid out..
So here are some size comparisons (remember my car is 2000 so the rotors were smaller than 5.5gens’)
Caliper (04 on left, 00 on right):
(04 on right, 00 on left) Pad size (newer ones on bottom obviously): And the best before and after lol:
Also notice my old rotor on the ground there, on the backside there is a very THIN strip where the pad was making actual contact.. I couldn’t believe how crappily the stock setup was working.
Until someone can TRULY engineer perfect Akebono brackets that bolt on to front Altima with zero modding needed, I only recommend this to people who are mechanically inclined, are willing to DIY, and go through some trial and error and use your intuition. Z1 motorsports 300ZX Z32 to Akebono adapters totally work but only for the DIY-enthusiast willing to modify them and spend some hours in the garage. Caliper lugs have to be shortened 6.85 mm to almost flush with the bracket. Also sleeving 14 mm bolt hole for 12 mm bracket bolts. Plus grinding a recess in the bracket for CV joint clearance.
Z1 Motorsports Akebono Front Brake Bracket Kit (300ZX)
Description: The Z1 Motorsports Akebono Front Brake Brackets are intended to mount the Sport model, Akebono Brake Calipers from the ’09+ Nissan 370Z or ’08+ Infiniti G37 Sport onto your 300ZX.
Each Z1 Akebono Brake Bracket Kit includes two black, hard anodized aluminum front brackets and all necessary hardware to properly install the calipers onto your ’90-’96 Nissan 300ZX. Designed and tested extensively in house, these are the best brackets on the market with the most even pad sweep. Our unique single piece design also makes installation a breeze. In addition, the one piece bracket design also means our brackets are more rigid than other pieced together kits on the market. These brackets do not require any additional machining or modification of the caliper itself in order to complete the installation.
Installation & Write-up
Rear is perfect install on knuckle with NO ADAPTER needed. No fuss no muss. You need the rear 370Z akebono calipers, rear 370Z rotors (I got Centric 120.42101 blanks), rear 370Z pads (I got Carbotech 1521 pads), Altima Stainless Steel Lines and you must specify the Akebono banjo bolts for these lines!
Perfectly centered, no shims necessary.
All 4 brackets were spaced for rear. Returned them and bought the Z1 adapters.
Z1 300ZX Z32 to akebono adapters. Quality 1 piece design. Altima front mount is 14mm and 300ZX is 12mm so some modding will be needed.
Re-drilling and tapping from 12 mm to 14 mm requires precision fixturing for diameter control as well as perpendicularly to existing holes, something I can’t do at home. Therefore I’ll sleeve the knuckle lugs with 1 mm shim stock coiled into a split bushing to eliminate any slop when mounting the adapters with 12 mm.
Axial positioning of calipers is outward approximately 1/2 inch. The alignment would probably be right on if the adapter thickness positioned calipers at the original lug surface. I suspect the 300ZX knuckle had a different offset.
Caliper lugs have to be shortened 6.85 mm to almost flush with bracket. Some other people who had issues with mounting 300zx brackets said they needed a few washers to space out the bracket from the knuckle and shave the top crevice of the caliper for the rotor to spin free A few washers adds up to what I did. I ended up using two slightly thicker OEM caliper bolt washers (6.85 mm total) and it seems to provide perfect centering
Sleeving 14 mm bolt hole for 12 mm bracket bolts. Plus grinding a recess in bracket for CV joint clearance. Should fit even better
At the local fastener store and got automotive grade revised bolts (didn’t have the proper lengths on hand)
Some pad overhang is negligible and at the pad is at the OD where it belongs. Swept area doesn’t cover full rotor radial which must be by design and still has massive capacity that will not get hot unless you’re at the track.
For front rotors, I am using are Lancer EVO X Centric High Carbon rotors which are 13.78 inches instead of 370Z’s 14 inch. There was controversy that 370Z rotors wouldn’t fit so I got the Mitsubishi ones. Doesn’t matter, they are same thickness and everything just 0.2 inches less diameter – never gonna make a difference.
Finally got the fronts centered and mounted. Had a problem with bracket interfering with caliper reinforcing rib when torquing down final assembly and had to disassemble and do more minor bracket mods.
Decided to install my Evo 9 Brembo BBK today on my 2002 Nissan Maxima. It cost me around $500 bucks to do the full setup. The brackets fit great and have full rotor-to-pad coverage.
Part’s Used:
2003-2007 Mitsubishi Evolution 8 / 9 Brembo Front Brake Calipers
Part Number for OEM Left/Driver Front: 4605A435
Part Number for OEM Right/Passenger Front: 4605A436
CGR Adapters (Paid $140)
Make sure to use Loctite on all bolts. I personally used Loctite Threadlocker Blue 242.
Important Note: Original kit came with 60MM bolts. I ended up needed 65MM bolts for proper fitment and tightening.
12.6″ 6thgen Nissan Maxima Drilled/Slotted Rotors
Goodridge Stainless Steel Brake Lines
Project Mu NS 400 (PMU-PS4F906)
CGR Adapter Brackets
Brembo Calipers – 4 Piston BBK
Project Mu NS 400 Brake Pads
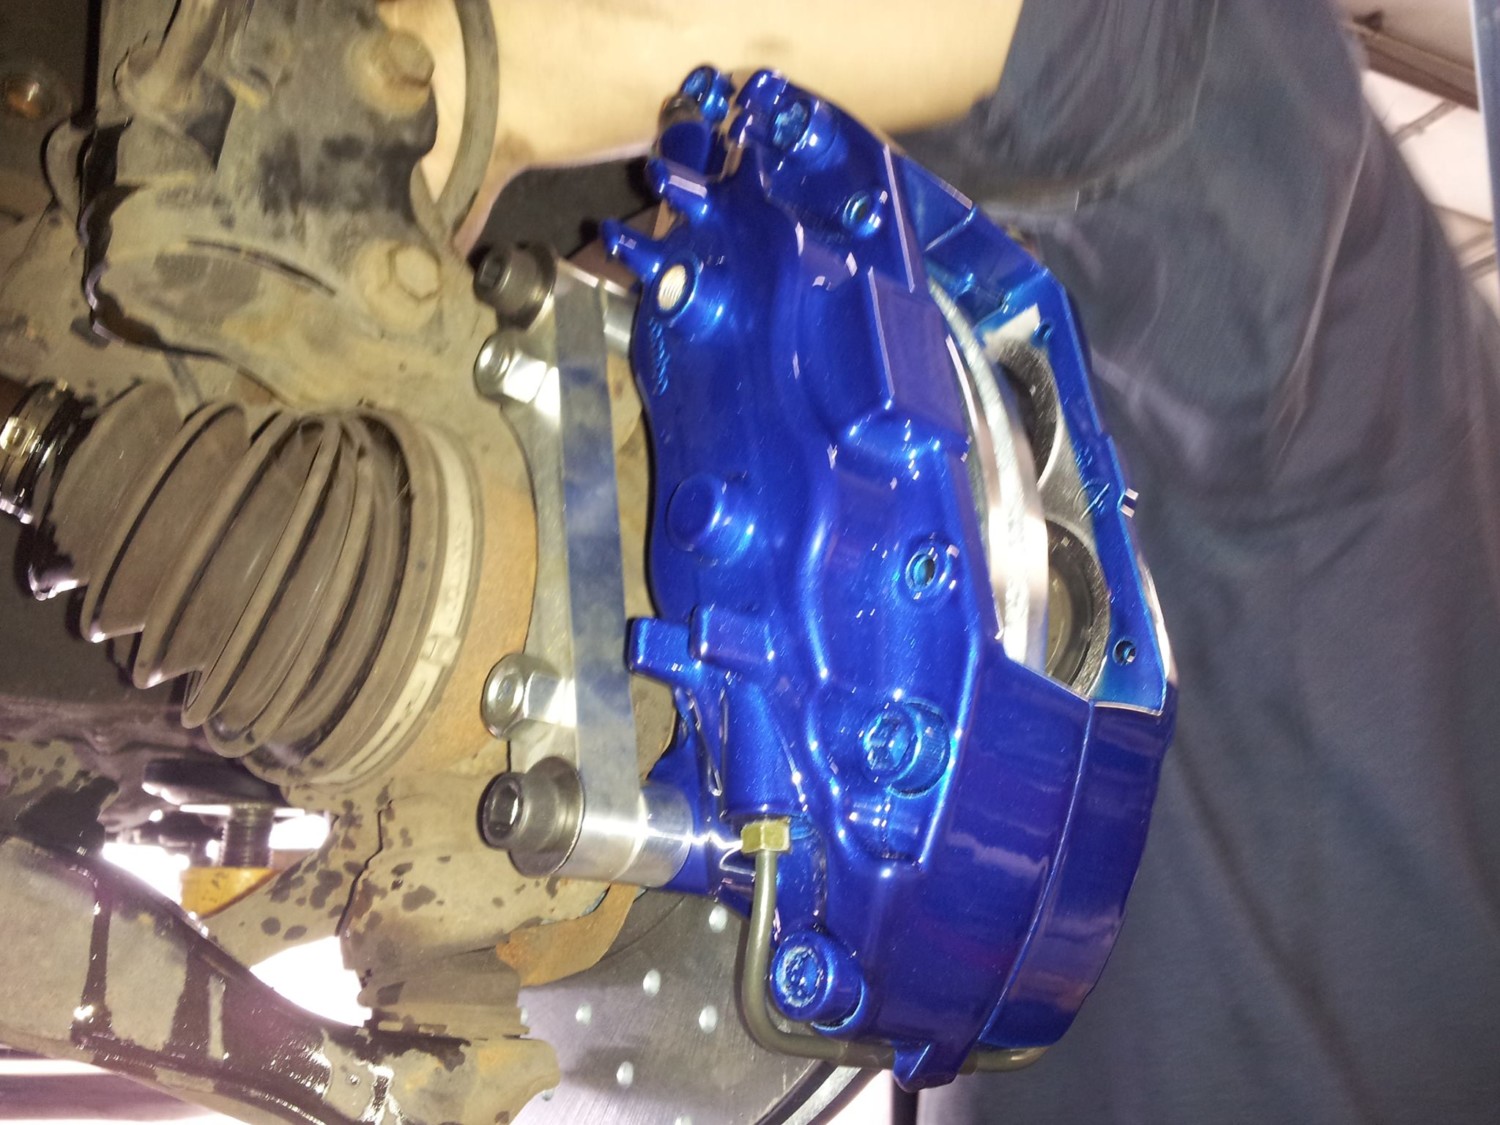
Showing how the brackets are supposed to be installed.
You need to ensure the bleeder valve sit upwards. Some people make the mistake of putting them on the wrong sides.
Additional Member Photo’s
You can see the better rotor-to-pad coverage on the Brembo’s versus the 300ZX BBK. Much better fitment.
I purchased the Akebono calipers, pads, etc. However, I just couldn’t go thru with adding that much unnecessary rotor weight to my car. And I’m talking about the Z1 “light weight” 2 piece ($1300) front and rear rotors. Even those add a ton of F/R weight because they are so large in diameter.
I decided to go my own route. I started working on a light weight solution using 350z rear Brembos and 2 piece rotors. The front will use 350z 2 piece rotors and a larger Brembo caliper from a genesis track spec.
2016 Maxima OEM
Front – 320 x 28 (22.5 lbs)
Rear – 307 x 16 (12.8 lbs)
G37/370z w/ Akebonos
Front – 355mm x 32mm (30.60 lbs)
Rear – 350mm x 20mm (20.9 lbs”)
Rront 2 piece = 21 lbs
Rear 2 piece = 16 lbs
350z w/ Brembos
Front – 324mm x 30mm (20.5 lbs)
Rear – 322mm x 22mm (17 lbs)
Front 2 piece = 15 lbs
Rear 2 piece = 13 lbs
I recently replaced the ABS Actuator on my 2004 Nissan Maxima. Since the job requires removing the brake hard-lines, you will need to bleed all of your brakes to get all the air pockets out. Easy enough right??
Well……. I bled the brakes 4-5x times and the pedal still kept going down to the floor. Literally, no pressure at all. I started to think that I didn’t tighten one of the hard-lines properly or the calipers were bad. But I didn’t notice any brake fluid leaks or issues.
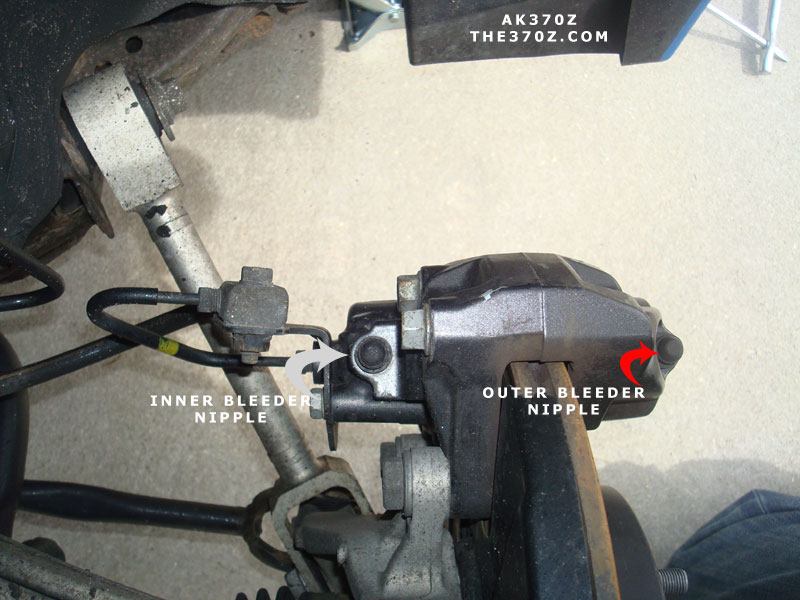
I reached out to my buddy Raul (@tuneonthego) and he asked if I bled both the inner and outer bleeder. I definitely did not do that (and totally didn’t even notice the inner valves). You are supposed to bleed the inner valve first and then the outer. I went back and did both following the standard bleeding procedure.
AND VIOLA….. brakes were solid and no longer going down to the floor. In total, you have to bleed 8 bleeder valves. Hope this helps someone who has the same issue.
Photos Courtesy of AK370z:
Inner and Outer Bleeder Valves
You can buy this nifty bleeding kit which allows you to do both bleeder valves at once. You can get itfrom Amazon for $20 bucks. I personally did it using my home-made kit, 1 valve at a time.
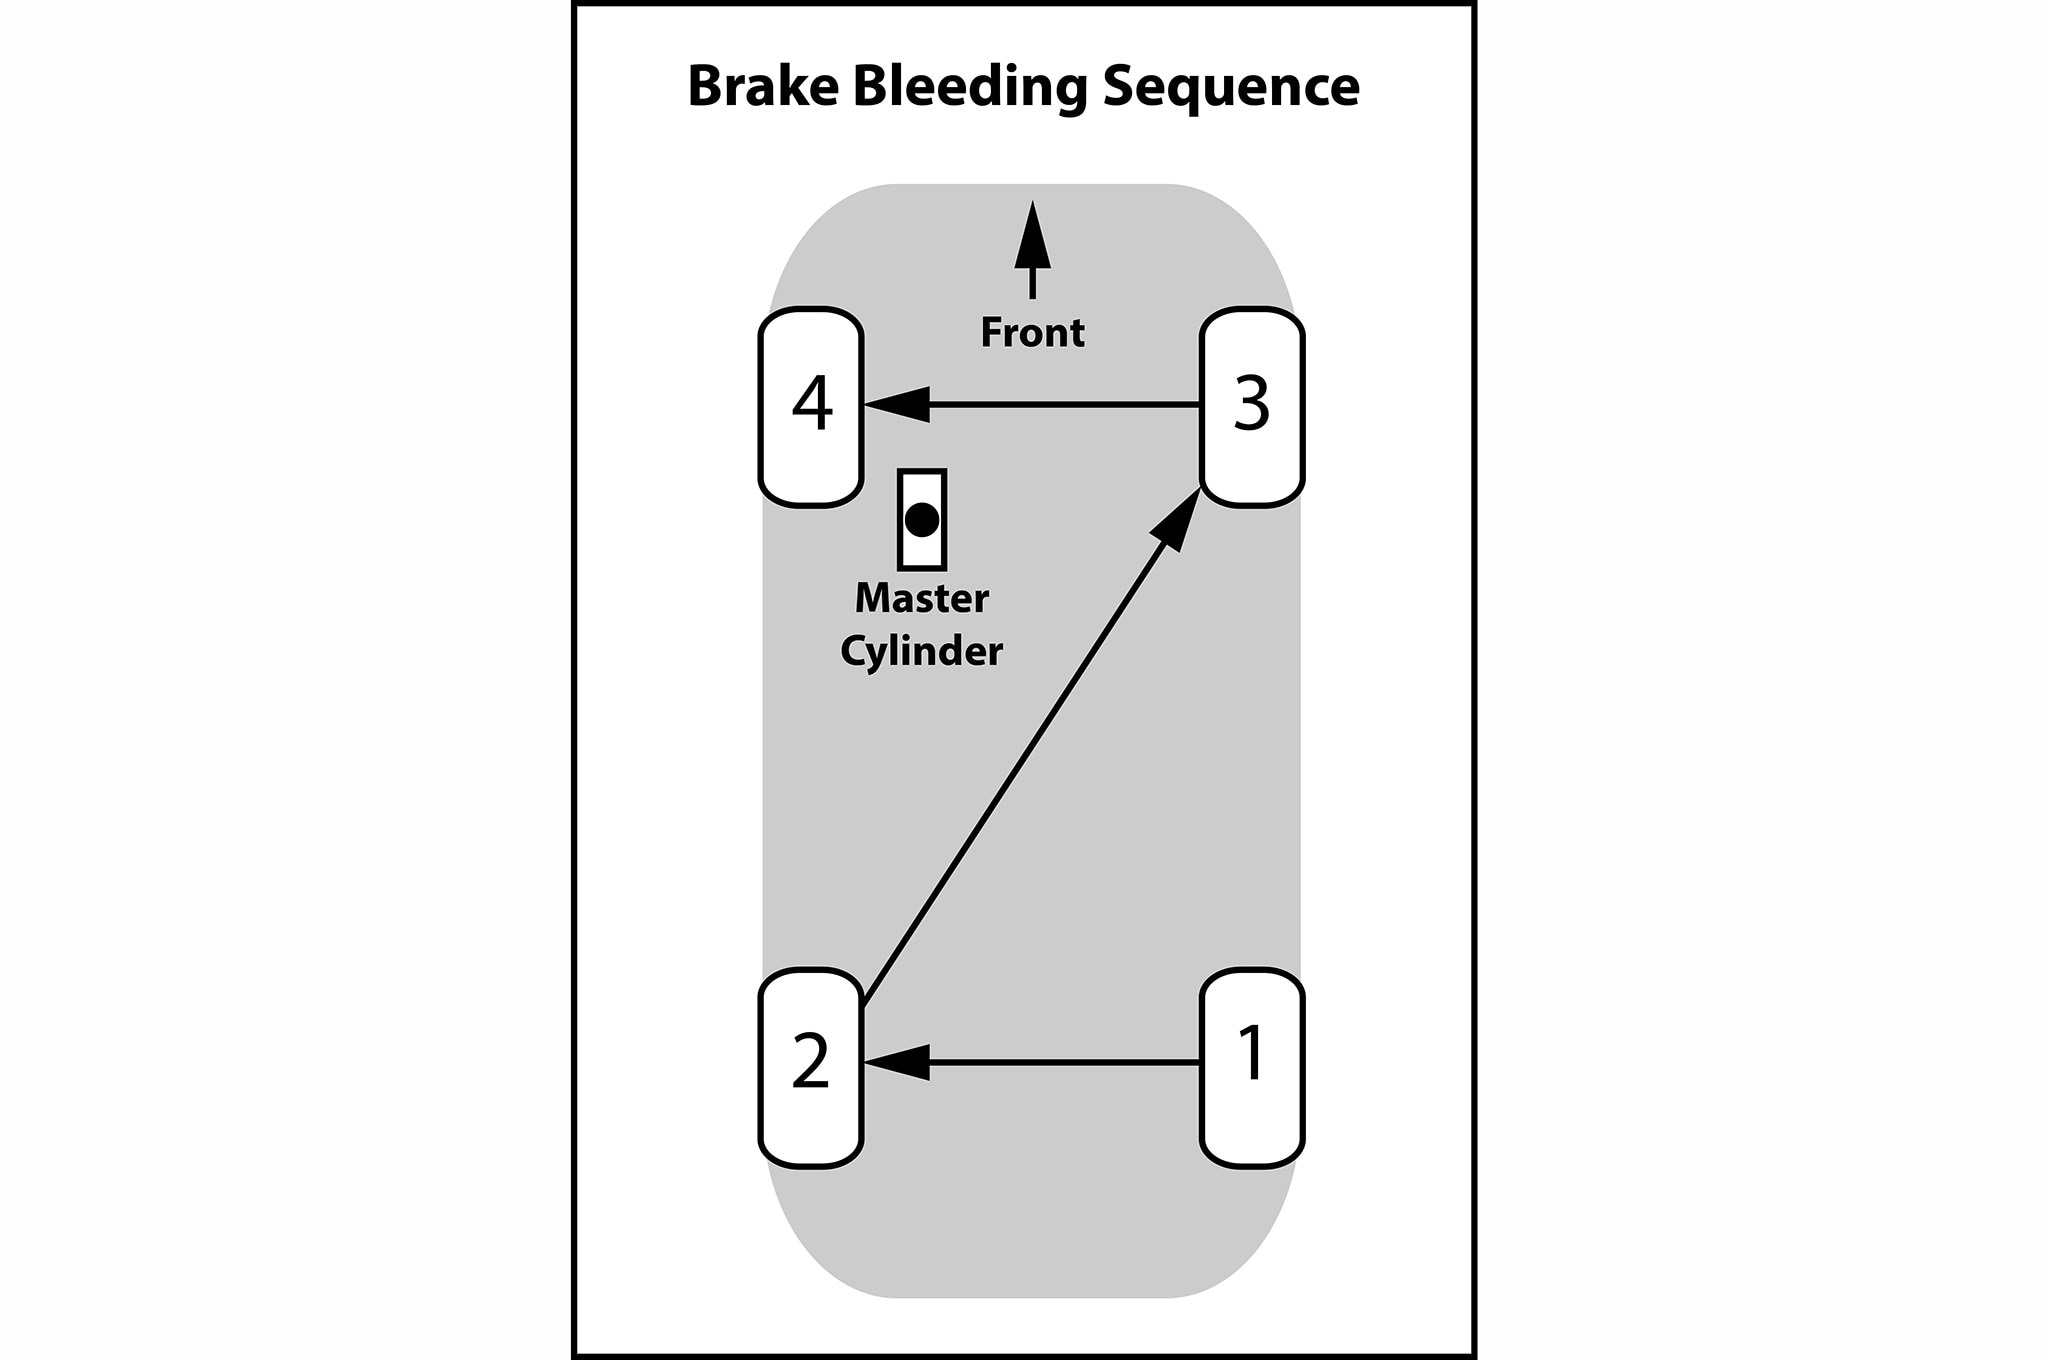
Standard Brake Bleeding Procedure Sequence
My Akebono BBK (Love these Brakes. Excuse the dirty wheels)
It was just under $1,800 shipped for the kit. Shipping was included at $125.
The options were:
Slotted Rrotors
Banjo Bolts
Red Calipers
Standard Ceramic Brake Pads
If you attempt this yourself, you assume that you have some mechanical aptitude, and already know how to bleed your brakes when you are done. Make sure you do not run out your brake fluid reservoir. Keep it topped off. Multiple fills per caliper.
Tools needed:
Jack and jack stands
Fluid Catch Tub
Small funnel, mine came from the camping section at walmart
1/4″ hose, clear, 2 feet in length. Not an absolute, but will help when you bleed brakes.
10, 12, 14, 19 wrenches, and a 21mm if you have it
12, 14, 19, 21mm sockets.
Flat head screw driver
Impact driver: Not an absolute, but will make your life easier
Rubber mallet
Angle grinder with cut-off wheel.
Paper towels
Gloves, if you like your knuckles.
1L bottle of brake fluid.
Safety glasses, or motorcycle helmet if you prefer.
I chose to complete one corner at a time, and bleed after each corner installed.
Step 1. Jack the front of the car up, place jack stands, and remove front wheels. Step 2. Remove the front caliper bolts. Use the 14mm.
Step 3. Remove the front pads.
Step 4. Tuck the caliper out of the way, don’t leave it hanging.
Step 5. remove the carrier with the 21mm. I was not able to make mine move with the wrench and some effort, so I just used the impact gun. Mine were very, very tight after 115kmiles of not being touched.
Step 6. I opted to test fit everything and make sure I wouldn’t have problems before I went any farther. Spoke design can influence fit. That is the picture I posted previously with the single lug nut
Step 7. Place the new rotor on the hub, and use one or two lug nuts to hold it in place. Depending on your lug nuts, you may need some washers. You don’t have to do this but it makes life easier.
Step 8. Now you need to add brake pads to your new caliper. Squeal tab goes on the inside. Then you add the spring plate, followed by slide pins. Use the cotter pins to hold it together. The flat head screw driver will help you here.
Step 9. Now you want to bolt this to the knuckle. The new brakes are the caliper and carrier. YOU MAY RUN INTO AN ISSUE AT THIS POINT.
ONE OF MY CALIPERS NEEDED A SLIGHT TOUCH WITH A GRINDER. One of the gussets was slightly oversized during molding, and was hitting the knuckle. I had to remove about 1mm of material in a small section where it was hitting. It would not bolt flat otherwise. One of my calipers self corrected when I bolted it down, and was not a problem, the other needed my help. Make sure it is correct. You could also remove the material from the knuckle if you dont want to scratch your paint.
Step 10. Now we get to make more of a mess. Use the 10mm wrench to remove the bleeder screw from the outside, and open the screw on the inside.
Use the small funnel to fill the caliper. Place the catch tub under the brakes. It does not take much, so go slowly. Once full, replace and close the bleeders. Use the paper towels to wipe up spills.
Step 11. Now we need to swap the brake line. Get the new, shorter banjo bolt ready. Use the 12mm to remove the brake line. You will need the 14mm for the new one. Quickly remove old bolt, slide on new bolt, then screw it into the back of the new caliper. Remember, the order is: bolt, crush washer, brake line, crush washer, caliper.
Step 12. Bleed the brakes for that corner. It will take a bit of time and a few repetitions to get fluid in and air out. Watch the fluid level in your reservoir so you don’t run it out. Use the plastic tube now. Slide it over the bleeder, then you can guide the fluid to the catch pan, and also see if it is air or fluid being pushed out. I recommend outside, inside, then verify outside when bleeding.
Step 13. Complete the same steps on the other side to complete the front swap.
It is fairly simple, and took about 1 hour to complete. If you are inexperienced, plan for 3 hours.
Step 14. Put your front wheels back on, lower the front, raise the rear of the car, and remove the rear wheels.
Step 15. Now we will take care of the rear brakes. Remove the rear caliper and pads. Use the 14mm for the caliper bolts. Use the 19mm for the carrier bolts. The bottom bolts both require a wrench, not socket, because of the tight space. Again, tuck the caliper somewhere out of the way.
You may need the hammer or mallet to get the disks off. Tape around the hat, and on the face of the rotor.
Step 16. This is more involved than the fronts because of the dust shield. You will need your cutoff wheel now.
If you optioned for factory dust shields, you will need to do substantially more work, and I won’t describe the process of removing the parking brake shoes and hub to R&R the shield. You need to remove the protruding ring of the dust shield as well as make room for the new caliper.
It makes a lot of sparks. Wear safety glasses. I do not recommend wearing safety glasses and a hat, as it can direct sparks behind the glasses if they are not well fitting. If wearing a hat, turn it around. My friend was with me, and wore his motorcycle helmet while cutting the other side.
When I showered afterward, there was a substantial amount of metal in my limited amount of hair.
Comparison:
Step 17. Install the pads into the caliper. Again, squeal tab towards the inside. Then place the new rotor on, and bolt on the caliper.
Step 18. Follow the same procedure as the fronts to fill the calipers with fluid, swap the brake line, and bleed.
Step 19. Put the wheels back on, torque everything down, and test the brakes.
Make sure you don’t have any weird noises, vibrations, etc. Bedding, or seating the brakes will vary based on which pads you choose.
Impressions:
WOW, Wow, wow. The brakes bite earlier than before, with a more solid pedal feel. When you really give the brake pedal some pressure, it will quickly lock your seat belt and try to give passengers whip-lash. There is a slight decrease in acceleration. THESE BRAKES ARE 37 POUNDS HEAVIER THAN THE STOCK OPTION. That is ~12lbs each per front, and ~6lbs each in the rear more weight.
If you can afford it, or if you have had them long enough to need replacement, I HIGHLY recommend the light two-piece rotors. You will only add 2lbs to the front and 1lb to the rear with this $900 option.
On slotted rotors:
The direction does not matter for these disks. They are manufactured with straight veins on the inside, or omnidirectional. It is up to you if you want the veins to go forward or backward.
I have heard repeatedly that spinning opposite of wheel travel can cause more noise, so I opted for spinning with direction of travel.
When they are on the car, you really loose the sense of scale. This is what I show people to give them an idea of size:


 Installation on 5thgen Maxima")
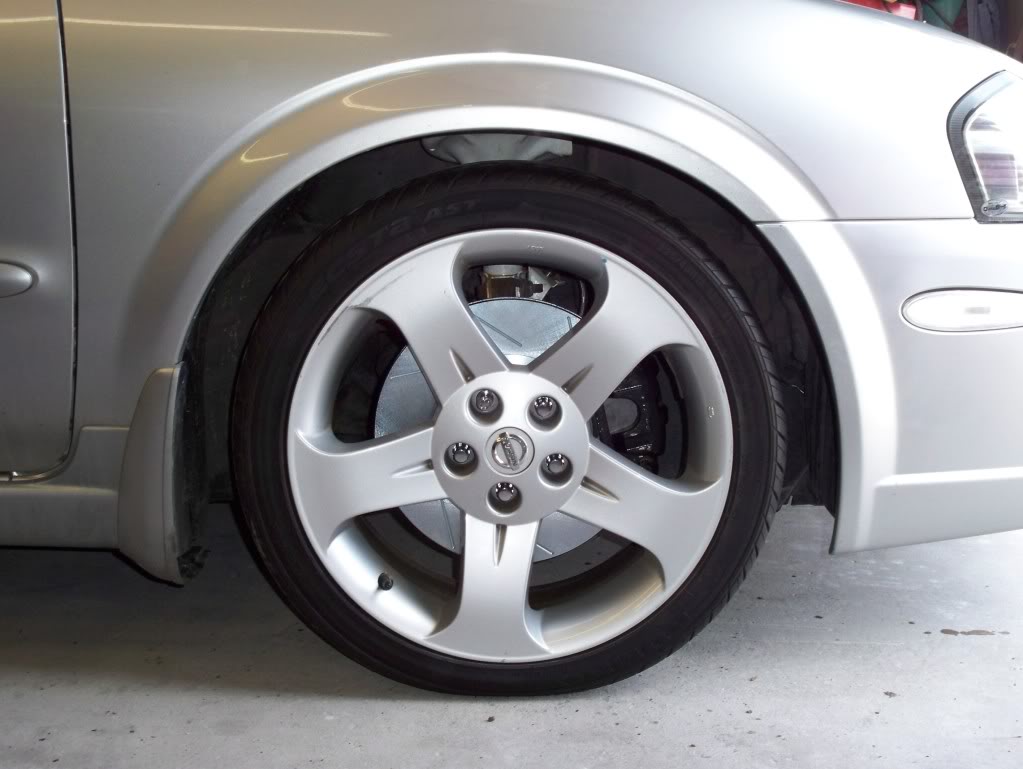
 After:


 Look at the size difference with my OEM ones!

 Use a C-clamp and an old brake pad to push the new caliper’s piston back to allow for the new pads to sit.


 Pad size (newer ones on bottom obviously):
 And the best before and after lol:
 Also notice my old rotor on the ground there, on the backside there is a very THIN strip where the pad was making actual contact.. I couldn’t believe how crappily the stock setup was working.
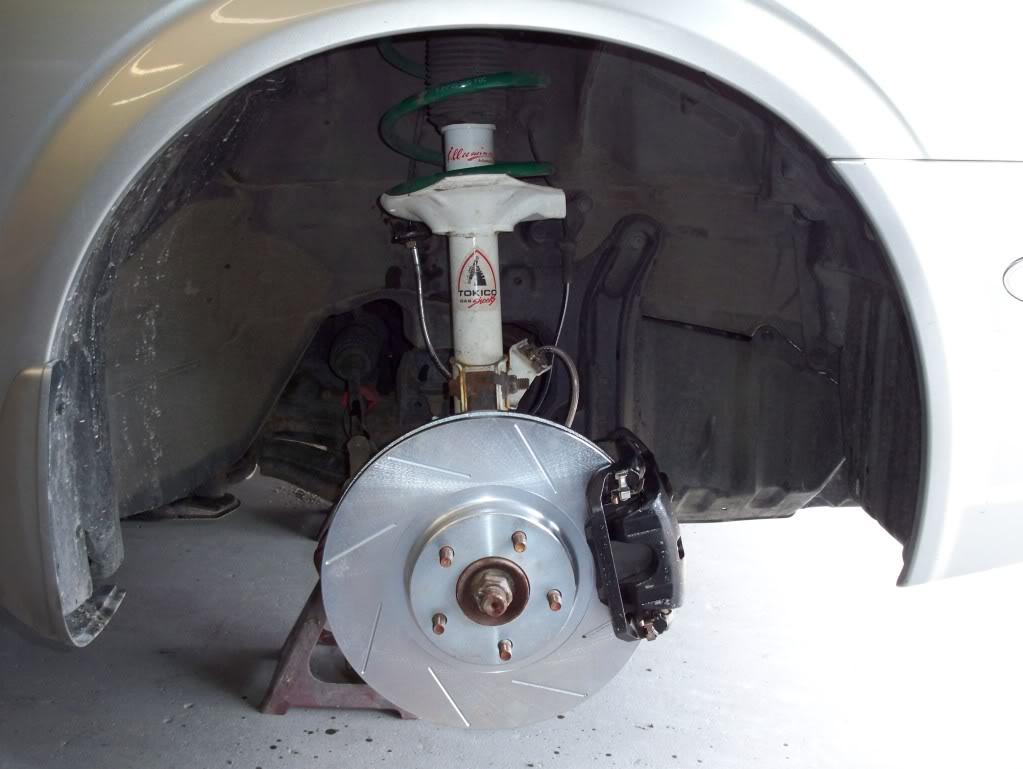


")


")


")


 Step 2. Remove the front caliper bolts. Use the 14mm.


