Community Member Credit: Eddy
This is the wiring for the rear Elite Package shade on the 2004-2008 Nissan Maxima.
| Color Plug | Color Harness | Purpose |
| Red/Green | Red | Power + |
| Black | White | Up – |
| Green/Black | Green | Down – |
| Red/Blue | Black | Ground – |


![]()
Community Member Credit: Eddy
This is the wiring for the rear Elite Package shade on the 2004-2008 Nissan Maxima.
| Color Plug | Color Harness | Purpose |
| Red/Green | Red | Power + |
| Black | White | Up – |
| Green/Black | Green | Down – |
| Red/Blue | Black | Ground – |


![]()
Community Member Credit: vr4z06gt
DISCLAIMER: I am not responsible if you screw this up. It really really really hard to do, but it’s your own fault if you do. This is just for reference.
I decided to change the filter in the driver’s seat this weekend. It is recommended in the owner’s manual that it be replaced every 15K and at the price the dealer wanted, more on that in a minute, it seems absurd.
My local dealer quoted me 2 hours of labor based upon the instructions from the factory. At $100/hr this becomes a $300 repair job. Following this guide: $25ish or possibly free and less than 30 seconds of time.
Here is a diagram of the bottom of the seat:

The area where the filter is located is item 4. It is the round hole, this is the entrance to the blower motor and where the filter goes (red circle).

This job is actually very very simple, if it takes longer than 30 seconds you are doing something wrong.
AFTER I went through the effort of disassembling the seat back and looking around I realized how easy this job is.
So the next thing I noticed. This is just a synthetic fiber mesh. There is no paper involved. So I just washed mine with dawn and let it air dry for a few minutes. This cleaned it 90% of the way, it was pretty gross to start with. Here is the after, sorry no before pics:
Front (fuzzy side):

Back (Rigid side):

When inserting make sure that you put the rigid side up. The fuzzy side should be facing the floor of the car.
Now the next thing I got to thinking, the price. The Nissan dealer quoted $96.XX+tax and no one seems to have heard of them or for that matter have them in stock. After seeing the part if I had paid their price I would have been EXTREMELY pissed. I found a local Infiniti dealer who had one in stock for the same price but there is a much better solution.
My dad’s 2011 F-250 King Ranch has air-conditioned seats on both sides. He has yet to replace the filter but he knows it can be done in less than a minute. So we took his filter out, and sure enough, IT IS EXACTLY THE SAME! My guess is there is a patent on this and every manufacturer leases that patent, which could explain why there are no aftermarket parts available from any of the local parts stores or even rock auto. But the local ford dealer only wants $42 for them…still, there is a better deal to be had. There is an online Parts Guy Ed who has them for $22.21 + S/H depending on the situation. There might be other places that have them for less, if you find them post them for others.
The bottom line is, don’t pay the inflated Nissan prices. It is exactly the same part, I know this is hard to believe but it is true. I put my dad’s part into my driver’s seat blower motor, and mine into his and there were no fitment issues whatsoever.
![]()
Community Member Credit: vr4z06gt
The usual disclaimer, I am sure I left things out, I am not a certified mechanic, this is for instructional purposes only, if you screw it up it’s not my fault. Follow this at your own risk. I recommend (I didn’t however), that you disconnect the battery to avoid setting off the airbags.
I tried my best to remember which size each bolt was. They all were either 13mm or 10mm. Deep sockets will be needed in addition to regular ones. Just have these on hand to get to each bolt when needed. You will also need a flat head screwdriver and a socket wrench. I recommend cleaning supplies while you’re in there to get rid of any hard-to-reach grime.
The first step is seat bottom removal. There are two latches that secure this on the lower front portions of the seat bottom in the middle of the left and right seats. Pull forward on them and the seat front will pop up. Then, while lifting slightly upward, pull forward and the seat bottom will come out. These latches are here:

Next step is to remove the rear seat back. There are two 13mm bolts and a 13mm nut that hold this down. It is difficult to get a wrench to spin for more than a few inches without an extension, so I recommend one. The bolt locations are here:

When the bolts are out you will need to lift the seat upwards. There are three mounting locations where a wire drops into the hanger. Image is here:

I recommend having a friend help you get this out. There is a bunch of metal hanging off the back that will damage your interior or door jamb paint if you are not careful… I wish I knew this, I put a nice gouge in the jamb paint.
The next step is C-Pillar trim removal. There is one bolt for each piece located behind the SRS AIRBAG tab. Use a flat object, like a flathead screw driver and carefully pry it out. It should just pop out as there is nothing really holding it in. Then using a 10mm deep socket, remove the bolt. The rest is held in with push pins and slides into the rear of the deck liner. In the front pull towards the middle of the car until you hear a pop. Then slide the trim piece toward the front of the car and the trim should come out with little effort. Then repeat on the other side.


Finally you can remove the deck trim. There are 7 yellow push pins. Just stick your hand in there and carefully separate them working from one side to the other. I have a premium package so I have the rear sunshade. There are 8 Velcro style grips that secure this to the rear of the deck liner. I noticed one of mine stayed on the sunshade bracket and came off of the deck liner. I recommend that you put it back on the deck liner as it will make reassembly much easier. Once you have popped the pins off pull forward firmly but gently and it should just slide out (the Velcro will give way).

While I was in there I figured I would remove the sunshade to eliminate that as my possible rattle source. There are 4-10mm bolts that hold this in, one on each end and two in the middle (front side). I have a few pics of these as it was awkward to try and get all 4 bolt locations at once.

 Be careful with the one on the passenger side middle as it is located just under the sunshade and the socket wrench will damage it, as I did and you can see here, if you don’t put something in between the wrench and the sunshade.

I found my problem to be the telephone antenna receiver? I tried to guess what “ANT ASSY-TEL” meant. The silver bolt, orange/yellow circle, is what was slightly loose. I tightened it and it seems to have fixed the bulk of the rattle. I think the rear glass is also slightly to blame.

I took a few random shots of the rear area while I had it apart for others to look at, if interested in them. While you have all of this apart I recommend that you really clean the rear window as this is your best time to get all the edge area and all the way back. I am the second owner of the car and I think the first person really liked having their dog in there as there was hair everywhere. I scrubbed the trim, exposed metal, and seats real well and vacuumed real well to clean up as much crap as possible.


Putting it together is just the reverse and it should go back together real easy. I would estimate it should take about 0.75-1 hours with standard hand tools to take it apart and put it back together. If you have air, it should go much faster.
Things I have learned:
![]()
Community Member Credit: maximaboy12
Hey Guys so my blower would make a lil rubbing noise so I went under there and cleaned it out. And might as well make a write up for all the n00bies out there. I saw a lot of pics for the 4th gen but not 5th so might as well do this.
1. Go ahead and open the glove box and start removing these bolts.


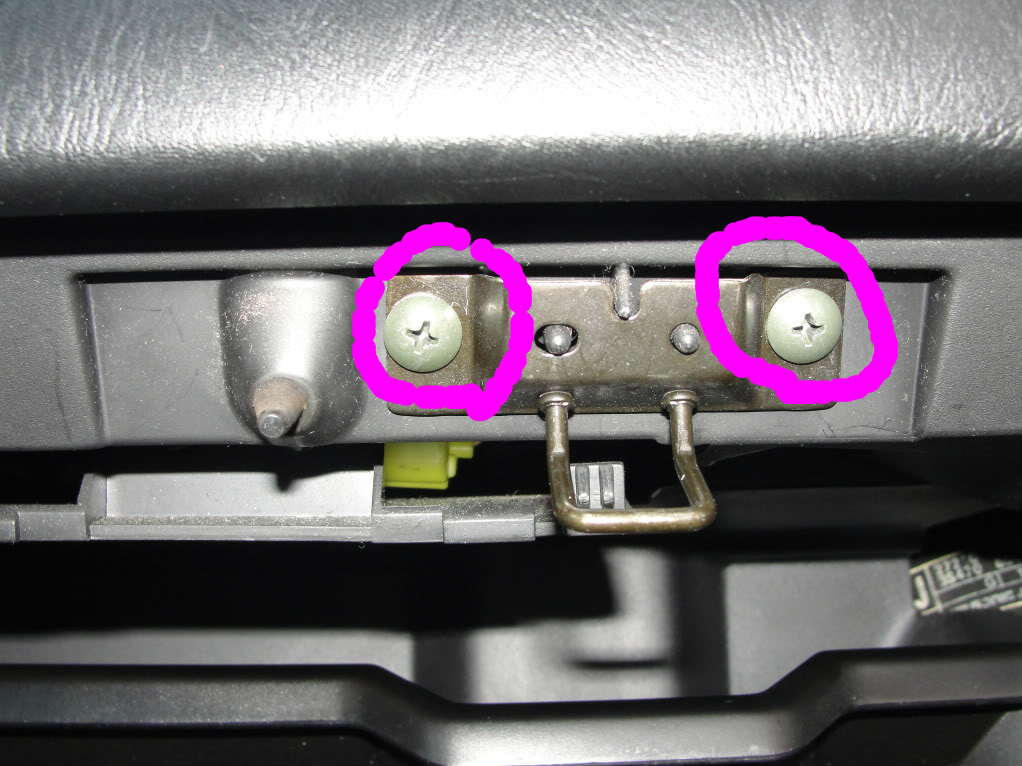
2. These bolts are in the foot well.

The next screw is under this panel. Go ahead and remove the plastic nut (pictured)


3. Now just give a gentle pull and the glove box should give way you will see two harnesses. Remove them. One is the light. It would be smarter to just move the clips on the yellow one. DONT UNPLUG THE YELLOW HARNESS THAT IS YOUR AIRBAG.

4. Now if youre looking for the blower heres what screws to remove.
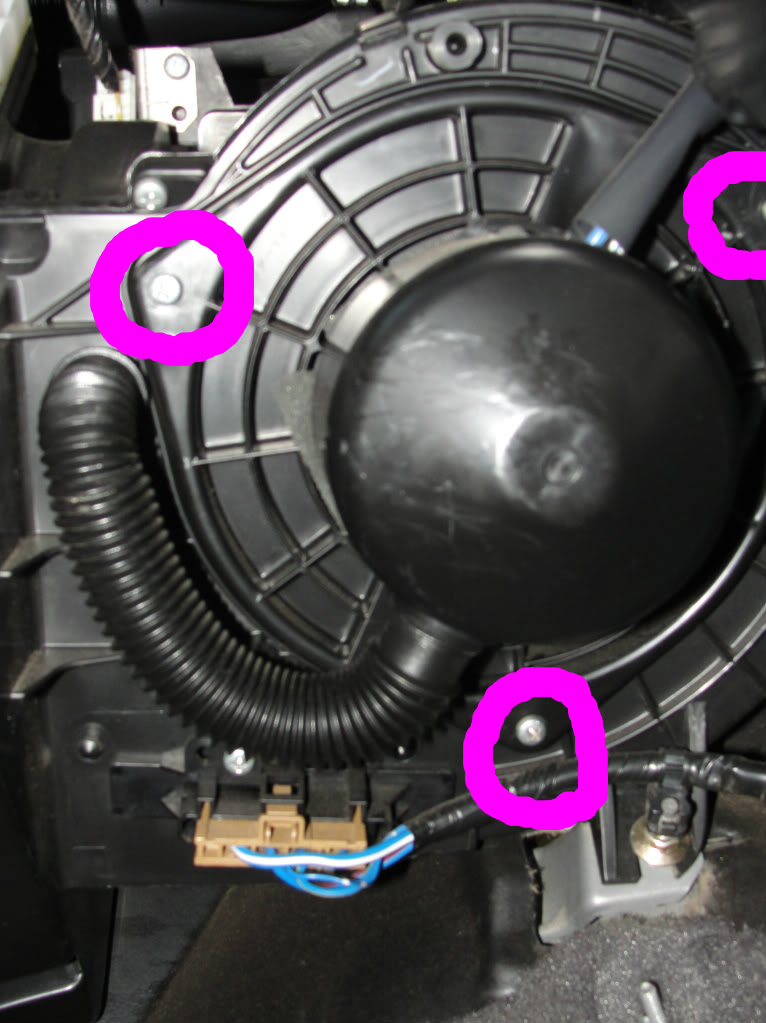
5. For the cabin air filter just remove the clip.

I hope this helps all you guys! Good luck with all your mods fixes and everything. INSTALLATION IS REVERSAL OF REMOVAL GOOD LUCK GUYS
![]()
Community Member Credit: Kevin Tetreault
Door Position: Connect the WHITE and ORANGE wire together.
It’s honestly best to install a 3-way rocker switch to make it easier.


![]()
Community Member Credit: BlackCrimsonChin
A little backstory: So I bought my 2012 SV used back in February. The car was sitting there for months waiting to be registered (thank you pandemic). During the height of summer, I was doing my routine engine start and realized the dashboard was blindingly shiny. As I do with anything I want to know more about, I poked it, and alas, the dashboard was sticky and deteriorating.
I asked around the forums, on Facebook, and my sister (who happens to have a 2014 max) if they’d experienced it, and several have but left it/didn’t know what to do. All were 2009-2012 maxes (my sister’s was fine). I did some research, and apparently this was a common issue in the 2005-2014 era for a lot of cars in hot climates. Nissan actually had a recall in Florida for Altimas with this issue, but only for those cars in that state. I called Nissan hoping they’d stand by their product, but they politely gave me the finger over the phone and said, “hopefully the glare doesn’t get you killed on the freeway.” Paraphrasing here


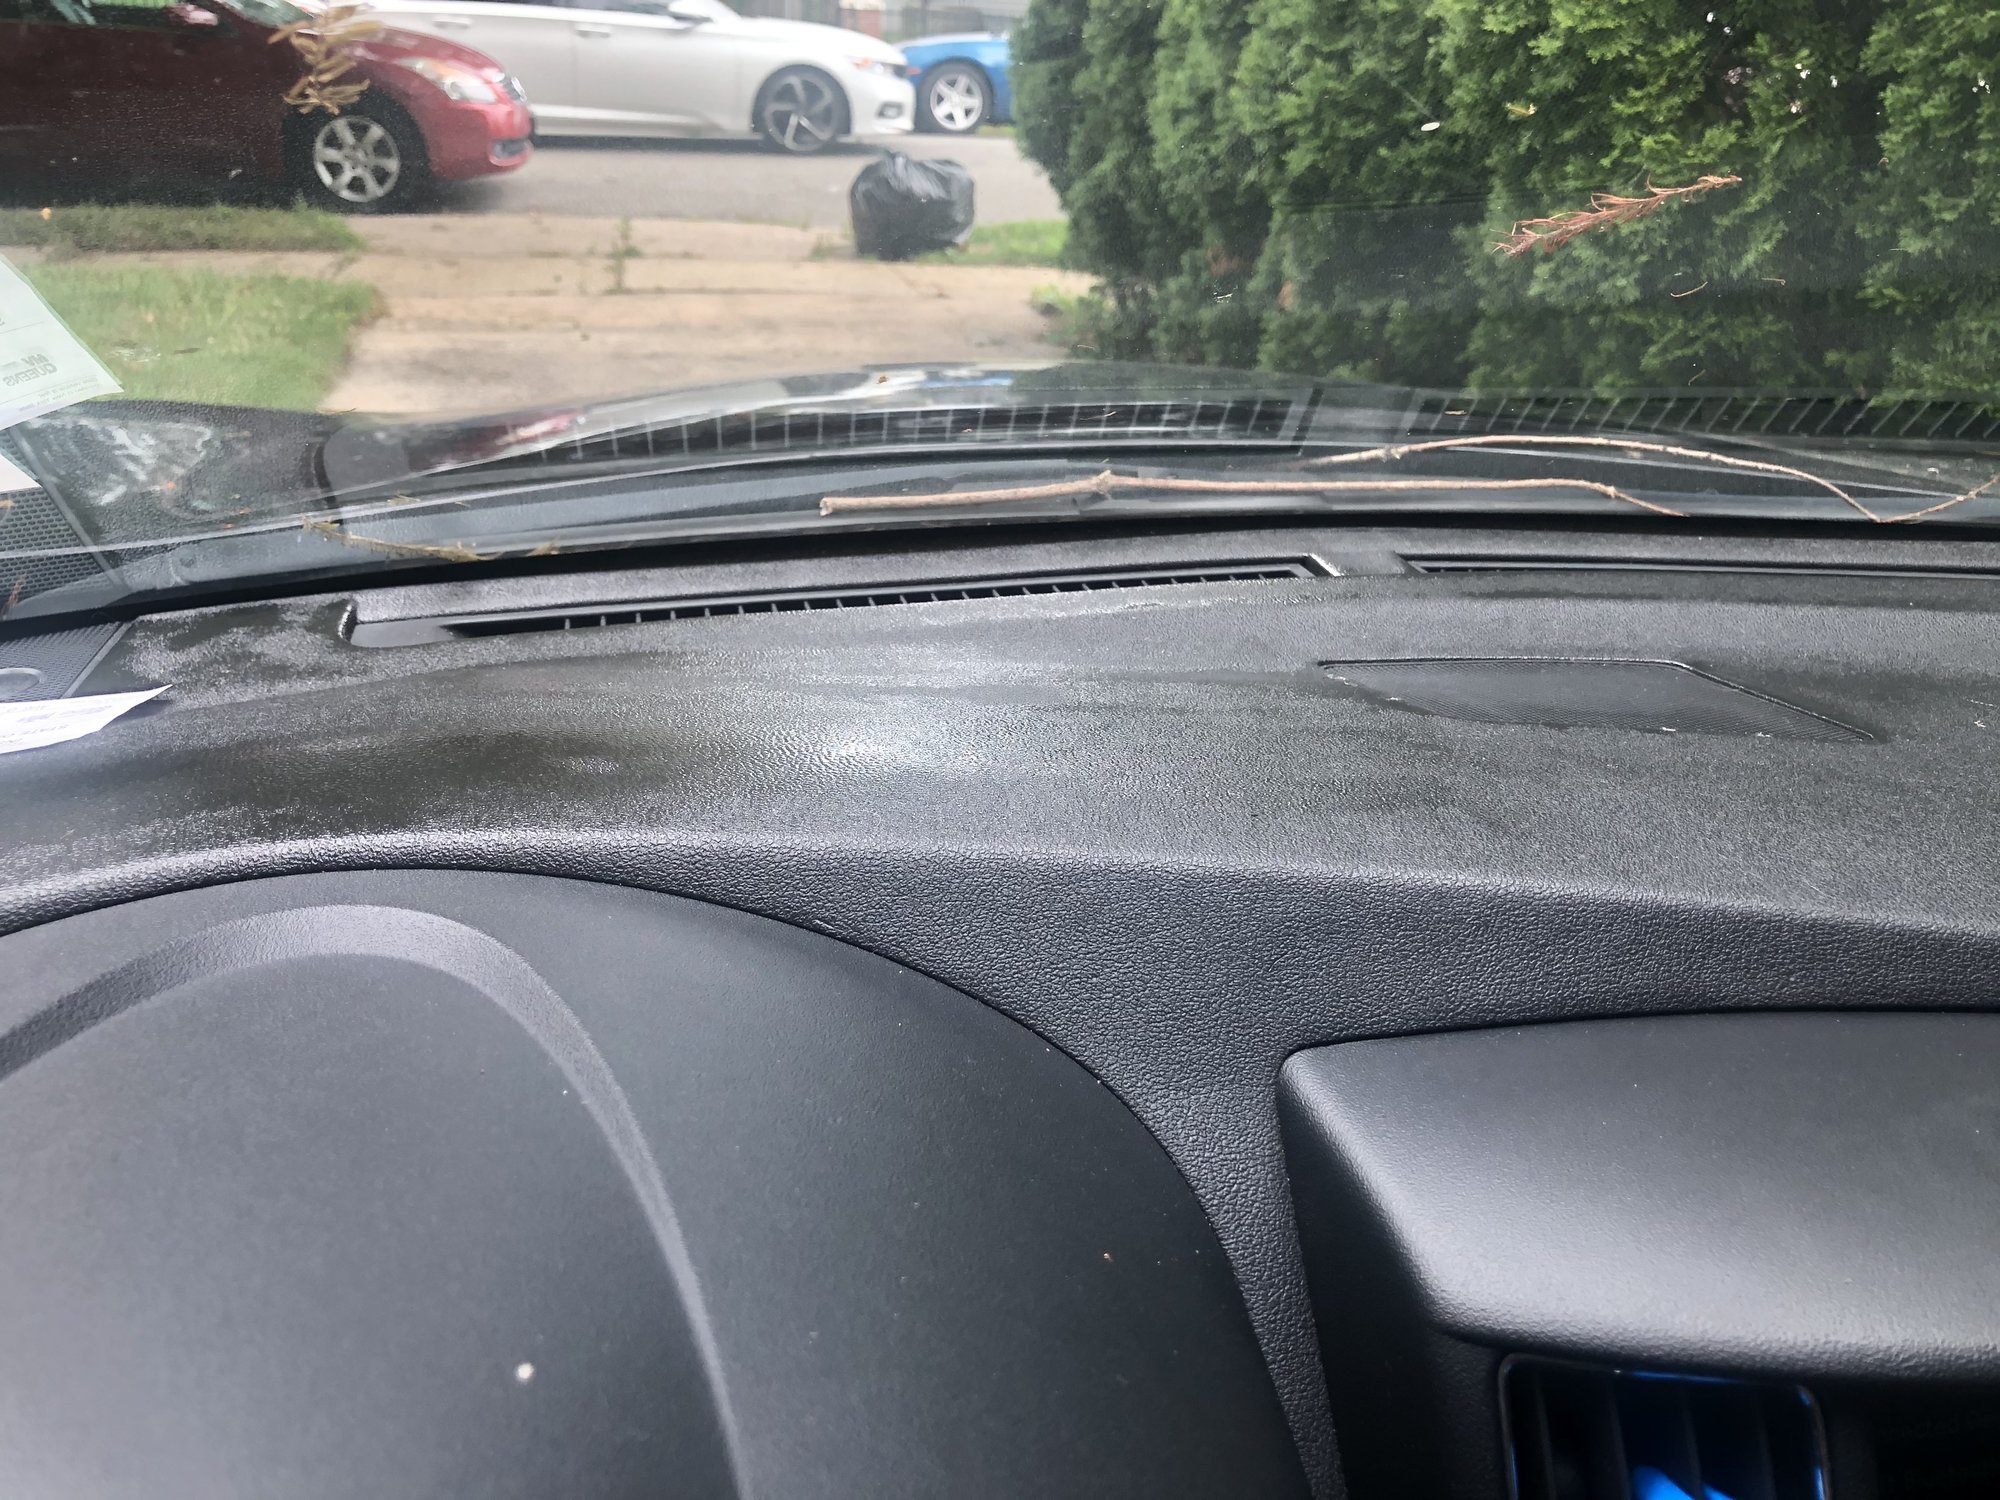
I took to Youtube, and after hours of videos of people scrubbing away their dashboards and gluing sheets of leather & vinyl to it, I found the solution I was looking for: StickyDashFix.com. According to them, the dashboard isn’t literally melting as I originally thought. Apparently there’s a chemical inside the dashboard that oozes up to the top in high heat/humidity, giving it a sticky surface. Their approach is basically to clean the surface of lint, debris, bugs, etc and coat it with a color-matched (their kits are make-specific, Nissan included) matte finish that seals up the pores the chemical surfaces through, and dull the shiny surface. Think Plasti-dip, but more care to retain the texture, color, and feel of the dash. The price seemed a little steep at first for what I was getting (the $40 product not so much, mainly the $20 shipping from Australia), but it beat my other options by far, which were put an ugly carpet on my dashboard for the same price, or replace the dash for over $1K, so I gave them a shot. A 5-week trip around the world later, I got my kit and here I am.
Anyway, enough history. Here’s how their product worked (spoiler, it worked great.):
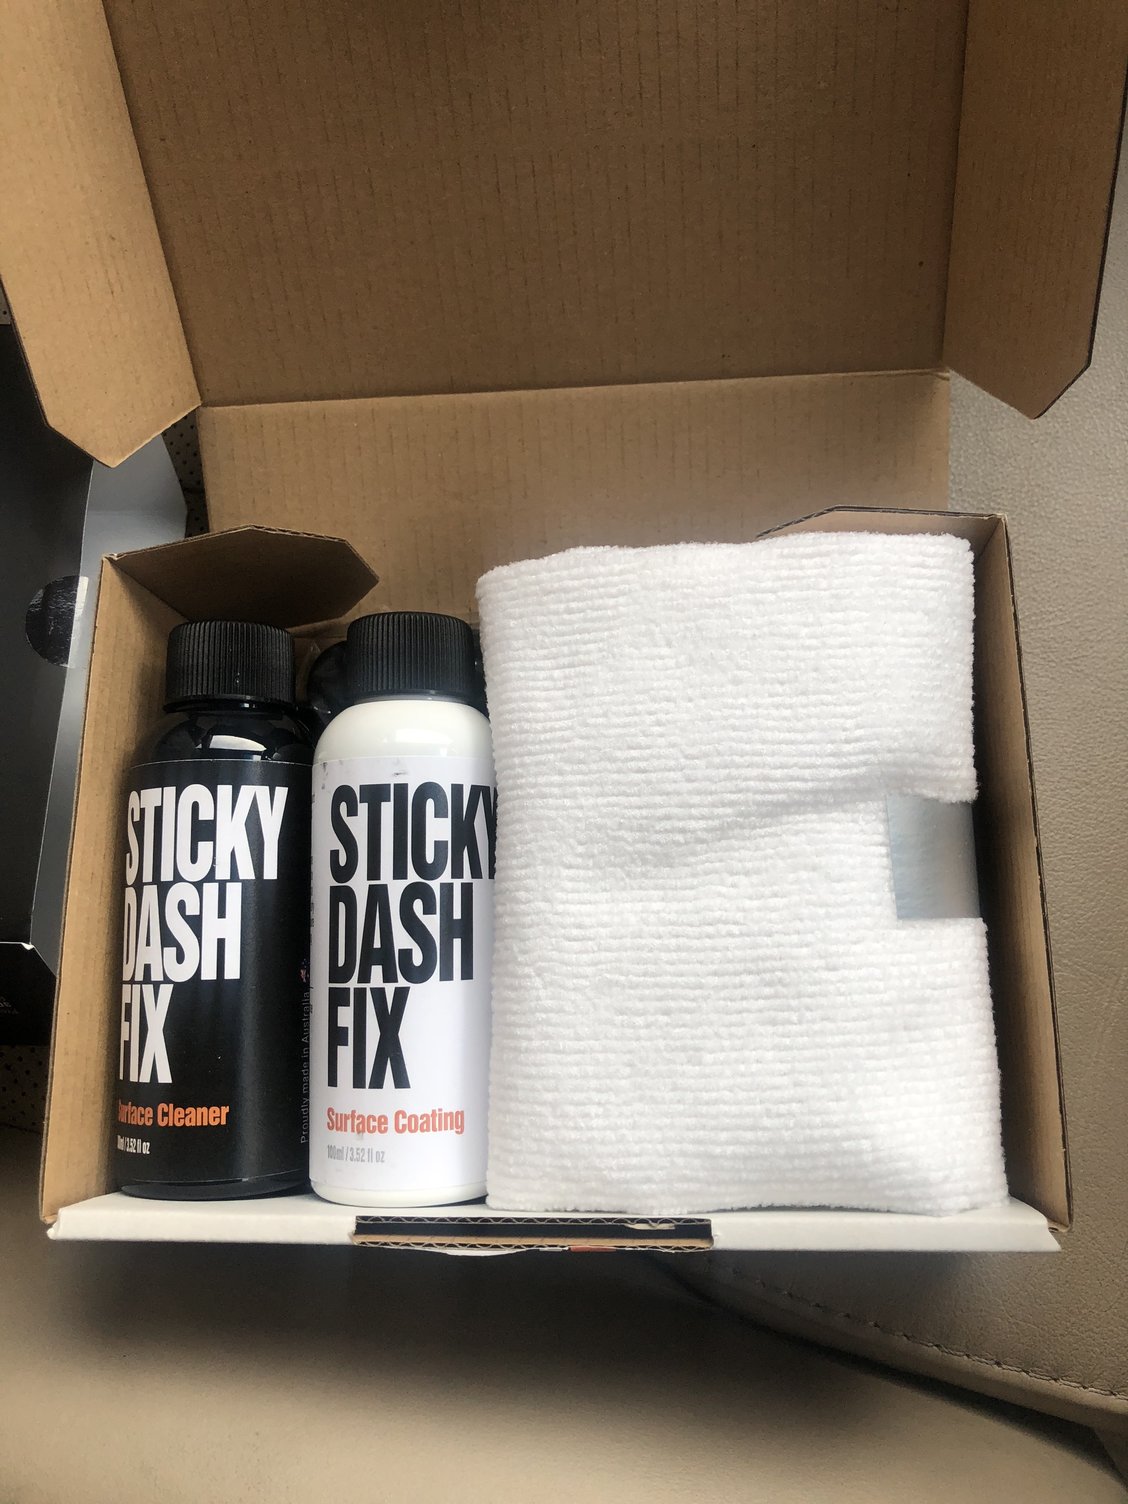
The package comes with a bottle of surface cleaner, the matte surface coating, 2 foam applicator brushes, black nitrile gloves, and a microfiber towel. They threw in an extra bottle of surface coating which was nice, but hopefully I won’t ever need it.
Some other tools I had that were helpful: A razor/cutting knife, tweezers (to remove any stubborn debris), low lint shop towels, a plastic plate to hold the coating liquid, and a flashlight. Doing it in the shade on an overcast day (or even better, indoors) is best.
Step 1, mask off any areas you don’t want charcoal-colored film on. I have the Cafe Latte interior, which was an added challenge for this klutz. I masked off my beige side pillars for obvious reasons. You could also just pop them out, but I have my dash cam wired through the passenger one and I didn’t want to have to go through that again. They say to mask off all the vents, sensors, etc, but the coating won’t adhere to those surfaces anyway, so save yourself the trouble of trying to get tape in that awkward space where the windshield meets the dashboard and just be careful. Only apply to the rubbery dashboard surfaces. If you’re worried about getting coating on the sensors (A/C & Heat sensor on the driver side, headlight sensor on the passenger side if you’re curious), it’s that circle thing on the speakers(?) on either side, so you’ll really have to try to mess that up.

Step 2, clean the surface. Luckily my dash wasn’t too dirty, save some dust here and there, so I probably could’ve even skipped this step. Their cleaner is made to lubricate the surface so it’s less sticky and you can (lightly) brush off the now wet debris. They recommend spraying the cleaner on the microfiber they provide, but be careful: don’t let the edge of the towel touch the sticky surface. The hem of the towel will give off lint. I did this in a few places and had to go in with the tweezers to remove the added lint. Fold the towel and wipe with a section of it without an edge to avoid being worse off than you started. I contacted them about providing or suggesting edgeless or nylon-edged towels, but obviously if you already have one, use it. For the really dirty spots, spray directly on the dash and let it sit for a minute. It’ll slightly discolor the dash, but you’re essentially painting it over in the next step so don’t worry about it.
Step 3, apply the coating. Pour some of the liquid coating on a plastic plate (or a fancy painters tray if you have one). This is common sense, but put the plate somewhere it won’t get knocked over/you won’t drop anything on it. The seat next to you is a good place, just don’t forget it’s there when you switch sides. Also crack a window; the scent can get kinda strong. I used the provided foam applicator pads, but the instructions suggested using a small paint roller (not provided) which I think would’ve given even better results (this was a suggestion from one of their customers, which I thought was pretty cool). Only coat one side of the brush so you don’t get coating on the windshield in that vent corner. I got better coverage doing more pushing strokes than pulling, but remember the brush is a sponge; applying pressure will squeeze out more coating. You want to go light on the first coat and heavier as needed. I got pretty good results after my first, light coat. I left it over night after this coat, but they suggest just 30 minutes in between layers.

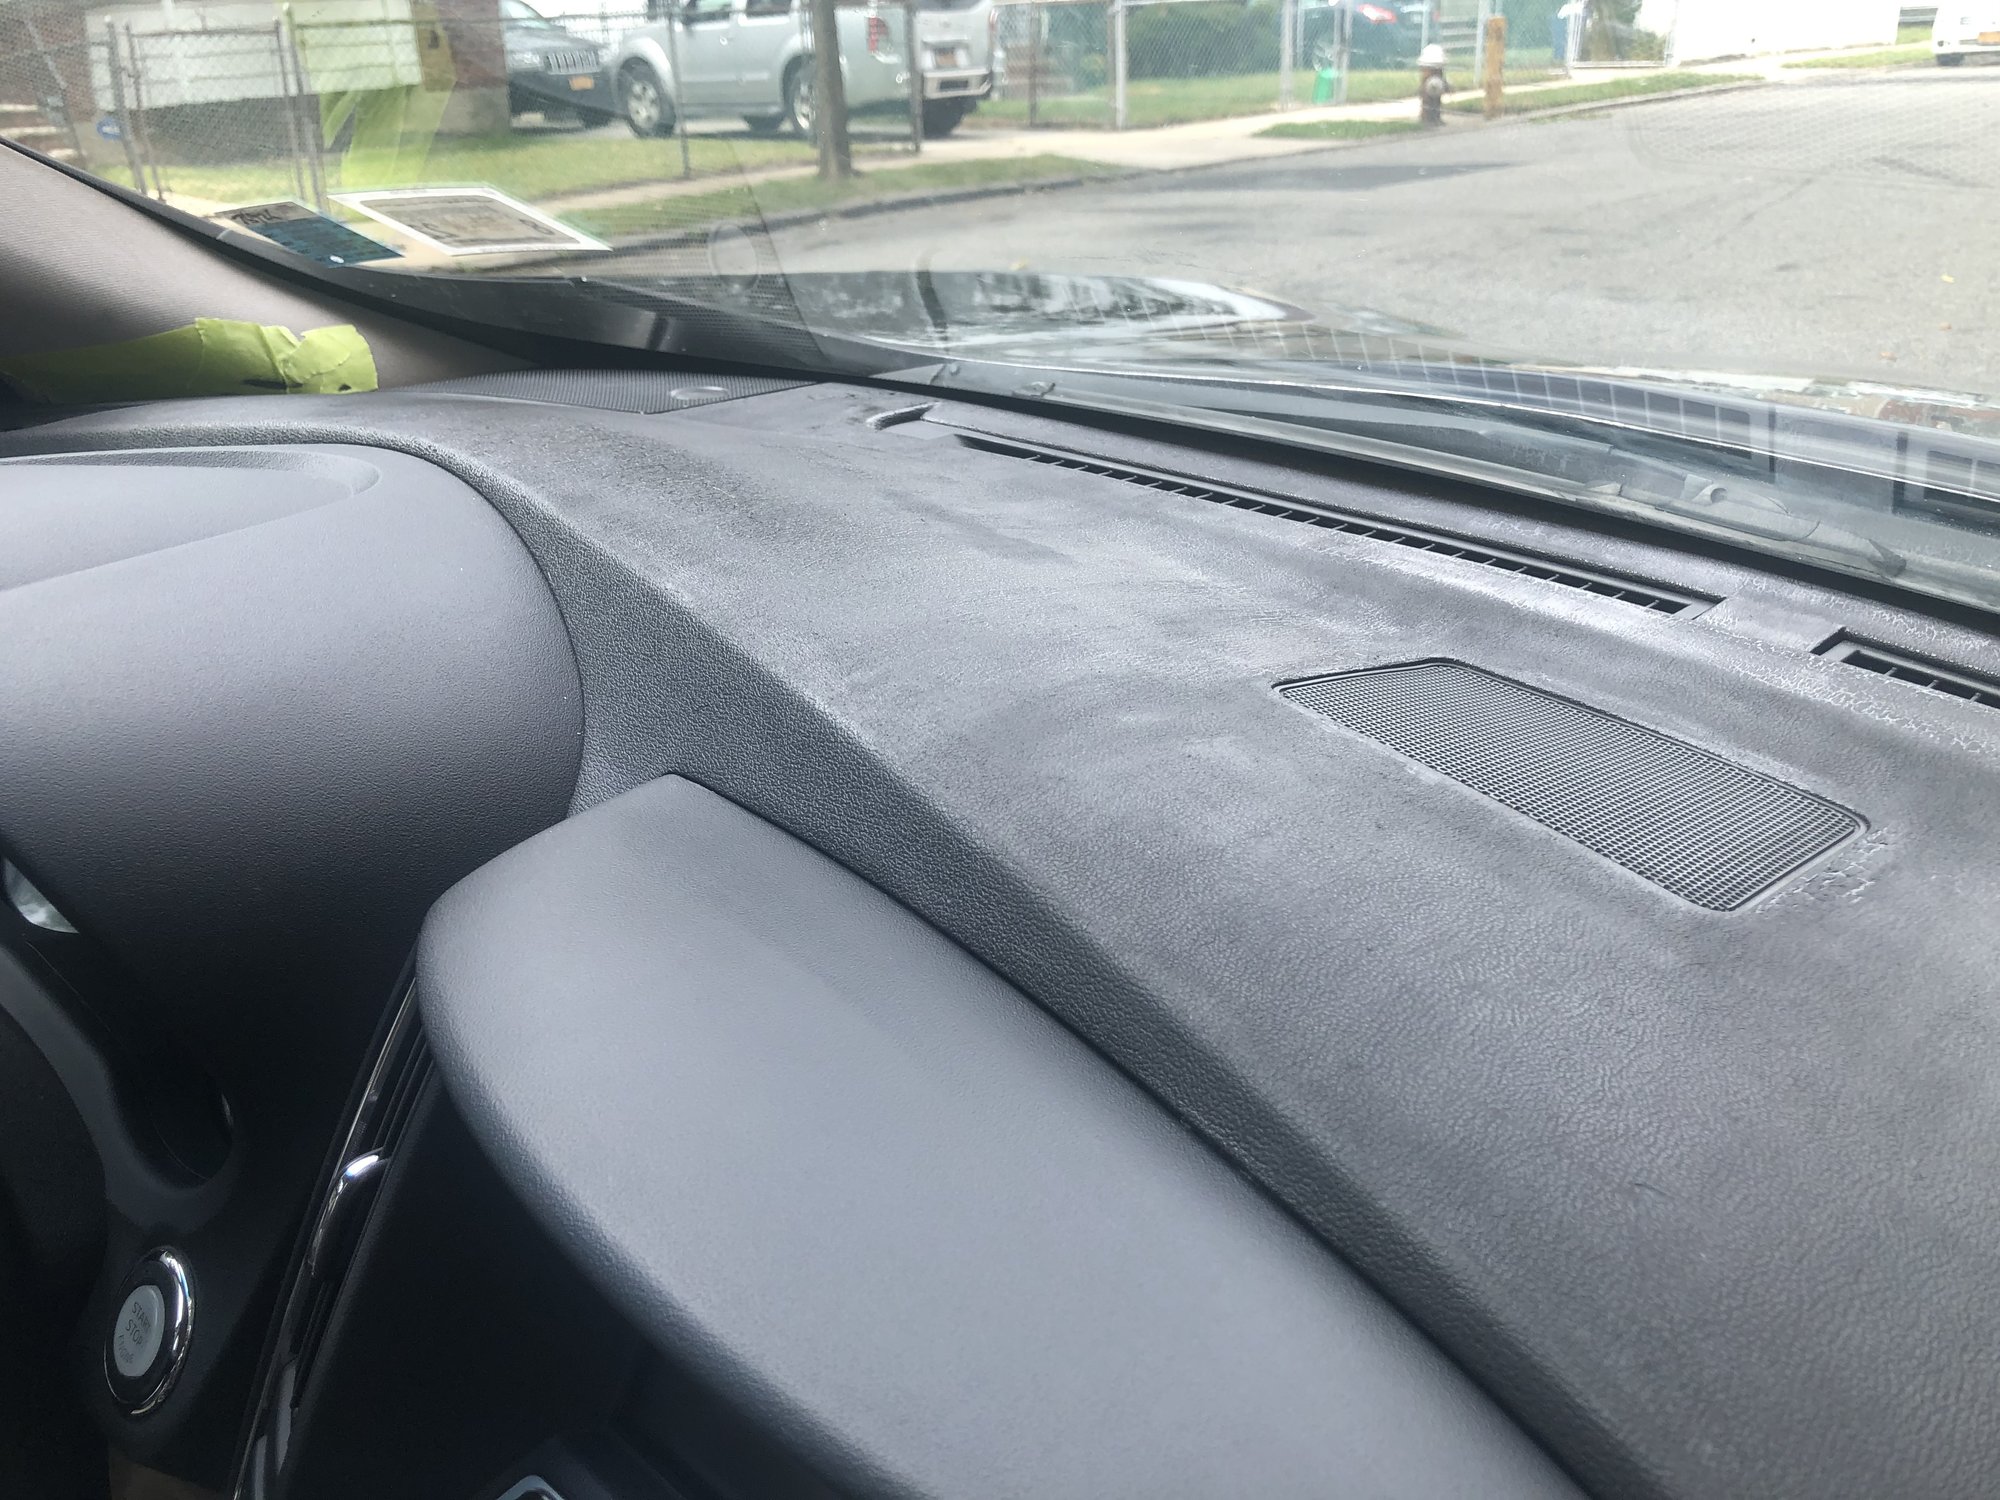


That crocodile skin texture occurred on the stickiest/most deteriorated parts. They suggested getting some rubbing alcohol and trying to smooth it out with a finger, but I just put on more coats in those areas. I was left with some rough texture in the end so I might do the alcohol thing later on if it bothers me. I ended with 2 coats on the whole dash, 3-4 on the crocodile parts. Still had more than half the bottle left. The only area I had trouble with was the side of the vent facing the windshield. I did what I could but some of it is still slightly sticky. If this is like rust and starts spreading, I’ll just go in again, but I’m not getting glare from that area so it wasn’t worth the hassle/risk of getting coating all over that hard-to-reach vent.
Step 4 is optional, but wipe the dash one more time with the surface cleaner. I think it helped a little bit to blend in the streaks and uneven spots. Final results:

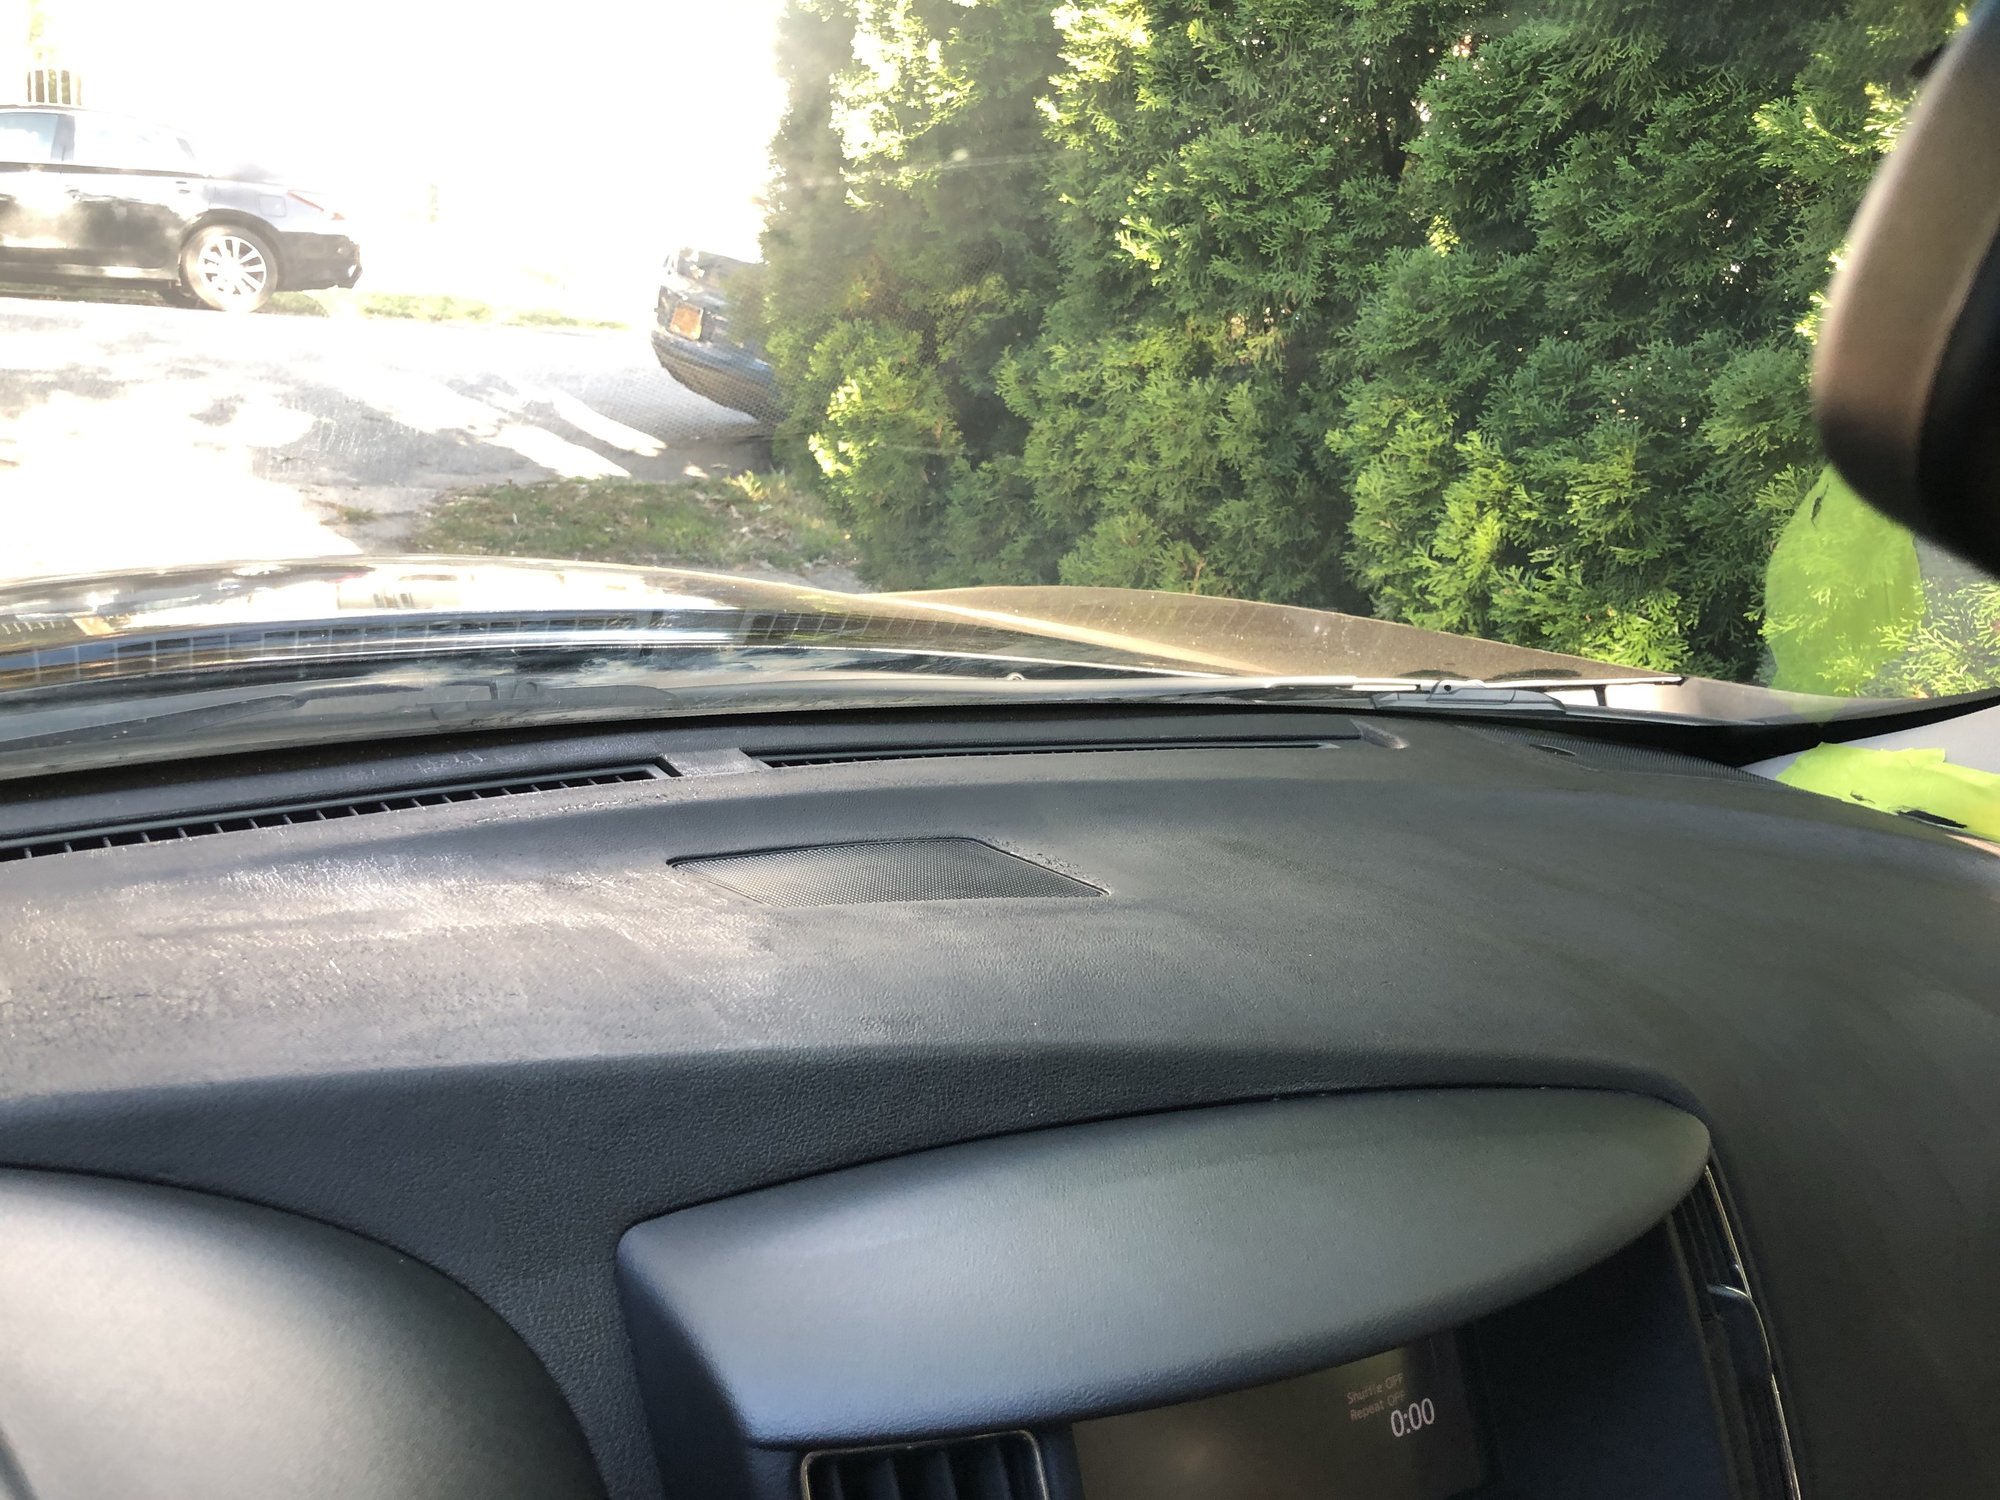
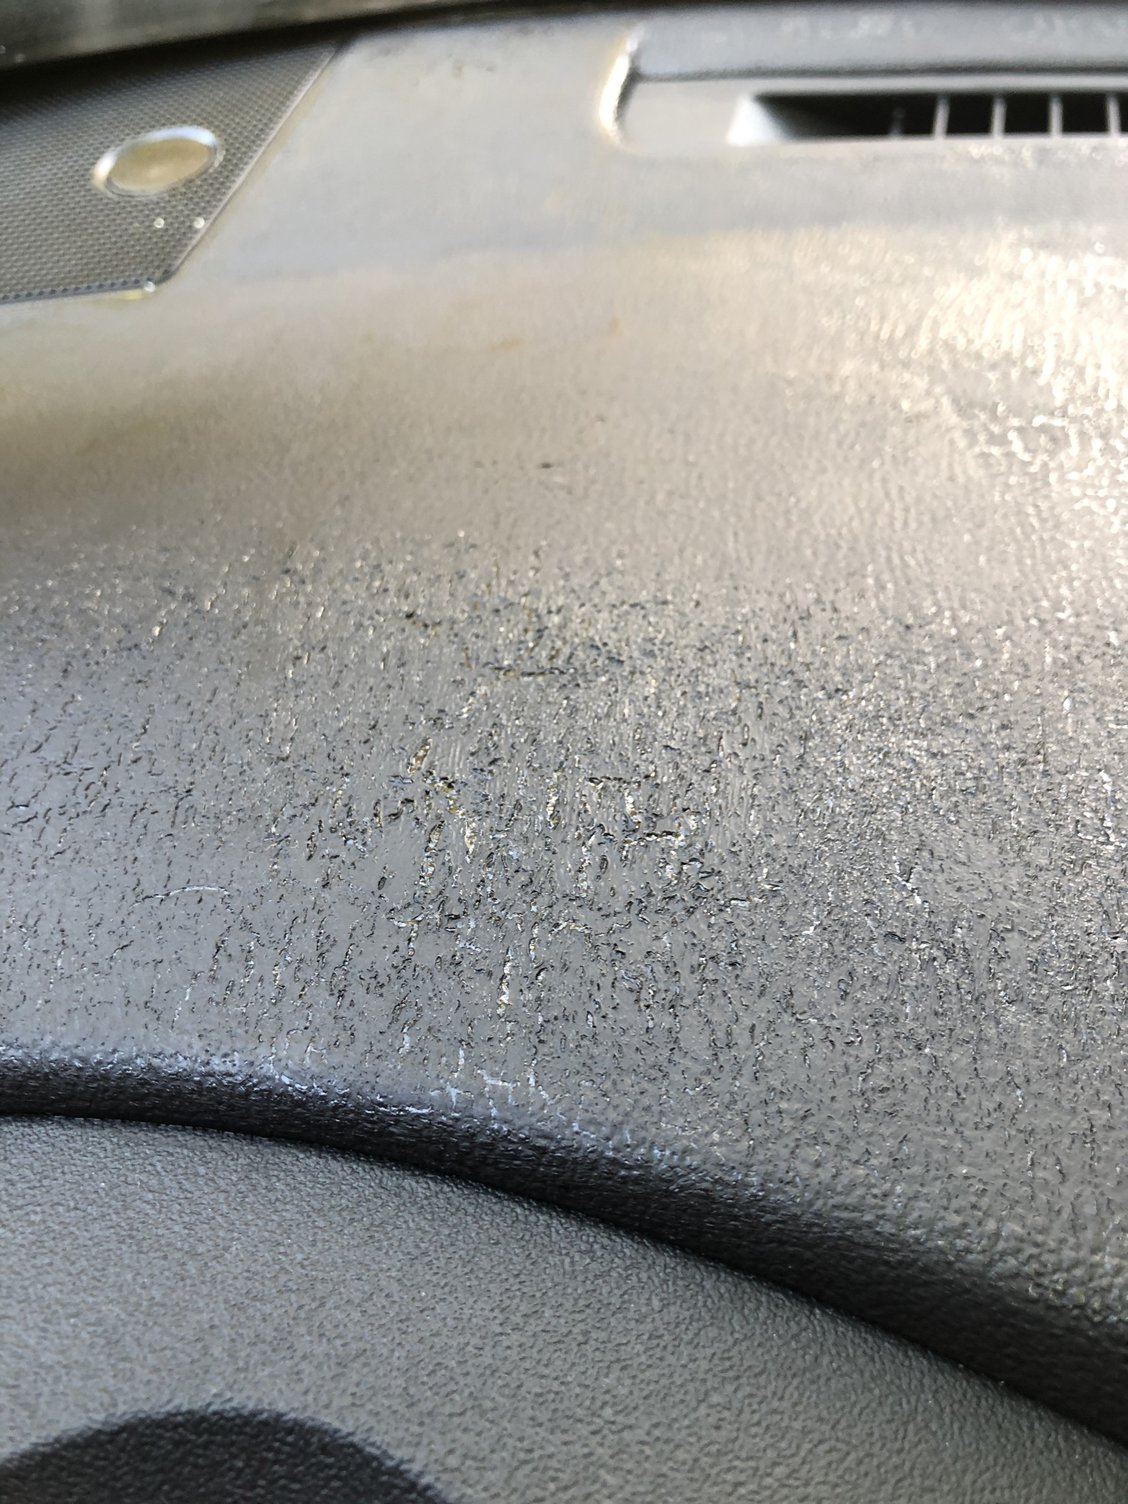
(this was the previously crocodiled section)


Overall, the results were better than I expected and well worth the price. The dash looks pretty much like a lightly-used stock now. There’s some streaks, which I think the paint roller would’ve helped with, but only noticeable if pointed out. The crocodile spots were on the driver side, so a passenger would never know there was ever anything wrong. No residue to the touch. No more glare and no more stickiness, which was ultimately the goal. Like I said, I did this across two days, but including prep & wait time between coats, I’d say it’s a 3-4 hour job.
The manual they provide is very clear and thorough, but just wanted to share my experience. If you have any questions, their R&D rep Derek (derek@3dformulations.com.au) was super helpful before and after I ordered and cared more about my dashboard than Nissan did.
Hopefully someone like me searches and finds this thread helpful.
![]()
Community Member Credit: mist max2000
I just wanted to throw this together so people can see what what an LED interior looks like…in post number 2 and 3 ill put some detailed pics up.. Let me know what you think.. any questions feel free to ask…
DAYTIME:


NIGHT TIME:


to get the map lights to work you need to reverse the polarity..once you remove the map light/sunglasses holder (2 phillips scerws in sunglasses holder then it pops off) you need to switch the – and + wires.. i did this by using quick taps as can be seen in this pic…

Heres the bulb I used,… Its a BA9 5 LED

heres the Dome light.. i got a 36 LED circuit board that had a adapter on the end the fit in the festoon bulb i dont remember the exact size sorry…and yes thats duct tape lol

heres the bulb for the personal mirror lights…3 SMT vanity bulb

and the bulb in the doors.. 6LED bulb 194 wedge bulb

I used 194 wedge bulb that had 4 LEDs flat faced like the previous 6 LED picture above…. heres the license plate LED’s


oh and i also put the same LED’s in my running lights as my license plate lights 194 wedge 4 led-flat,..also in the pic..paired with 5K HID fogs

![]()