My Racing Line End Links finally have up again for the second time. So I decided to switch over to the Moog. I got the fronts for about $50 from Advanced Auto Part using an online coupon code. Don’t get me wrong, the racing line ones were good for the time they lasted. I just didn’t expect them to break off like which is very dangerous on the highway and can cause you to lose control.
One-Piece Race Spec Strut Tower Bar constructed of strong Aluminum to extremely tight tolerances and then polished to perfection. Designed for the Nissan to decrease body roll, this bar ties the chassis from left to right at critical stress points (Between the shock/strut towers).
As you drive and maneuver, your car undergoes many different forces that the chassis of the car absorbs; the brace helps to absorb the energy and directs these forces into your suspension components so that they can better do their job and serve their purpose more effectively.
A must for any track-driven, and a great addition to any street or show car, this bar truly lives up to the Megan Racing name.
Well basically there is a rubber piece that sits in the steering column. Now this is a replacement for that rubber piece. This new piece replaces the rubber piece and provides more direct feeling. The rubber pieces has flex in it when you turn the wheel. This new piece made out of 6061 T6 Aluminum. I have been driving around with this new piece for a long time now and honestly I felt a difference in the way the steering felt and in the way the car reacts.
Here is a picture of the OEM rubber piece that is located in the steering column. Next to it is the aluminium piece however that is the first design that was made. The new version is a little bit different and makes the install alot simpler.
Location of the bushings and what it looks like installed
As you can tell by the date in the picture, I have had this mod for a long time now. Some members have bought them from me as well and their opinions are below
Zero2sixtyZ said “Steering feels more solid and stable. I feel that my OEM bushing was very worn, and needed this mod. No added vibration or anything like that, only benefits.”
Islandmax said “Pain in *** to put in, but is worth it, my stock rubber piece was really worn and soft. Steering is more direct, no added vibrations at idle or in motion.”
Here is a shot of the new design
As far as write-up, this is what I had provided for individuals that have bought the thinner bushings a while back. The process is similar for the new thicker current bushings.
Step 1
Alright some of you might look at the piece and say I have no idea where it goes. Well the piece is located under your dash. If you look at it you see this
You see the black piece behind the pedals ? That is where it is at…
Here is a close-up of it
Now this piece is bolted with Three (3) 10 mm nuts. Remove them.
Once you remove those you would think the piece would come out. Well no it wont because it is a single solid piece. Take a something with a blade and cut it. Now when you cut it I would suggest cutting it on the back side of it so you will not see the piece cut when you look where the pedals are. Now when you cut it, pull and yank on it and it will come out. Reason for cutting it is to
A) make removing it easier
B) Installing it easier
This is what it looks like cut and removed.
You do not have to cut it though since there is enough space to pull the boot up to get to the bolt that holds the column to the steering rack.
This is the view you get when the piece is removed. I already had the aluminum piece installed but on your car it will be rubber. Pictures is the original design of the bushing.
Now the whole piece is held in with Four (4) 12mm nuts. You have to remove each one of them. Also when you are removing them, you will have to turn the sterring wheel to get access to it. It might help to have somebody hold the steering wheel for you when you are loosing it because those nuts are nylon threaded and they are on there tight. I would suggest wearing some gloves if you dont want you hands all beat up. There is alot of metal under there.
Once you remove all those 4 nuts look down and you will see the shaft connected to the rack. There is a bolt that goes straight through. Loosen the bolt but dont remove it. Just enough to pull the shaft up.
Now to get the OEM busing out you have to pull on the steering column towards the driver. But the steering column is bolted down.
next step is to unbolt it… Pictures is installing the bushing on a 4th gen but the same concept goes for the 5th gen.
Once it is removed this is what your car should look like.
Next remove the trim behind the steering wheel. It is held in with screw. This is where the screws are.
There are 6 of them. Once the screws are removed pull the trim off. It will look like this now
Now time to loosen the actual steering column. It is held with 4 nuts. 2 in the front and 2 further back
You can see the 2 nuts in this picture And the other 2 in these next pictures.
Once those 4 nuts are removed the steering column will drop down but be careful since it kinda heavy and there is a bunch of stuff on it
Next you will yank the column towards you and the bushing will fall apart with a bunch of other pieces also.
The next step is to put the new bushing into place. The latest design is a direct replacement so you will only be using the oem hardware.
Once you get the bushing into place, Put the 4 nuts and start them first by hand and then repeat the same procedure you did when you were removing them.
make sure they are tight. If you are not sure you can use some locktite. it can be purchased at any auto parts store.
Once those 4 nuts are tight lift the column up so you an put the 4 nuts back on that held it in place. If the holes dont line up push the whole assembly down. If it doesn’t go down loosen that bolt I was talking about before even more
You can see that bolt in this picture at the bottom
ighten the 4 nuts that held the steering column in place.
Now make sure the 4 nuts on the bushing are tight, the 4 nuts on the steering column are tight and make sure the bolt at the bottom is tight.
Next assemble all the plastic trim behind the steering wheel and under it. Make sure all the hardware goes back into its original place.
You are almost done but now you have to stick that cover back over the shaft of the column. This is a pain i know guys. You dont have to put it back on but you will see the shaft. The easiest way is to align it and open it wider with your hands where you cut it and slide it over and keep working back and forth until you get it to sit the way it was before. That is why I recommend to cut the piece on the back not the front. Once you get it back on tighten the 3 nuts and you are done…..
Take your car for a drive and see how it feels. But please make sure you checked and checked again that all the nuts on the bushing and column are tight.
Well that is a pretty straightforward write up. If you have any questions feel free to ask.
Calipers + torque member from a 2004 maxima through a junkyard ($50)
Black Zinc coated Dimpled Rotors + Hawk HPS pads via rotorpros ($149)
Total of 200 spent
The first step is to really clean the calipers.. they were filthy!
Before: After:
Then sand the hell out of it and mask everything off for paint:
I used enamel based spray paint (high heat as it is really meant for BBQ grills)
Rotors and pads get delivered: Look at the size difference with my OEM ones!
So jack up your car, USE JACKSTANDS, take off your wheel
At this point you want to place a drip pan under the caliper and loosen the brake line bolt (12mm)
Then remove 2 bolts (14mm) that hold the caliper on, hang the caliper to the spring using rope or something similar:
Then remove 2 more bolts (19mm) holding the torque member (these are on hella tight): Use a C-clamp and an old brake pad to push the new caliper’s piston back to allow for the new pads to sit.
Now, connect the brake line to the new caliper and hang that one by the spring.
Place the rotor on. NOTE: some rotors are directional and have curved vanes, follow the instructions!
Put on the new torque member (with those two 19mm bolts). I applied some loctite here for a secure hold.
Put in the new brake pads, apply the special anti-squeal stuff.
Put the caliper on using the two 14mm bolts.
Now you need to bleed the brakes, so pick up some Dot 3 brake fluid, and have a friend help. If you don’t know how to bleed, the person outside of the car opens the bleeder to allow fluid to escape while the person in the car pumps and holds the brake to provide pressure. Keep bleeding until you don’t see any air in the line. It helps to use a tube into a water bottle filled w. some brake fluid so you can see the air bubbles come up. Remember to keep topping off the fluid so you don’t start drawing air in. It’s also a good idea to bleed a whole bunch of that nasty old fluid out..
So here are some size comparisons (remember my car is 2000 so the rotors were smaller than 5.5gens’)
Caliper (04 on left, 00 on right):
(04 on right, 00 on left) Pad size (newer ones on bottom obviously): And the best before and after lol:
Also notice my old rotor on the ground there, on the backside there is a very THIN strip where the pad was making actual contact.. I couldn’t believe how crappily the stock setup was working.
I recently replaced the ABS Actuator on my 2004 Nissan Maxima. Since the job requires removing the brake hard-lines, you will need to bleed all of your brakes to get all the air pockets out. Easy enough right??
Well……. I bled the brakes 4-5x times and the pedal still kept going down to the floor. Literally, no pressure at all. I started to think that I didn’t tighten one of the hard-lines properly or the calipers were bad. But I didn’t notice any brake fluid leaks or issues.
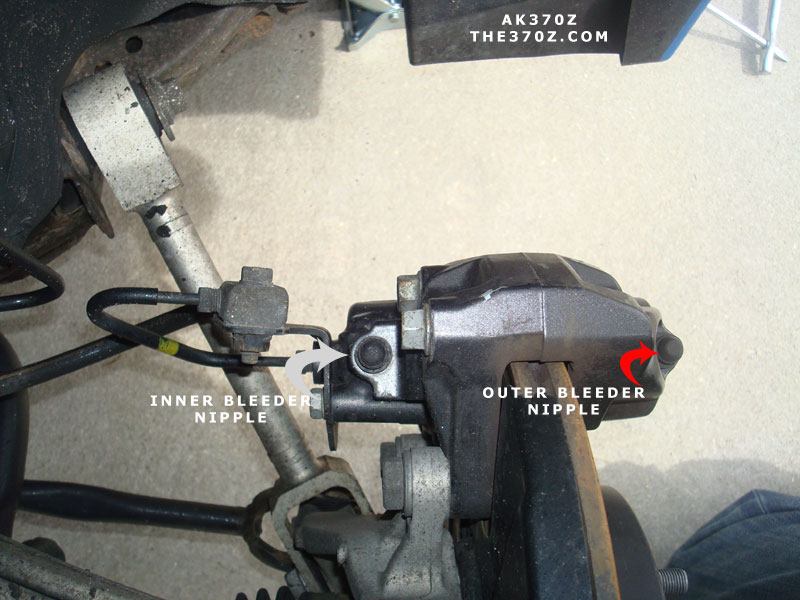
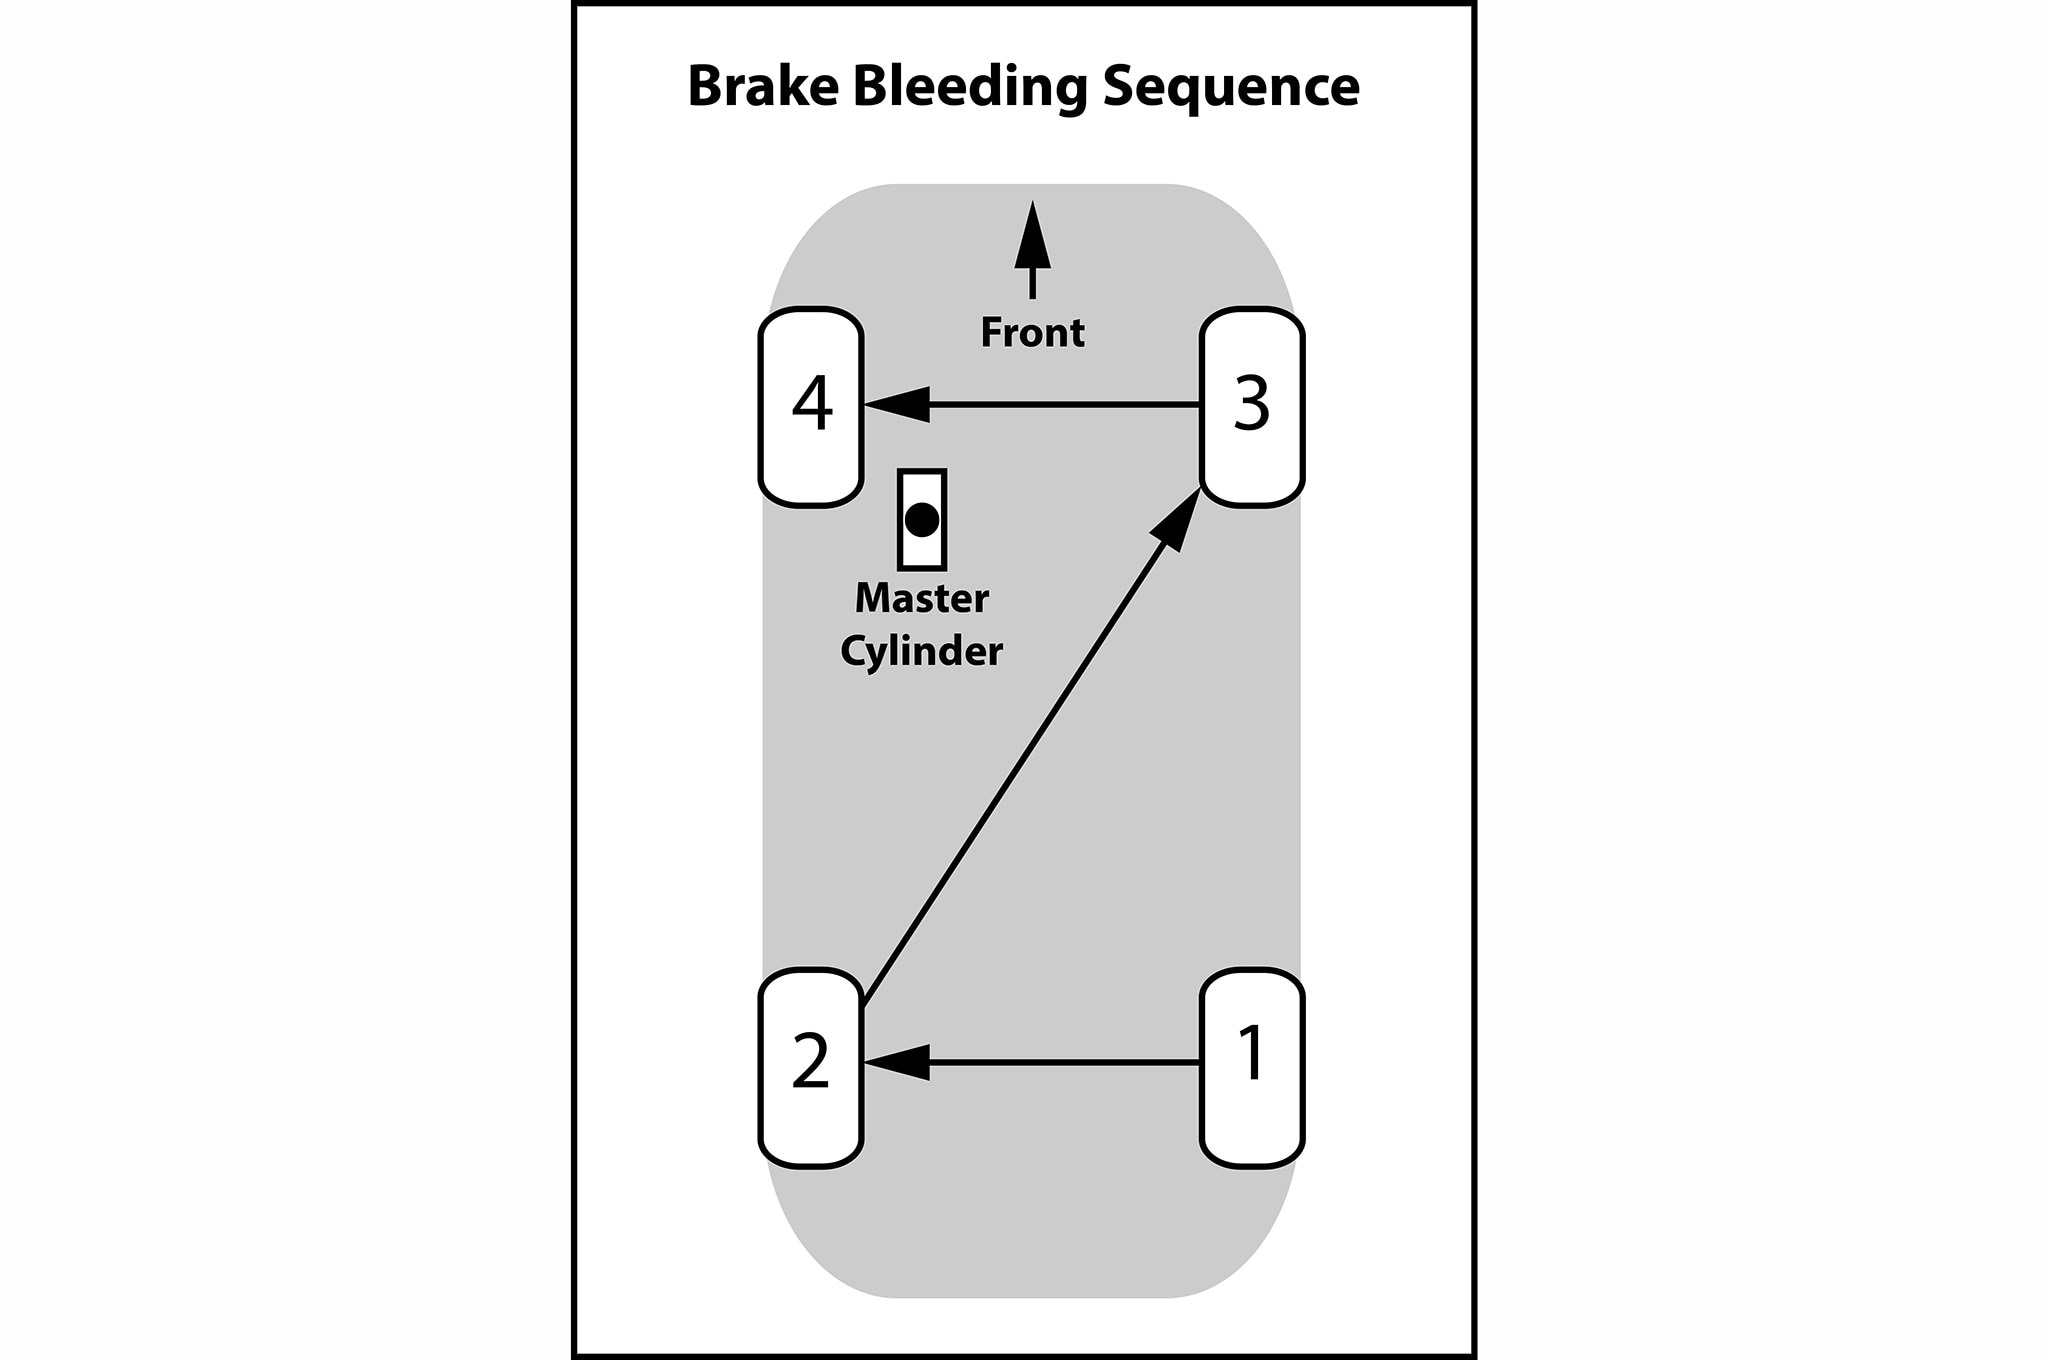
I reached out to my buddy Raul (@tuneonthego) and he asked if I bled both the inner and outer bleeder. I definitely did not do that (and totally didn’t even notice the inner valves). You are supposed to bleed the inner valve first and then the outer. I went back and did both following the standard bleeding procedure.
AND VIOLA….. brakes were solid and no longer going down to the floor. In total, you have to bleed 8 bleeder valves. Hope this helps someone who has the same issue.
Photos Courtesy of AK370z:
Inner and Outer Bleeder Valves
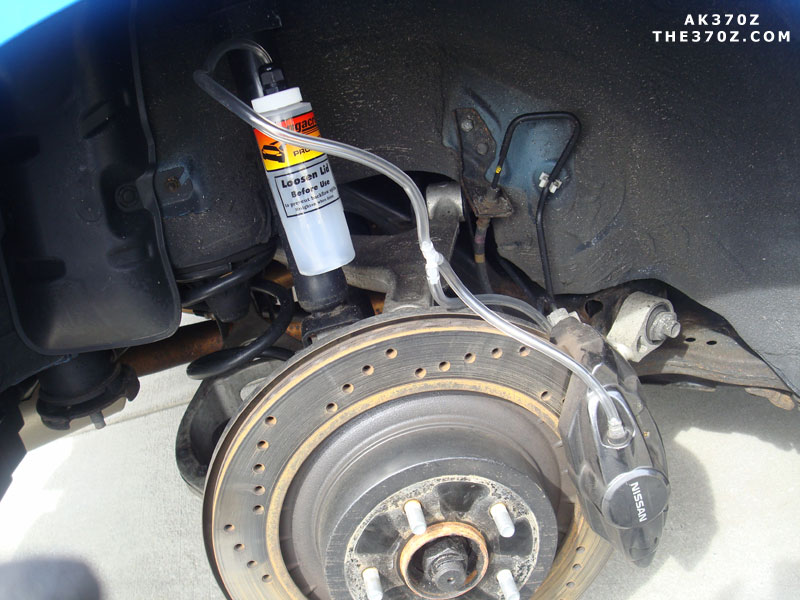
You can buy this nifty bleeding kit which allows you to do both bleeder valves at once. You can get itfrom Amazon for $20 bucks. I personally did it using my home-made kit, 1 valve at a time.
Standard Brake Bleeding Procedure Sequence
My Akebono BBK (Love these Brakes. Excuse the dirty wheels)
Alright. So since I’ve had a few messages already about air suspension and what to do, how it works and what you should get. I decided to make a thread about it. This thread will cover most questions that people ask. I will also give you a run down as to what is needed and what is recommended.
Air suspension’s quite the headache and our forum isn’t quite up to date with it when it comes to air suspension since barely anyone will tell you what to do or what to get so I’ll give you the run down since I’ve already gone through it all. Before I go on, the rule is that our cars have a different style of suspension. Our upper control arms allow us to only run a sleeve design strut, therefore most universal air suspension won’t work.
The Basic:
Companies like D2, K Sport and Air Runners are complete plug and play kits. Basically you buy it from them, and it goes in your car and it works.
The kit itself will come with things like your air struts, compressor, tank, wiring, and management. Keep in mind, this management is the most important part. So these kits that come with it, they’re not great. Almost every single car that you see with a custom trunk setup or remote control will not be from these kits.
For example, if you buy the D2 complete kit, it’s a full kit. But it’s manually managed (toggle switches), while K sports upgraded kit has other options with a remote and what not which is digital. These are complete kits, meaning there’s less work of customization and what you see is what you get.
What should I go with?
Well this is completely up to you. How much money are you trying to spend and what do you want it to do? The first thing you want to think about is if you’re going to easy way out by buying a complete kit. It’s good if you’re new. You’ll hate it after you see the real stuff.
Once you’ve gotten over the complete kits from those companies I have told you about, lets start talking about the real stuff. So we’ll start by deciding what kind of management system you would like. Struts don’t matter, they’re based on the type of cars so our car only has so many struts you can choose, and they’re all realistically the same.
So management. The first option is your most basic and easy to use, manual management system, and if you want to go this route. The complete kits offer this. When we think manual, it’s down to bare bone. Your next option is digital pressure based. It’s good, and it’ll get the job done. But it’s not precise. Your best option is height sensor based, and this option is done with Accuair’s E-Level Management. I’ll go into depth.
Manual Management:
Lets take D2 for example, you buy their kit. You get struts. Air compressor, air tank, wires, toggle switch, and a pressure gauge. So how do you air up and down? Well with the D2 kit, you have toggles and therefore that fills and empty’s the bags. This is great and it sounds good, and for $2500 (rough estimate) it’s a steal. But think about this.
You’ve just installed your air suspension, and you got it all set up. Your driving height is great and that’s what you want it set as, so you go for an alignment at that height. Awesome. You drive out, go park, air down, and you’re alignment is now off. To go back to the exact height you were at before, you would have to air up to that exact height. Now that’s hard when you’re just guessing it all by looks. That’s manual. Simple, easy, no height sensors, no pressure sensors. It’s a guessing game, and you suck at guessing.
Pressure Based Management:
So now it’s onto the real stuff. Pressure based management system is the next best option. It’s all digital, meaning there’s a controller that’s plugged into the manifold and the manifold puts out air to each strut based on the controller of how much you want.
So lets take the most popular pressure based management system out there called Airlift Autopilot V2. This is the most popular system when it comes to air mainly because A. It’s cheap, and by cheap. I mean it’s cheaper than Accuair and it’s more accurate than manual. and B. It’s easier to install, and by easier. I mean it’s the easiest to install, even easier than manual. Why? Because with manual, you instead of running one wire up to the controller. You run the air lines up to where the toggle switches are. Analog style = manual.
So how does pressure based management work? Pressure based management is exactly how it sounds. Your air struts fill up until it hits a certain PSI, the exact same way as to how your tires are filled. They fill until it hits that PSI and then that’s when the air compressor filling your tires stops. So that’s how your height of the vehicle is raised and lowered, by how you set your PSI. Let me give you an example. Lets say your struts are all installed and all alignment is done, you drive out. Park. Air out, and bam. Your alignment is off again, this time when you air back up. Your alignment is back to where it was before up to an estimated accuracy of 3-5% and this is all because your Autopilot V2 management system comes with a total of 8 presets. So you can have #2 preset to be your ride height which you will align at, #3 to be your raised height and #1 to be your low cruise. The other presets you can just mess around. So this is good. And the thing with the Autopilot V2 unit is there’s an LCD that can tell you how much pressure is in each bag, your tank and if there’s a leak. It’s overall an amazing system and I’d highly recommend it. It’s what I almost got. What stopped me? I’ll explain.
As you have heard before, those who are anal about precision will tell you to fill your tires up to lets say 35psi on a colder day or at night when your tires haven’t been ran on a lot or at all. This is because air pressure changes based on humidity and temperature. So lets say you’ve got everything set in the summer on a warm day and your air bags are set to ride height of 50psi. That’s your ride height. Lets say in the winter, your ride height is still set at 50psi, but you’re not as high as it was in the summer. Hot air expands, cold air doesn’t. Chemistry people! This is why pressure based isn’t as accurate and this is why I didn’t go this route. If you live in the cold, you’ll notice the difference. You’ll also notice the difference when you’re driving yourself vs when you’re driving 4 other people. The pressure of your bags still sit at 50psi. That hasn’t changed, but your height of the vehicle has. That means you’ll need to let more air into your bags to compensate for the amount of people that are in your car. And this is why I chose height based management.
Height Based Management:
So lets start off by saying height based management is the most accurate system, most easy to use system, hardest system to install, and the most expensive system. I’m talking if you don’t have at least $3500 to spend on your whole setup, don’t even bother. So what’s so good about height based management? Well first of all, Accuair is the only company that I know that makes this. How does height based management work? Well it’s in the name.
Accuair has designed their height based system called E-Level to work based on height sensors. Not only does your car have air struts installed, but there are also height sensors installed next to struts which are usually connected to your lower control arm and the frame of your car. This will give you the most accurate level of airing up and down. So whether it’s the winter, summer, really hot one day, really cold the next, or you have a bunch of people sitting in your car. Your system will always compensate and be accurate because of those sensors. In fact, this is the exact same technology that is used in the Porsche Cayenne Twin Turbo’s and the Range Rover’s with air suspension.
So how does it work? Well your touchpad (remote) will have 3 presets. 1: Low/Cruise Height (Typically set at 10% of your total suspension travel) 2: Ride Height (the height you typically drive at) and 3: High/Extra Clearance (Typically set at 90% of your total suspension travel) and your all down which completely air out your bags. These settings are done automatically by the calibration that the E-Level does when you first set up your unit but all three of these presets can be adjusted just like your radio can. You manually adjust your height with the buttons beside it then you hold the number you want to set it at.
“I want the best. I’ll take it.” Wait a minute. Who’s installing it? Because this is not your simple plug and play anymore. Now instead of running only one wire (air tube) to each strut, you’re running that and the height sensor wire, and you’re installing the sensor. I’ll tell you, when I first did my sensor install. It took me over 3 hours just to do one. Most of the time, you need to fabricate a bracket to your lower control arm and then mount the sensor to your frame and so on. And accuair is so precise that if it’s not done right, bam, broken sensor. $125 a sensor. You could easily overextend and underextend the sensor rode and snap the sensor.
If you’re comfortable with the install and the price tag (roughly 2k just for the management system quoted from bag riders) then you’re set. Take it.
Here’s an amazing video by BagRiders that demonstrates how height based management system vs pressure based management system.
Air Struts:
Well that covers the management system, but what about your air struts? Or your air tank size? Or your compressor? Or your air lines? Oh you thought it was simple. Hell no. Next is your Air struts, so what do you get? Well, you’re not going universal because it doesn’t fit and it doesn’t work. As far as I remember (and some others can chime in) UAS does not make a sleeve system which will work without hitting our front upper control arms. How our air struts work is exactly how a coilover works. In fact, if you purchase the D2 or Ksport struts, you’ll notice that besides the airbag, it’s the exact same setup as the D2 or Ksport coilovers with springs.
So you’re now you need to decide on what brand of struts you’d like to get. I don’t know them all, but I’ll name a few that are popular. You have a choice of D2 or Ksport. Both are the exact same design. You can get replacement bags for one another. There’s no difference between the two. Or you can go Airrex or Airlift, both from what I heard are higher quality but more expensive. There are other brands, but I forgot what else. Air struts or Air coilovers will run you about $2000 give or take. These are fully adjustable struts. D2 and Ksport both have 32way adjustable dampening while the others have more or less. I don’t remember. These are car specific, so unlike the management system which can go in any car. These air struts or air coils are specific to our cars. Don’t get too caught up on this topic, just choose your brand and make sure the bags are not blown and the struts are not blown. Don’t quote me on this but I also believe we share the same air struts as the 2004-2008 Acura TL’s…
Air Tank:
Now is your selection of air tank which will also affect your air compressor. There are many sizes, many types and many brands. Really it’s up to you to decide what you want. The bigger the tank, the less your compressors will have to keep refilling. My air tank is a 5 gallon aluminum tank. Why? Because aluminum doesn’t rust and 5 gallon is one of the largest tanks you can get. Steel tanks will rust and you’ll have rust water if you’re in a colder weather. So again, choose your shape, your size, and then aluminum or steel (you know what I would pick). Some people run two tanks. Totally up to you. You might also want to paint over it or decal it if you’re planning on showing it. Mine’s chrome, I however haven’t decided if I want to do anything with it right now. It’s up to you to find a creative idea.
Air Compressor:
In the air bagging community, there will be (from what I hear) only two brands you can choose from. VIAIR which is the most popular and Air Zenith also known as OB2 or AZ which is the best. VIAIR is the most popular because it comes in chrome and it’s cheap. Now cheap doesn’t mean good. VIAIR’s compressors are generally smaller. They range from 380cc and up. Meaning that the smaller they are, the more time it takes to fill up and the less PSI it will cap out at. VIAIR also has a cool down time to let the air compressor cool down. Most who run VIAIR run two compressors because it fills up faster and it’s reliable if one dies. Now this was my concern. Why would you be concerned about a compressor dying? The only reason would be because they’re not that good. Not as good as Air Zenith.
An Air Zenith OB2 compressor is quality made, and what that means is that it’s more expensive and built tougher. Usually one cost the same as two VIAIR units, or maybe more. The good thing about an AZ unit is that it’s more quiet and it has a built in fan and will continuously fill your tank up to 200psi. An AZ unit is also a heavy, so most run one and that’s all you really need. The time it takes to fill a 5 gallon tank with 1 AZ is the same amount of time it takes to fill a 5 gallon tank with 2 VIAIR 400cc compressors. So you choose really. I have both and I can’t even decide. (although I’m leaning towards the AZ to save space and to maybe one day run 2 AZ’s)
Check Valve:
Now this is an addition to the compressor section but I’d like to take the time to talk about how important a quality check valve is, especially us Canadians. A check valve is a valve that opens to let air threw one direction only and will not go backwards. This check valve is put in between your compressor and your tank. Now Air Zenith comes with a quality check valve which is rated of up to -40 degrees celsius or fahrenheit. The VIAIR check valve comes with is a junk check valve which freezes EVERY. SINGLE. WINTER. So trust me when I say this, if you live in a climate that goes below zero or snows and you run a VIAIR compressor. Change your check valve to an SMC branded check valve which is rated to -40 and will work. You don’t want your air suspension not going up when you’re shovelling your driveway and late for work.
Water Trap:
Now this is another subtopic that goes under compressor. I believe that everyone running an air suspension system should consider running water traps. A water trap traps water… simple. And you press a button, it releases the water. It’s good for humid climates (like Texas… God, even your toilet paper is wet) or Canada where we have constant unstable weather temperatures. California… probably not as much. Water in lines aren’t good, and when it freezes. It’s game over. You should generally have one water trap per compressor and it’s attached after the check valve between the compressor and the air tank. This stops the warm air which has some condensation to go into the air tank. Now that being said, you should still empty your air tank once a while just to make sure there’s no liquid.
Air Lines:
This is not so much the type of air lines (however you should be running DOT approved air lines and fittings) but more so the thickness of the airlines. There are (as per DOT approved) two sizes. 1/4 and 3/8. The choice of this will determine how fast your car raises and lowers. 1/4 gives a slower luxury lift and drop where as the 3/8 is quicker. There are also hard lines. If you’ve ever heard of these, they are generally solid metal tubes that are bent in order to run lines. Usually fancy for looks and made of copper or aluminum to avoid rust.
Along with air lines, you need to consider the type of fittings you want to use. The most popular is called Push to Connect, also known as PTC, which are the easiest to connect and easiest to remove and fix if there are leaks. PTC’s are great and I use it all through my car. Your next option is compression fittings. Compression fittings are good because they stay solid and don’t accidentally become removed but if there is a leak, tools are required.
Here is another video from BagRiders demonstrating the fill and dump of the 3/8 air lines.
and here’s a video demonstrating the fill and dump of a 1/4 air line.
What’s Next?
Well, it looks like you’re all set. I’ve provided as much knowledge as I can and if you guys have any questions. I will definitely try and answer them. If there is something that I left out or put wrong, then let me know because I am human and I’m not perfect.
Now it’s time for you to decide what you want. Take the shortcut of a complete kit by D2, Ksport or AirRunners or choose your own custom setup. (I would choose your own setup to save money and get the best). If you decide to choose your own, here’s a check list of what you need.
Management System:
– Manual Management (eg. 4 Way Toggle Management System)
– Pressure Based Management (eg. Airlift Autopilot V2 or V1 Management System)
– Height Based Management (eg. Accuair E-Level Management System w/ Touchpad)
Air Strut:
– D2
– KSport
– AirRex
– AirLift
Air Tank:
– 5 Gallon and under
– Aluminum or Steel
– Shape
– Finish (Chrome, Raw, Painted, Custom Decal)
Air Compressor:
– Single or Dual
– VIAIR 380cc, 400cc, 444cc, 450cc, 480cc.
– Air Zenith OB2
Check Valve:
– If cold climate. Needed
– VIAIR/required
– Air Zenith/not required
Water Traps:
– Cold or humid climate
– SMC Water trap
Air Line:
– 3/8 (faster dump and rise)
– 1/4 (slower dump and rise)
Another thing. You’ll also want to custom design your trunk. This is totally up to you. I have no creativity when it comes to that. I hope all this information will be enough to help you decide if you want to go air or not. It’s a tough decision and it’s an expensive one. If you keep your car for long, then I’d do it. If not, make sure your next car will have it since the management system can be moved over. Again, any questions. I’ll try to answer. Any mistakes, call me out. It’s a thread, the more you put in, the more it’ll help our community, and if you’re wondering. I do not work for BagRiders, but they’ve been so helpful and supportive so if you have more technical or pricing questions. They are who I’d direct you to.
It was just under $1,800 shipped for the kit. Shipping was included at $125.
The options were:
Slotted Rrotors
Banjo Bolts
Red Calipers
Standard Ceramic Brake Pads
If you attempt this yourself, you assume that you have some mechanical aptitude, and already know how to bleed your brakes when you are done. Make sure you do not run out your brake fluid reservoir. Keep it topped off. Multiple fills per caliper.
Tools needed:
Jack and jack stands
Fluid Catch Tub
Small funnel, mine came from the camping section at walmart
1/4″ hose, clear, 2 feet in length. Not an absolute, but will help when you bleed brakes.
10, 12, 14, 19 wrenches, and a 21mm if you have it
12, 14, 19, 21mm sockets.
Flat head screw driver
Impact driver: Not an absolute, but will make your life easier
Rubber mallet
Angle grinder with cut-off wheel.
Paper towels
Gloves, if you like your knuckles.
1L bottle of brake fluid.
Safety glasses, or motorcycle helmet if you prefer.
I chose to complete one corner at a time, and bleed after each corner installed.
Step 1. Jack the front of the car up, place jack stands, and remove front wheels. Step 2. Remove the front caliper bolts. Use the 14mm.
Step 3. Remove the front pads.
Step 4. Tuck the caliper out of the way, don’t leave it hanging.
Step 5. remove the carrier with the 21mm. I was not able to make mine move with the wrench and some effort, so I just used the impact gun. Mine were very, very tight after 115kmiles of not being touched.
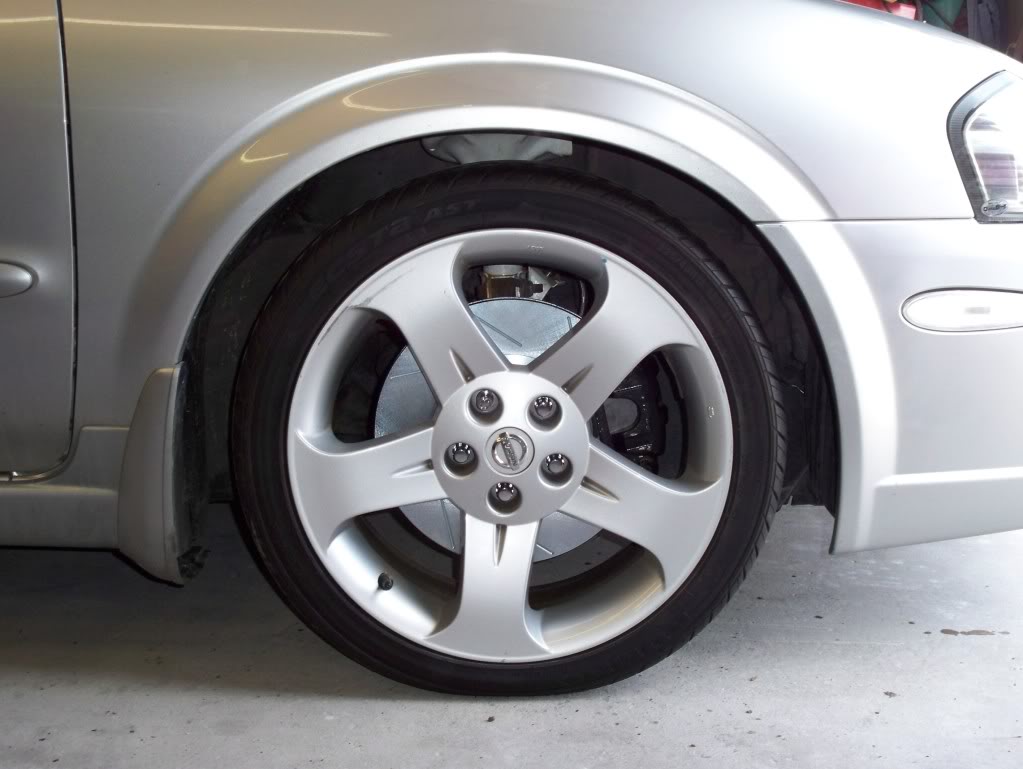
Step 6. I opted to test fit everything and make sure I wouldn’t have problems before I went any farther. Spoke design can influence fit. That is the picture I posted previously with the single lug nut
Step 7. Place the new rotor on the hub, and use one or two lug nuts to hold it in place. Depending on your lug nuts, you may need some washers. You don’t have to do this but it makes life easier.
Step 8. Now you need to add brake pads to your new caliper. Squeal tab goes on the inside. Then you add the spring plate, followed by slide pins. Use the cotter pins to hold it together. The flat head screw driver will help you here.
Step 9. Now you want to bolt this to the knuckle. The new brakes are the caliper and carrier. YOU MAY RUN INTO AN ISSUE AT THIS POINT.
ONE OF MY CALIPERS NEEDED A SLIGHT TOUCH WITH A GRINDER. One of the gussets was slightly oversized during molding, and was hitting the knuckle. I had to remove about 1mm of material in a small section where it was hitting. It would not bolt flat otherwise. One of my calipers self corrected when I bolted it down, and was not a problem, the other needed my help. Make sure it is correct. You could also remove the material from the knuckle if you dont want to scratch your paint.
Step 10. Now we get to make more of a mess. Use the 10mm wrench to remove the bleeder screw from the outside, and open the screw on the inside.
Use the small funnel to fill the caliper. Place the catch tub under the brakes. It does not take much, so go slowly. Once full, replace and close the bleeders. Use the paper towels to wipe up spills.
Step 11. Now we need to swap the brake line. Get the new, shorter banjo bolt ready. Use the 12mm to remove the brake line. You will need the 14mm for the new one. Quickly remove old bolt, slide on new bolt, then screw it into the back of the new caliper. Remember, the order is: bolt, crush washer, brake line, crush washer, caliper.
Step 12. Bleed the brakes for that corner. It will take a bit of time and a few repetitions to get fluid in and air out. Watch the fluid level in your reservoir so you don’t run it out. Use the plastic tube now. Slide it over the bleeder, then you can guide the fluid to the catch pan, and also see if it is air or fluid being pushed out. I recommend outside, inside, then verify outside when bleeding.
Step 13. Complete the same steps on the other side to complete the front swap.
It is fairly simple, and took about 1 hour to complete. If you are inexperienced, plan for 3 hours.
Step 14. Put your front wheels back on, lower the front, raise the rear of the car, and remove the rear wheels.
Step 15. Now we will take care of the rear brakes. Remove the rear caliper and pads. Use the 14mm for the caliper bolts. Use the 19mm for the carrier bolts. The bottom bolts both require a wrench, not socket, because of the tight space. Again, tuck the caliper somewhere out of the way.
You may need the hammer or mallet to get the disks off. Tape around the hat, and on the face of the rotor.
Step 16. This is more involved than the fronts because of the dust shield. You will need your cutoff wheel now.
If you optioned for factory dust shields, you will need to do substantially more work, and I won’t describe the process of removing the parking brake shoes and hub to R&R the shield. You need to remove the protruding ring of the dust shield as well as make room for the new caliper.
It makes a lot of sparks. Wear safety glasses. I do not recommend wearing safety glasses and a hat, as it can direct sparks behind the glasses if they are not well fitting. If wearing a hat, turn it around. My friend was with me, and wore his motorcycle helmet while cutting the other side.
When I showered afterward, there was a substantial amount of metal in my limited amount of hair.
Comparison:
Step 17. Install the pads into the caliper. Again, squeal tab towards the inside. Then place the new rotor on, and bolt on the caliper.
Step 18. Follow the same procedure as the fronts to fill the calipers with fluid, swap the brake line, and bleed.
Step 19. Put the wheels back on, torque everything down, and test the brakes.
Make sure you don’t have any weird noises, vibrations, etc. Bedding, or seating the brakes will vary based on which pads you choose.
Impressions:
WOW, Wow, wow. The brakes bite earlier than before, with a more solid pedal feel. When you really give the brake pedal some pressure, it will quickly lock your seat belt and try to give passengers whip-lash. There is a slight decrease in acceleration. THESE BRAKES ARE 37 POUNDS HEAVIER THAN THE STOCK OPTION. That is ~12lbs each per front, and ~6lbs each in the rear more weight.
If you can afford it, or if you have had them long enough to need replacement, I HIGHLY recommend the light two-piece rotors. You will only add 2lbs to the front and 1lb to the rear with this $900 option.
On slotted rotors:
The direction does not matter for these disks. They are manufactured with straight veins on the inside, or omnidirectional. It is up to you if you want the veins to go forward or backward.
I have heard repeatedly that spinning opposite of wheel travel can cause more noise, so I opted for spinning with direction of travel.
When they are on the car, you really loose the sense of scale. This is what I show people to give them an idea of size:


")


 Installation on 5thgen Maxima")
 After:


 Look at the size difference with my OEM ones!

 Use a C-clamp and an old brake pad to push the new caliper’s piston back to allow for the new pads to sit.


 Pad size (newer ones on bottom obviously):
 And the best before and after lol:
 Also notice my old rotor on the ground there, on the backside there is a very THIN strip where the pad was making actual contact.. I couldn’t believe how crappily the stock setup was working.
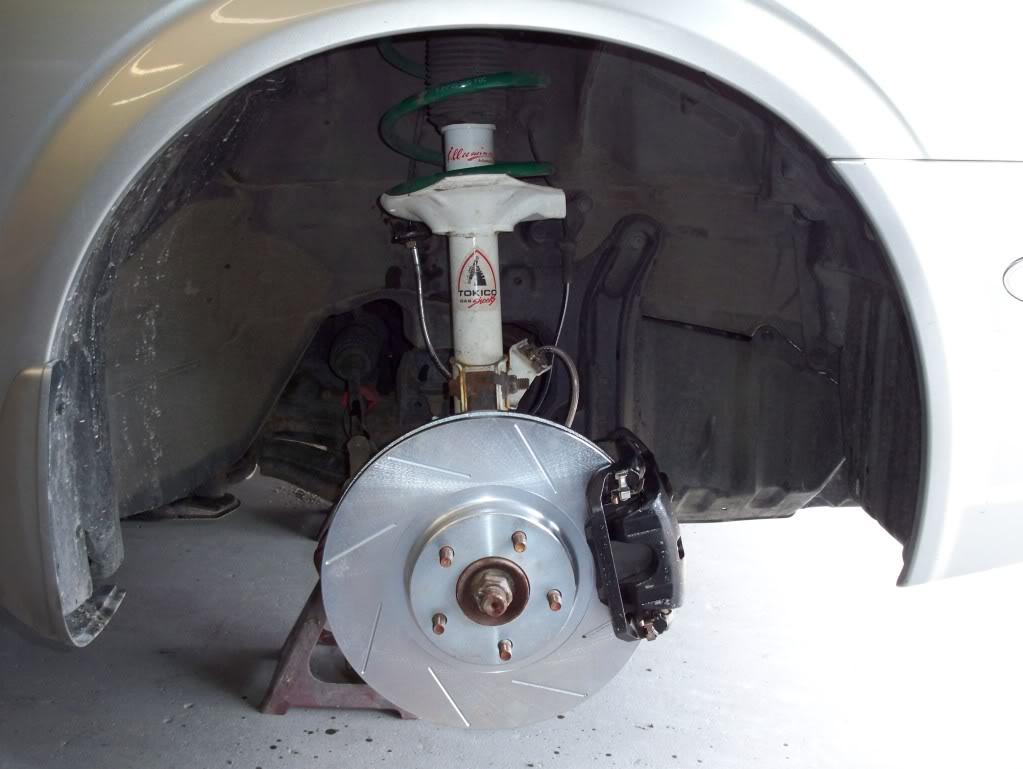


")


")


 Step 2. Remove the front caliper bolts. Use the 14mm.


