

Member Credit: Craig Brace
This procedure is for the installation of an underdrive pulley. This requires removal of all 3 drive belts and possibly the starter. Nissan recommends changing drive belts every 30,000 miles. They should be checked periodically too. This procedure applies to the VE30DE engine, but is very similar for the VG30E.
My car was leaking oil out of the front main seal (behind the crankshaft pulley) so I figured if I was going to have to take off that pulley, I should go ahead and put a better one back on. For the VE engine (1992-1994 SE only), ASP Racing sells a lightened, smaller crankshaft pulley:
Auto Specialties underdrive pulley systems increase engine horsepower by reducing the amount of power required to drive external accessories. For example, the alternator, power steering, water pump and air conditioner all rob horsepower from the engine. By replacing factory-sized crank and accessory drive pulleys with a resized pulley, the accessories are slowed, resulting in more horsepower available to drive the rear wheels. Typically, a set of Auto Specialties street pulleys will increase output by 12 to 15 horsepower, resulting in quarter mile time improvements of .2 to .25 seconds.
I got mine at RPMoutlet.com. For the VG engine (89-91 SE and 89-94 GXE), Unorthodox Racing sells a lightened, smaller pulley. You can get this from Courtesy Nissan. Because the new pulley is smaller, you will need smaller sized drive belts which run about $10 each from most parts stores. Here are the Gates parts numbers for the belts you need (note: ASP gives a different part number for the power steering belt, but this is the correct one). I got mine at PepBoys and they are Dayco brand; the numbers are easily converted to Dayco numbers – 325K5, 378K4, 460K4. The number next to K means the number of grooves in the belt and the other number has something to do with the length (probably the circumference).
| VE30DE | VG30E | |
| Alternator | K050323 | K040292 |
| Air Conditioning | K040460 | K040460 |
| Power Steering (also drives water pump) | K040378 | K040395 |
As you can see, the new belts fit just inside the old belts:

- Various sockets: 10,12,14 and 27mm (for the crankshaft pulley bolt); you may need one or two other sizes, but nothing special besides the 27
- 12mm open end wrench
- Socket extension
- Torque wrench
- Breaker bar
- Flat head screwdriver
- Impact wrench would be very helpful, but not necessary
- Maybe: pulley remover
This procedure isn’t that complicated, but if you haven’t ever changed drive belts, it may be a good idea to have someone else check over your work before you put everything back together (especially important for power steering and alternator belts). Read through the instructions first before beginning any work. Also, you should buy a new front oil seal for your car. It’s about $3 from Courtesy Nissan and maybe $5 or 6 from a local dealer; you’ll have everything off to change it and you wouldn’t want to have to do this again if it starts leaking in a few weeks from now. The part for the VE engine is 13510-97E10; I’m not sure of the part number for the VG.
First, remove the right front wheel and remove the splash shields that cover the side and below the drive belts. There are a couple 10mm bolts holding these on. You should now be able to see the crankshaft pulley and drive belts


- Remove bolt in the center of the crankshaft pulley. This is where you need the 27mm socket. This bolt is on very tight; if you have an impact wrench, this is a great time to use it. Otherwise, you’ll probably need a long breaker bar. Chiltons recommends removing the starter and placing a flat blade (your hubcap removal tool in your Nissan jack set in the trunk should work fine) in the teeth of the flywheel/driveplate.
- If you have a manual transmission, put the car in 5th gear. The starter is easily removed; if you are going to remove it, you should unplug the negative terminal of the battery first so you dont short anything while removing the starter’s power wire. The starter is only held on by a large wire, one 14mm nut and one 14mm bolt.
- If you remove the rubber protective covering over the large wire, you will find a nut under there; just remove that and the large wire will come off. You will also need to unclip a smaller ground wire from it’s harness. Then you can remove the 14mm nut and bolt that hold the starter onto the transmission. After these are loose, the starter will just pull off and you should be able to see the flywheel.


If you have an automatic, there should be a small cover over the lower part of the transmission that you can remove to see the driveplate.
Then wedge something in between the teeth and prop it against something solid. You should now be able to break loose the crankshaft pulley bolt.


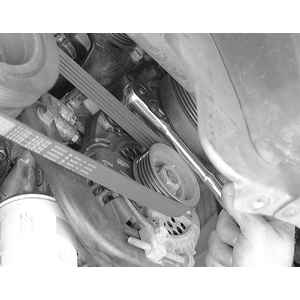
Now you are ready to put the belts back on. This is just the opposite of how you removed them – put new belt over the pulleys and tighten the adjustment bolt and then tighten a bolt to lock the adjustment (and for alternator, tighten pivot bolt). If your belts are too loose, they may make a squeling sound when you start the car and may slip a little. If they are too tight, they could cause lots of other problems so it’s important to get the tension right. The picture below shows the test point for each bolt as indicated by the arrow. If you push or pull down on this point it should move a certain distance for each new belt. Alternator: 6.5-7.5mm, A/C: 5-6mm, power steering: 6.5-7.5mm. This is where it would be helpful to have someone who has done drive belts before to check the tension for you to be sure.


![]()
Comments are closed.